I like to think that I can predict the future.

While that’s probably not possible, even for a guy like me, I’m often able to anticipate the future, or at least predict what might happen in the next few seconds or minutes while I’m out on location.

To me, this is a key element when it comes to creating compelling imagery, especially when shooting adventure, sports and action. I use this skill all the time in my own photography, and, in fact, I think it’s one of the most important ingredients towards getting great shots.

In my mind, refining your skills of thinking geometrically, constantly observing and reacting to the unfolding scene in front of you is one of the best way to improve as a photographer.

Want to explore this idea even more? Read my featured article, The Power of Anticipation in Photography over at ProPhotoResource.com, where I’m the featured guest contributor today.

April 18, 2011
See this post
The Power of Anticipation- Today on ProPhotoResource.com

The other day I had an assignment to shot the interior of Speedway Cycles here in Anchorage, which is where they build Fatback snow bikes.

Of course photographing any interior can be a challenging… no make that a downright scary proposition, especially when you’re dealing with a mix of daylight and sucky fluorescent lighting. Here’s a straight ambient shot of the store, complete with bad color cast, dark corners and unworkable contrast.

Enter Speedlights.

Armed with my Nikon D700, the Nikon 14mm f2.8D lens, a Nikon SB-900, a pair of Nikon SB-800 Speedlights, and a Nikon SU-800 Wireless Commander. I took charge and attempted to wrangle this scene into submission. First charge was to try and bring a little fill into the left side of the frame, since my job was to highlight the bikes up front and center.

I stuck the SB-900 over there in the left corner and put the dome diffuser on to try and give me some softer, more even light. For the back of the store, I clamped one of the SB-800s (also w/ dome diffuser) onto a fixture and pointed it across the shop.

Here’s the result: Color balance better. The front is lit nice and soft, but right side of the store is still dark. The back doesn’t work very well, because although I see the back wall so much more, I’m losing the middle section of the store- you know, that big rack of finished Fatbacks.

Analysis: Aside from the light problems described above, it’s boring. Nothing stands out and there’s really no dynamic element about the image. Plus you can see that flash in the back of the store.

The fix:

1. Put the CTO warming gel on the SB-900 and zoom the head to 200mm, which will do three things. First, it will warm up the scene and add flavor, second, it will throw light onto that dark right side over by the counter, and third, it will fill that space with some nice strong shadows as it shines through the rack of bikes.

2. Put an SB-800 on a Manfrotto 74″ Nano Stand, raise it up to the level of the orange bike that’s hanging in from the ceiling and put a Lumiquest Softbox III onto the flash head. That help light that hanging bike and also throw some fill into the bike rack up front. The Softbox will soften the light just a little bit, but not so much that it just scatters all over the place and loses focus.

3. Take that SB-800 in the back of the store and clamp it to the shelves on the far right of the shop (out of frame) with a Manfrotto 175F Justin Clamp. For that unit, I took the dome diffuser off, zoomed to 105mm and angled it one click up. That makes it throw nice hard light across the shop, illuminate the middle and back sections of the store, and bring out all those cool looking Fatback forks that are hanging from the ceiling.

Analysis: I like it.

The shop is lit well front to back, the warm color and long shadows add great interest, the bike above it evenly lit, and it stands out against a darker background, since the zoomed SB-900 isn’t bleeding light up on to the ceiling anymore. Plus, that third SB-800 in the back effectively throws a nice spotlight onto all the Fatbacks. That hard patch of light also helps break up the flow and add a sense of depth to the entire scene.

I did try a few different setups, but the one described above gave me the best results. I also tried shooting hard zoomed light through the bikes on the left wall, and I also varied the placement of the back right flash. All the flashes were controlled and trigged with the SU-800, which works incredibly well as a commander.

Looking back, I think I’d like to see a bit more light in the back left corner of the shop- it’s still a little dark over there. I’d like to think I’ve learned for next time.

Oh, and the best part of the whole shoot was when a customer was standing in front of the shelves near the back looking at the selection of energy bars. Since I was shooting up front, and obviously a little wrapped up in what I was doing, I didn’t notice her, and she didn’t notice the SB-800 that was Justin Clamped to the shelf at eye level right in front of her.

Imagine her surprise when the thing went off.

Oops…

April 14, 2011
See this post
Lighting the Bike Shop with Nikon Speedights.

Ever since I broke my lightweight backpacking tripod last fall, I’ve been looking for the perfect replacement. Of course, there is no such thing as perfect when it comes to outdoor photography gear, but you can sometimes get pretty darn close.

While there are quite a few tripods in the 3 lb. and above range, there are not very many quality choices in the under 3 lb. range. Most tripods that are super light weight just aren’t very sturdy. You might as well try to stack your camera on top of a set of twigs, which is essentially what you’re doing if you get one of those cheapo models. However, if you’re on a tighter budget, check out these 3 slightly more affordable lightweight carbon fiber tripod models.

When it comes to quality, though, here are three of the best options that I’ve found. If you’re the kind of photographer who likes to carry your equipment into the backcountry, who likes to go light, fast and unencumbered, and who isn’t afraid to spend decent money on a good tripod, you should definitely consider one of these. All are carbon fiber, which has excellent strength to weight ratio, and it doesn’t radiate cold on your hands in the winter like aluminum does.

1. Gitzo GT0532 Mountaineer

Gitzo tripods are the cream of the crop when it comes to camera support. There is simply no finer tripod that you can buy. Whether you need ultralight or big lens support, you can never go wrong with a Gitzo.

At 2.3 lbs, the GT0532 Mountaineer offers excellent strength to weight ratio. It’s not quite as light as a feather, but it sure comes close. It’s also quite sturdy for how little it weighs. It’s rated to 17 lbs, and it while it won’t provide the same support of a heavier tripod if you’re using longer telephotos like 300 and 400mm, if you’re looking for a set of legs that feels like you’re carrying nothing at all, this is your best bet. Note: Right now there’s a $150 rebate deal on the this tripod.

The GT 0352 extends to 52″ and closes down to 20.9″. With the center column all the way down, it still extends to 42.5″ high.

profile-pic

@Danbaileyphoto I love my Gitzo Mountaineer.

Steve Coleman
profile-pic

My vote? Gitzo Mountaineer > RT @Danbaileyphoto: Great tripods for outdoor and landscape photography

Bret Edge

2. Gitzo 0545T Traveler

At 2.1 lbs, the GT0545T Series 0 Traveler is exceptionally lightweight, and with leg sections that fold back, it packs very small- only 14″ long. The smallest model in the popular Traveler Series, the GT0545T is rated to hold 22lbs, which is way more than most other “lightweight” tripods on the market.

Yes, it costs more, but if you want the ultimate, ultralight, compact tripod with a beautiful streamlined design with no compromise in quality or stability, this may be the one.

All the Gitzo Traveler tripods have 2 options- either with the gorgeous 1382QD ball head, or  without a head. They also come with a carrying strap and a short center column for ground level shooting.

Specs on the GT0545T are as follows: Max height: 48.2″, closed length: 14.4″, load capacity: 22 lbs, max height with center column all the way down: 41.7″.

profile-pic

Lovin' my Gitzo 1541 > RT @Danbaileyphoto: 3 Ultra Lightweight Tripods for Outdoor Photography http://t.co/IZurlQpJ

Russ Bishop

[iframe]<iframe width=”120″ scrolling=”no” height=”240″ frameborder=”0″ style=”border:none;” border=”0″ src=”http://mer54715.datafeedfile.com/widget/aff_widget_prdt_generate-2.0.php?aff_num=6746&aff_net=1&widget_num=7528&sid=” marginheight=”0″ marginwidth=”0″></iframe><iframe style=”width:120px;height:240px;” marginwidth=”0″ marginheight=”0″ scrolling=”no” frameborder=”0″ src=”//ws-na.amazon-adsystem.com/widgets/q?ServiceVersion=20070822&OneJS=1&Operation=GetAdHtml&MarketPlace=US&source=ss&ref=as_ss_li_til&ad_type=product_link&tracking_id=danhbaisadvph-20&marketplace=amazon&region=US&placement=B014EQFSL6&asins=B014EQFSL6&linkId=d01be083267b8d8f2fbd5fb6b1d35d21&show_border=true&link_opens_in_new_window=true”></iframe><iframe style=”width:120px;height:240px;” marginwidth=”0″ marginheight=”0″ scrolling=”no” frameborder=”0″ src=”//ws-na.amazon-adsystem.com/widgets/q?ServiceVersion=20070822&OneJS=1&Operation=GetAdHtml&MarketPlace=US&source=ss&ref=as_ss_li_til&ad_type=product_link&tracking_id=danhbaisadvph-20&marketplace=amazon&region=US&placement=B014EQFYE2&asins=B014EQFYE2&linkId=6e898b77a48438f183312e7a16ef7df7&show_border=true&link_opens_in_new_window=true”></iframe>[/iframe]

3. Oben CT-3561 5-Section Carbon Fiber Tripod

Next to the Gitzo GT0531, the Oben CT-3561 feels heavy, but at only 3.1 lbs, it’s still a contender. Oben is a lesser known brand, but they make high quality tripods that are both lightweight and affordable. The CT-3561 is a 5-section tripod that folds down to 16.8″, extends to 64.3″ and only weighs 3.1 lb.

It’s very compact because the legs fold back on themselves, making it an ideal choice as both a backpacking tripod and travel tripod. It’s also heavy duty enough for pro use, as it has a 12 lb. load capacity.

It’s got twist lock legs sections that allow for one handed operation, a center column hook that lets you attach a weighted pack or bag for added stability and a full pan and tilt ball Arca style quick release head.

Oben makes good tripods. Are they are good as the Gitzos? Some say yes, some say no, but there’s no question that they’re well made and great for all around use. Load capacity is listed as 16.8 lbs., (up from the previous CT-3500 model) which is certainly strong enough to hold most camera/lens combinations. It also has retractable spiked feet and an Arca style quick release plate on the head.

[iframe]<iframe width=”300″ scrolling=”no” height=”250″ frameborder=”0″ border=”0″ src=”http://mer54715.datafeedfile.com/widget/aff_widget_prdt_generate-2.0.php?aff_num=6746&aff_net=1&widget_num=5699&sid=” marginheight=”0″ marginwidth=”0″><p>Your browser does not support iFrame.</p></iframe>[/iframe]

April 13, 2011
See this post
3 Ultra Lightweight Tripods

Sometimes photography isn’t about lenses, equipment, f/stops, ISO, megapixels, off-camera lighting, TTL, tripods, grad-neutral density filters, Photoshop, composition, color relationships, shutter speeds, motion blurs, the weight of your camera or number of cross-type AF sensors your fancy high-end DSLR has.

Sometimes it’s just about the moment.

Grab it.

April 12, 2011
See this post
Sometimes It’s All About The Moment

Wide angle lenses rule. I don’t know what I’d do without them; probably take up another career.

Wide angles are the quintessential lenses for shooting landscapes, but they’re also great for photographing sports and environmental portraits, because you can show the subject in context with the environment. This helps you add a sense of depth and story to your imagery.

And because they’re usually light, compact, unobtrusive and have an inherently very wide depth of field, they’re great for travel, street photograph, candids and in confined spaces. If I’m heading out with a single lens, I almost always reach for a wide angle.

Although I often rely on my Nikon 14mm f/2.8 lens, which is heavy and relatively expensive, I’ve probably used my Nikon 24mm f/2.8 lens a whole lot more. My point is that you don’t have to spend an arm and a leg to get a good quality wide angle lens that will serve you for many years and produce great imagery. (Edit: Check out the Bower 14mm f/2.8 lens. Ultra wide angle lens for only $419. Exceptional value. It’s all manual, but when shooting that wide, you have incredible depth of field, so focus is rarely an issue. It’s available for both Nikon and Canon.

Here’s a list of affordable, yet very high quality wide angle lenses (all under $600) that will do the job and do it well. Note that all of my selections are fixed or prime lenses. While there are a few really inexpensive wide angle zooms out there, such as the Nikon 18-55mm f/3.5-5.6 and the Canon 18mm f/3.5-5.6, which both cost less than $200, I’d highly recommend steering away from choices like these, unless you’re an a REALLY tight budget.

Cheap zoom lenses will never be as sharp edge-to-edge, or as fast as a fixed lens. If you go this route, your image quality will suffer, plain and simple. If you want a quality zoom wide angle, you’ll need to pay a whole lot more than $200.

Finally, wide angle lenses are especially prone to flare, so I’d always recommend getting the dedicated lens hood that goes with your lens. They also help to protect the lens. If you’re like me, your lenses can take quite a beating.

28mm f/2.8

If you’re looking for your first wide angle lens, 28mm is a great place to start out. That’s where I began over 20 years ago; a used manual 28mm was my second lens after my 50mm f/1.4. Nikon has the AF Nikkor 28mm f/2.8D, while Canon has the Canon EF 28mm f/2.8. Both cost less than $300 and are excellent, sharp lenses with incredibly clear optics that are way better than any of the budget wide angle zooms on the market.

[iframe]<iframe width=”468″ scrolling=”no” height=”60″ frameborder=”0″ style=”border:none;” border=”0″ src=”http://mer54715.datafeedfile.com/widget/aff_widget_prdt_generate-2.0.php?aff_num=6746&aff_net=1&widget_num=461″ marginheight=”0″ marginwidth=”0″><p>Your browser does not support iFrame.</p></iframe>[/iframe]

24mm f/2.8

Lenses get more expensive as they get wider. The 24mm is also a great choice if you like to go wider, especially on the crop sensor and DX cameras, and they’re not too much more than most 28mm lenses. These choices all fall between $250-300. The Nikon 24mm f/2.8 has been a staple in my camera bag for over fifteen years. It’s very small and lightweight and super sharp. I use it for landscapes, action, adventure, people- you name it, I’ve shot everything with this lens. Canon has the EF 24mm f/2.8 lens, and it gets the same reviews as I give my Nikon 24. Unfortunately, Sony doesn’t have a budget 24mm. They recently released their 24mm f/2.0 SSM Wide Angle Lens, but it costs over $1,200. A fantastic lens, but not exactly budget.

[iframe]<iframe width=”468″ scrolling=”no” height=”60″ frameborder=”0″ style=”border:none;” border=”0″ src=”http://mer54715.datafeedfile.com/widget/aff_widget_prdt_generate-2.0.php?aff_num=6746&aff_net=1&widget_num=462″ marginheight=”0″ marginwidth=”0″><p>Your browser does not support iFrame.</p></iframe>[/iframe]

20mm f/2.8

Again, wider is more expensive, and if you find that you love wide angle photography, you might well consider a 20mm lens. Believe me, once you go wide, you always want wider! The Nikon 20mm f/2.8D, which comes in at $564, is a great lens. I’ve used it before and it’s wonderful. The only reason I don’t have a 20mm is that I already have a 24mm, an old, expensive 17mm that’s not made anymore and a 14mm. Just can’t justify the price. However, maybe you can, especially if you don’t already have three wide angle lenses in your camera bag. Canon’s choice in this range is the Canon EF 20mm f/2.8 USM lens ($529). Sony also has an offering in this class, the SAL-20F28 20mm f/2.8 lens ($599).

[iframe]<iframe width=”300″ scrolling=”no” height=”250″ frameborder=”0″ style=”border:none;” border=”0″ src=”http://mer54715.datafeedfile.com/widget/aff_widget_prdt_generate-2.0.php?aff_num=6746&aff_net=1&widget_num=463″ marginheight=”0″ marginwidth=”0″><p>Your browser does not support iFrame.</p></iframe>[/iframe]

Zoom Lenses

Like I said above, high quality zoom lenses are not cheap and with the wide angle range, I’d always recommend a fixed lens over a zoom, unless you’re spending over $1,000. That said, there are a few lenses that fall into the budget zoom range that are better than the $200 models.

None of them rival any of the choices above, which are all pro quality glass. These lenses are not. They’re not as well built, and they lack the edge-to-edge sharpness of a prime. However, on DX and crop sensor bodies, this is not as much of an issue, because when you crop, you lose the corners anyway. So, consider these choices only if you have a crop sensor camera body. Otherwise, go prime.

[iframe]<iframe width=”468″ scrolling=”no” height=”240″ frameborder=”0″ style=”border:none;” border=”0″ src=”http://mer54715.datafeedfile.com/widget/aff_widget_prdt_generate-2.0.php?aff_num=6746&aff_net=1&widget_num=464″ marginheight=”0″ marginwidth=”0″><p>Your browser does not support iFrame.</p></iframe>[/iframe]


April 11, 2011
See this post
The Best Budget Wide Angle Lenses

I have another featured post on the B&H Photo Insights Blog today, called “Get Creative with Depth of Field and Selective Focus.”

This is the third post that I’ve written for B&H Photo. Having been a B&H customer for my entire photography career, I was honored when they asked me to write for them a few months ago.

I’ve produced three article for them so far, and will continue to be a regular featured contributor to their blog. B&H has such a vast audience, and so I’m excited for the opportunity to share my knowledge and experience, and to connect with a great number of other photographers out there in the online world.

Read my other two posts:

Photography and Human Sight: How We See

The Power of Shooting Abbreviated Subject Matter

And the next time you need to pick up some new photo gear, stop by the B&H Photo & Video website. They pretty much have everything you’d ever want, and the best prices you’re likely to find anywhere. (Clicking through directly from this site helps me out. Consider it your way of showing support for the content that I publish here on the blog. It’s like a “Like” button with small monetary benefits.)

As always, thanks for reading.


April 8, 2011
See this post
Featured Writer on B&H Insights Blog

In a recent post, I enthusiastically extolled the creative and practical benefits of using short telephoto lenses. Basically, they’re light, fast, compact, sharp and great for shooting a variety of outdoor photography related subject matter from people, sports, adventure, nature and travel.

Today, I present four more reasons why I love my short telephoto, in the past the Nikon 85mm f/1.8D lens, and these days, the Fujifilm XF56mm f/1.2 and the compact, weather sealed Fujifilm XF50mm f/2. I had intended on doing the nice, clean “3 more…” type post, but since I love this lens so much, I felt compelled to throw in a fourth shot.

For you Canon users, their equivalent lens that’s roughly the same price, size, weight and speed is the Canon Telephoto EF 100mm f/2.0 USM Autofocus lens. Also a great and very versatile piece of glass.

1. Late Summer Mountain Biking, Alaksa

With the extended daylight in the late summer and early fall in Alaska, there are still hours of riding time to be had on the trails, even after your biking partners get off work.

This photo was shot on a September evening after a particularly rainy summer. The trails were far from bone dry and so we often ended each ride caked with mud and dirt.

Often times when I head out on the bike, it’s more about riding than shooting. However, I still always carry my camera in the event that I see something that sparks my interest.

Throwing my short telephoto in the pack allows me to cover my creative bases with minimal weight, and it allows me to quickly shoot longer shots even when it gets darker.

This muddy biking image was shot in the shade near the end of the day- conditions which would end up being quite challenging for most long lenses. And with that setup, I can shove the camera back into my Camelbak without even removing the lens, which gets me back in the saddle that much more quickly.

Here, I cranked the Nikon D700‘s ISO up to 800 and shot 1/250 at f2.2, which gave me the sharpness that I needed without pushing the ISO too much.

2. Flamenco Dancer, Andalucia, Spain

Travel photography always involves challenging lighting conditions and varied subject matter.

It also means going light and fast without looking too conspicuous with your gear.

The 85mm f/1.8 is a great travel lens, because not only is it WAY smaller than something like a 70-200mm f/2.8G ED VR II, it’s even faster, which makes a big difference when shooting inside.

For this flamenco performance, which was shot inside a VERY dark venue deep, in the heart of Jerez de la Frontera, Spain, I needed to milk every single ounce of speed from my lens.

I was using my Nikon D300, so I didn’t have the luxury of high ISO performance. Going any higher than around ISO 500 was really not an option, so the f/1.8 on the lens was an absolute necessity if I was going to get any kind of sharpness from this scene.

Of course, I could have used my Nikon 50mm f1.8D lens, but that angle of view would have been too wide to isolate the performers on the stage. With the 85mm f/1.8, I was able to shoot wide open at 1/60 which barely eeked out enough sharpness to make this image work.

Knowing that I’d never be able to freeze the dancer’s flowing arms and dress, I focused on the foot and shot tons of frames, hoping that I’d get one where here foot was planted and still for just a fraction of a second.

3. Backcountry Snowboarding, Talkeetna Mountains, Alaska

This one is all about going light and fast.

When the snow is good, you want to pack in as much vertical as you can during the course of a day, especially up here when the winter days are not especially long.

And also especially when your ski buddies have no interest in waiting for you just because you’re carrying The Big Lens today.

I do occasionally ski with my Nikon 80-200mm f2.8ED lens, but it’s rather heavy and it takes time to unsling my pack, pull the lens out, stick it on the camera, shoot and then pack the camera away, sling my pack back on and continue skiing down the hill.

An entire day spent doing this won’t get me very far. By contrast, the 85mm f/1.8 will fit on the camera right there in my chestpouch. I can pull it out, shoot, and tuck it back away in mere seconds.

Again, it gives me creative telephoto options without the weight, especially when I use it on a crop sensor body. On an APS-C camera, 85mm effectively becomes 127mm. It’s a small change, but it can be a very useful difference.

4. Winter Trees, Anchorage, Alaska

And here’s your bonus example for today.

Much like the mountain biking example above, sometimes I like to head out with my camera, no particular agenda and just see what sparks my creative interest. In this case, I took off for a 45 minute skate ski on the trails near my house.

Strapping on my LowePro Inverse 100 AW belt back camera bag, which comfortably fits a body and pair of small to mid size lenses, I threw in my Nikon D300 with the 85mm f/1.8 lens and enjoyed a pleasant midday break from the office.

At my turnaround point, I stopped to snap a few photos and exercise my creative muscles. I like the shot above because it crops in nicely on the subject and really accentuates the low winter light that was streaming through the trees.

[iframe]<iframe width=”120″ scrolling=”no” height=”240″ frameborder=”0″ border=”0″ src=”http://mer54715.datafeedfile.com/widget/aff_widget_prdt_generate-2.0.php?aff_num=6746&aff_net=1&widget_num=6748&sid=” marginheight=”0″ marginwidth=”0″></iframe><iframe style=”width:120px;height:240px;” marginwidth=”0″ marginheight=”0″ scrolling=”no” frameborder=”0″ src=”//ws-na.amazon-adsystem.com/widgets/q?ServiceVersion=20070822&OneJS=1&Operation=GetAdHtml&MarketPlace=US&source=ss&ref=ss_til&ad_type=product_link&tracking_id=danhbaisadvph-20&marketplace=amazon&region=US&placement=B006TAP096&asins=B006TAP096&linkId=GVT3VSJFRIGL3JFO&show_border=true&link_opens_in_new_window=true”>
</iframe>[/iframe]

April 6, 2011
See this post
4 More Reasons Why I Love Shooting With Short Telephoto Lenses

Digital Imaging Tips by Dan Moughamian

One of the most important techniques you can learn in Photoshop is the ability to mask your layers. This allows you to isolate changes to specific areas, while leaving others unaffected or only partially affected. There are many ways to create layer masks (as many ways as there are to create selections) but for many shots I find the following steps work great, especially when there are distinct color regions to help guide you.

1. Activate the Quick Selection tool (tap W or Shift-W if the Magic Wand tool is active when you start this process), then, using a region of contiguous color, click and drag until all or most of the region is selected. Use Shift-click to add and Option/Alt-click to remove regions from the initial selection. You don’t have to get it perfect just get close!

2. Click the Refine Edge button in the Options Bar, and when the dialog window opens, you should see a black “mask” cover the unselected parts of your image. Click the Refine Radius option and set your radius high enough so that as you brush over the edges of your selection, Photoshop can detect where the color and contrast changes. I find a setting between 2 and 10 pixels will usually do the trick. Some experimentation is required.

3. Using the Refine Radius tool (which is active by default in the Refine Edge dialog),  roughly brush over over all of the edges in your selection, outlining your entire subject. When you finish the brush stroke, after a second or two, you should have a very precise looking selection. Again you can hold down the Option/Alt key as you brush to mask pixels you don’t want selected. If needed, use the Adjust Edge controls to soften the selection or expand/contract its boundary slightly. Click OK when you’re finished.

4. Now you should have a precise selection, and are ready to create your layer mask. To add the layer mask to an adjustment layer, simply add the type of adjustment layer you want from the Adjustments panel and the mask will be created automatically! From this point any settings you create with that specific adjustment, will not affect the areas shown in black.

Note: to create a layer mask for a standard pixel layer, just highlight the layer you want to use and from the bottom of the Layer’s panel click the “Add Layer Mask” button (third from left). Simple!

———-

Dan Moughamian is an experienced photographer and educator, and has worked
with Adobe Photoshop since the early 1990s. He also has extensive
experience with Photoshop Lightroom, Photoshop Elements, plugins from Nik
software, and many other digital imaging products. As a long-time member
of their testing programs, Dan has collaborated with Adobe Systems to help
enhance many of the core functions in Photoshop, Lightroom, and Elements.

As an educator, Dan’s focus is to help photographers at all levels get the
most from their digital workflows. Tips on raw editing, layer masking,
alpha channels, image adjustments, HDR photography, focus and lighting
effects, and perspective correction, are just a few examples of the topics
he covers. To learn more, you can visit Colortrails.com, and follow Dan on Twitter, and on Google Plus.

He is the Author of Adobe Digital Imaging HOW-TOs- 100 Essential Techniques for Photoshop CS5, Lightroom 3 and Camera RAW 6, and his work has been also been published in Photoshop User Magazine and Photo Techniques Magazine.

April 4, 2011
See this post
Quick Layer Masks with Photoshop CS5

Starting today and continuing through the entire month of April, I’m offering my Facebook Fans an exclusive 25% discount on my photography eBooks.

Making the Image is a 50 page eBook that will guide you towards making more powerful photographs. By exploring how the human visual system responds to the world, it breaks down imagery into individual concepts, such as light, color, balance and viewpoint and shows you not only how, but why you should apply those concepts to your own photos in order to make them stand out.

How to Become a Pro Photographer is a concise guidebook for aspiring pros that longtime pro and social media gugu @photojack calls “27 page treasure of pertinent information for the aspiring and emerging photographer.” It’s designed to answer many of the questions that you probably have if you’re thinking about or just starting out in a photography career. Essentially it’s like sitting down with a pro over coffee, but on your own time.

Both books are formatted as PDF files that look great on either a computer or an iPad, and each one is sure to inspire, educate and spark your own creativity and knowledge about photography.

Click here for the discount Code. If you’re not a Fan of my Facebook page, simply Like my page to unlock the special Fan-Only Content on the page and get the promo code.

April 1, 2011
See this post
Spring eBook Sale: Facebook Fans Save 25% Through April

A short telephoto lens has long been a staple piece of gear in my camera bag. The third lens I ever bought was a Nikon 105mm f/2.5 manual lens; when that got stolen, I bought another. That one got stolen too, so I bought a third, which I still have. Eventually, I picked up a Nikon 85mm f/1.8D lens, which has become one of my all time favorite lenses. Canon also has an EF 85mm f/1.8 lens. For my Fujifilm X Series cameras, I use the incredibly sharp and fast XF 56mm f/1.2, and the ultra compact, weather sealed XF50mm f/2. Both of these lenses are super sharp and lots of fun to use!

In my mind, short telephotos rule. They’re faster, lighter and more compact than most zooms, which makes them useful for a wide variety of photography situations. And they do an excellent job of isolating your subject matter against the background, which helps make your images pop.

Here are a few ways that I like to use them in my photography. Hopefully these examples will inspire you to rush out, get a short tele and run wild with their great versatility.

1. Portraits

Short telephotos are the number one choice for most portrait photographers. The slight compression effect that a lens of this range gives the human face leads to an extremely pleasing look.

Essentially, it flattens the features slightly and brings the ears a bit closer to the rest of the face. It’s a subtle effect, but it’s one that professionals use to their advantage when shooting people.

The Nikon 105mm and the Canon 100mm have long been #1 lens choice for professional portrait photographers. The Nikon AF Micro 105mm f/2.8 ED-IF AF-S VR is the current model in the Nikon family. With the ability to do extreme micro closeup, it’s truly an awesome lens.

They also have the Nikon AF 85mm f/1.4 IF Autofocus lens. Even faster than the Nikon 85mm f1.8, it’s an extremely sharp lens and great for shooting inside, or when weight isn’t an issue.

For the more budget conscious shooter, there’s the Sigma 105mm f/2.8 EX DG Macro lens for Nikon AF Cameras. It’s considerably less expensive than the Nikon 105mm and it’s generally rated 4 out of 5 stars from most users who take the time to review it.

Canon actually makes three lenses in that range, the Canon EF 100mm f/2.8 Macro IS USM lens is their top of the line pro short telephoto. It’s consistently rated as one of the top Canon lenses.

They also have two less expensive 100mm lenses, the Canon Telephoto EF 100mm f/2.8 Macro and the slightly faster, non-macro version, the Canon Telephoto EF 100mm f/2.0 USM Autofocus lens.

2. Travel

The short telephoto is an awesome travel lens. In fact, I consider it the quintessential “across the street lens,” because it allows you to capture a very nice candid scene from a safe, unobtrusive distance.

Often times the subject won’t even know you’re taking the shot. And, since they’re small and compact, compared to some larger zooms, you’ll blend in with the crowd more than you would if you had a bigger zoom attached to your camera.

These days I never go anywhere without my Nikon 85mm f1.8. Even if I’m taking along a bigger zoom, the 85mm always lives in my camera bag, because its speed and compact size gives me plenty of options.

They’re great for shooting cultural scenes, architectural details, interiors, and for isolating people in their environment. And since they’re so fast, they’re often great lenses for shooting inside where you’re often faced with difficult lighting options.

Whereas I used to consider myself strictly an “outdoor photographer,” these days, armed with my Nikon D700, its low light sensitivity and my 85mm f/1.8 lens, I’ll shoot anything with confidence, inside or out. This is also true with the Fuji gear. It has excellent sensitivity for shooting in low light, and even using the stock XF 18-55mm lens on the X-T1, and X-E1 and 2 give excellent results.

3. Landscapes and Nature

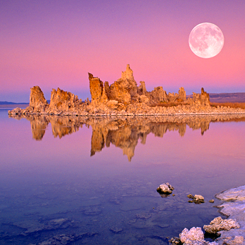
That’s right, you’ve seen this shot before. It’s the cover of my eBook, Making The Image.

I love using short telephoto lenses for shooting landscapes and nature. They allow you to isolate specific areas of the world at a workable distance.

You can put together two or three simple subject elements and create a moving composition without having to worry about showing too much other stuff which might make the image too busy.

You also don’t have the danger of composing too tightly as you might be tempted to do with a longer telephoto or zoom lens.

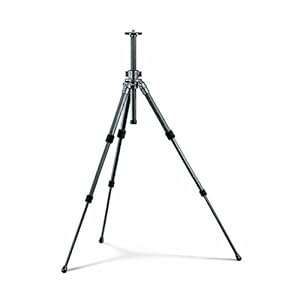
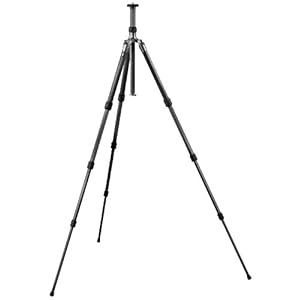
I’ve shot some my favorite landscape photos with short teles. And the close focusing distance of a lens like an 85mm or a 100mm lens makes it ideal for shooting semi-closeups of nature from a tripod.

I’ll say it again, I never go anywhere without my one of these lenses in my bag or backpack. Neither should you.

4. Sports, Action and Adventure

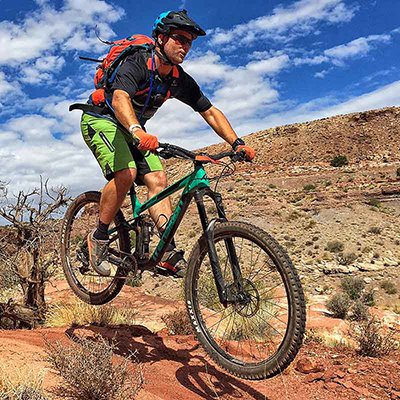
During those times when all you have room for are are a single camera body and a couple of small lenses, like when you’re out hiking, biking or skiing, take along a short tele.

They do such a great job of isolating your subjects against a soft background, a technique that makes your images pop.

And, of course, they won’t weigh you down. Galen Rowell used to say that his favorite lenses for going light and fast were his 24mm and his 85mm.

I’ve carried my 85mm lens on rock climbs, long mountain bike rides, multi-day hikes, backcountry ski excursions… like I said, I never go anywhere without my short tele.

In fact, I don’t think that there’s a trip or outdoor adventure that I’ve ever gone on where I didn’t have either my 85mm or my old 105mm lens with me.

And I don’t always use it up close to isolate the subject, sometimes I’ll use it at infinity focus to show a subject with just environment around them so that it tells the larger story without overwhelming the image with too much clutter.

This shot below of the mountain climber on El Pico de Orizaba in Mexico was shot with my old 105mm f/2.5 manual lens. To date, it’s one of my biggest selling images.

So, again- What can you do with a short telephoto lens? Everything. Get one and expand your creativity.


March 30, 2011
See this post
What Can You Do With a Short Telephoto Lens?