Digital Imaging Tips by Dan Moughamian

Adobe just updated Photoshop to v12.1. (That’s CS5.1 for those of you who aren’t total hardcore Adobe geeks.)

To celebrate the update, here’s a video tutorial that covers Color Efex Pro 3 for Photoshop from Nik Software, which is a great way to add subtle color styling to your images, in order to create the mood you want. It allows you to get there much more quickly, in many cases, than by using a combination of adjustment layers and filter effects from Photoshop. Hope you enjoy it!

Color Efex Pro 3 for Photoshop from Colortrails on Vimeo.

————–

Dan Moughamian is an experienced photographer and educator, and has worked
with Adobe Photoshop since the early 1990s. He also has extensive
experience with Photoshop Lightroom, Photoshop Elements, plugins from Nik
software, and many other digital imaging products. As a long-time member
of their testing programs, Dan has collaborated with Adobe Systems to help
enhance many of the core functions in Photoshop, Lightroom, and Elements.

As an educator, Dan’s focus is to help photographers at all levels get the
most from their digital workflows. Tips on raw editing, layer masking,
alpha channels, image adjustments, HDR photography, focus and lighting
effects, and perspective correction, are just a few examples of the topics
he covers. To learn more, you can visit Colortrails.com, and follow Dan on Twitter, and on Google Plus.

He is the Author of Adobe Digital Imaging HOW-TOs- 100 Essential Techniques for Photoshop CS5, Lightroom 3 and Camera RAW 6, and his work has been also been published in Photoshop User Magazine and Photo Techniques Magazine.

May 5, 2011
See this post
Color Efex Pro 3 for Photoshop

Truly great photographers utilize a wide variety of skills, creative thought processes and equipment to create their imagery. However, as I looked at thousands of photos over the years and studied the recurring visual and thematic elements that many of the best images contain, I came up with a list of four main ingredients that always seem to emerge.

I’ve incorporated this list into my teaching curriculum, both in my online courses at The Compelling Image and in my face to face workshops. It’s short, concise and easy to remember, and yet it clearly outlines the necessary elements that are needed to produce a great image. Spend some time thinking about each ingredient and how they play out in your own photography.

1. Vision

Vision is the mental aspect of image making. It’s the part that takes your own individual ideas about the subject and combines it with your inner creativity, your experience and your own style.

Vision encompasses the composition, framing, and the inclusion and arrangement of your subject matter. It represents the artistic foundation of your photograph and it’s what sets your imagery apart from everyone else’s work, even when it involves subjects that are commonly shot by other photographers.

Although vision is a very personal ingredient, it can be taught and fostered with ideas, introspection and creative exercises. During the early stages of my career, I explored the vision aspect of photography through Galen Rowell’s books, specifically with Mountain Light and The Art of Adventure Photography, which is a collection of the columns that he wrote for Outdoor Photographer Magazine.

Lately, I find great inspiration with some of the excellent eBooks that are published by Craft and Vision and those by some very talented photographer/writers like Ian Plant and Guy Tal. I also find it through the work that I see everyday on Twitter.

2. Anticipation

Anticipation is all about evaluating and studying the scene and understanding all the elements that will need to come together in order to make a great image, so that you can put yourself in right place at the right time. The idea behind anticipation is making sure that when a great moment does happen, you’ll already be in the optimum place to capture it.

Anticipation is thinking geometrically. I look at is as stacking the deck in your favor, and in fact, I like to think of anticipation as the secret ingredient behind luck.

For more of my thoughts on this essential ingredient, read my recent post, The Power of Anticipation in Photography over at ProPhotoResource.com.

3. Technique

Although it’s certainly possible to stumble upon great image by accident, if you’re going to have any consistency with your photography, you’ve got to know your gear. It’s that simple.

You need to know how your camera works, how it sees and responds to the world, how each of your lenses characteristically portray different types of subject matter, and how to get that machine up to your eye quickly enough so that you can capture what’s in front of you.

You also need to know how to process and develop your shots once you take them, so in addition to intimate and rock solid familiarity with your camera gear, you need to be familiar and competent with your digital imaging software.

Not to diminish any of the other two ingredients above, I feel that technique is the backbone of being a great photographer. Sure, the top shooters have great creativity and vision, but they know their gear inside and out. Know yours too.

There are so many great books, magazine articles and blog posts on technique and software, I won’t even go there; you know where to look for that stuff.

4. Luck

Luck is the smallest part of the equation, and it’s never to be relied upon. However, that doesn’t mean that luck doesn’t play a vital role in the image making process. In fact, many of the greatest images of our time were created with a touch of luck. Photography is often about the moment, and moments usually involve at least some luck.

Remember, though, often times you can increase the chance for luck through your anticipation and geometric understanding of the scene. Just don’t try to make it the main ingredient of your photography or you’ll spend a lot of time standing around waiting.

Read my post, Is Photography About Pure Skill or a Little Bit of Luck over at The Photoletariat.

May 4, 2011
See this post
The 4 Ingredients for A Great Photograph

lens rental

Unless you’re a working pro, it can sometimes be hard to justify shelling out the money for expensive camera gear. Heck, it’s hard for me sometimes, and I do gig this full time.

That’s why it makes sense to rent lenses, flashes and DSLR bodies from time to time.

Let’s way you’re headed to Alaska to photograph eagles or bears for a week and you think about how nice it would be to have a 300mm or 400mm, or even a 500mm telephoto lens for the trip.

Or you’re headed off to Italy and you’d love to have a PC or tilt shift lens for all the interiors and architecture you’ll be shooting.

Or you wonder if getting a few extra speedlights and going Joe McNally style just might help you nail that assignment you just booked.

While spending $7,000, or even a few hundred dollars on a lens, camera or flash(es) that you may not use very often might be a hard purchase, what about spending 1/20th of that amount for the chance to use some killer gear for a week?

That’s about how much California-based BorrowLenses.com and some of the other lens rental companies out there, like LensRentals.com charge.

And with a huge variety of equipent, (pretty much everything you’d ever want or need) fast shipping, and rental options that vary from 3 days to 4 weeks and everything in between, you’ll find that renting specialized photography equipment turns out to be a very reasonable option.

In fact one pro photographer friend of mine just competed an entire year-long project using a variety of rented lenses, which of course, means more profit for him.

Whether you need a specific item for an upcoming trip, photo assignment or personal project, or if you just want to try before you buy, consider renting camera gear. The money you spend will be made up in the increased quality of your imagery, which could easily turn into more stock sales or paying jobs, and the money you save will mean increased profits and a bigger budget for your trips and adventures.

May 3, 2011
See this post
Renting Lenses and Camera Gear is A Great Option for Photographers

Ian Plant is the kind of photographer that makes me want to go lose myself in the amazing places of the world.

His work is simply outstanding. He has a mastery of light and color, which means that he probably also has an unending amount of patience and tenacity to be able to seek out his subject matter and wait for the perfect moment.

His brand new eBook, Patagonia: Behind The Lens is an absolutely stunning collection of photographs. But it’s not just that.

Ian is a also an accomplished teacher who writes for Popular Photography and Outdoor Photographer, and his eBooks are rich with tutorials, creative exercises, technical tips and compositional insight on how to improve as a nature and outdoor landscape photographer.

Patagonia: Behind The Lens takes you behind the scenes of twenty of his favorite shots of the mountains, glaciers, lakes, rivers and vast expanses that grace this epic land. For each image, Ian gives you a step-by-step description of how the image was made, and he breaks down the artistic choices, the specific equipment and the camera settings that led him to create the shot. He also into detail about his own personal analysis of how and why he was compelled to make each image.

I’ve never met Ian Plant, but my impression of him is that he’s a wonderfully talented and hardworking photographer who’s finding success in an incredibly tough field. His workshops continually sell out, and his eBoooks are some of the most beautifully designed and produced titles out there, not to mention the fact that they’re awesome landscape photography instruction manuals. I aspire to make imagery as dramatic or eBooks that are as well done as his.

To me, that amount of creative talent and true dedication deserve to be rewarded, even if you weren’t getting one of the most inspiring eBooks that I’ve seen in a long time.

Patagonia: Behind The Lens is absolutely worth the 8 bucks and the time you’ll spend reading, learning and becoming a better photographer. So, treat your own photography right this weekend, pick up a copy and start dreaming.

April 29, 2011
See this post
Patagonia: Behind The Lens – A Stunning New eBook by Ian Plant
Nikon SU-800 Wireless Speedlight Commander

The main issue with using off-camera Nikon flash is how to trigger it (or them.) Essentially, there are five different ways:

  • Remote cord like the SC-28,
  • The popup flash on your camera,
  • Using another Speedlight as a Master,
  • Wireless radio remote system, i.e. Pocket Wizard or Radio Poppers, or
  • The SU-800 Wireless Commander.

So which method is the best? There is no easy answer. I’ve used each one and they all work, but they all have some definite limitations as well. Lately I’m completely sold on the SU-800. After I run down the pros and cons of each method, I’ll give my my final review on why I think that it’s definitely worth buying if you shoot with flash.

Sync Cord: Range is your main limitation, although you can daisy chain up to three 9′ cords together and still retain full TTL capabilities. Works great for handholding the flash.

Pop Up Flash: This usually works pretty well, especially inside. The limitation is distance and line of sight, although I’ve triggered flashes that are behind me in smaller rooms. This method doesn’t really work for closeups or portraits, though, because the monitor pre-flashes are still picked up by the camera, and they often make your subject blink, or else they show up in your photo when shooting close up. Also, the D3 doesn’t have a pop-up flash.

Using Another Flash: This works even better because you can turn the flash head to point directly to the sensor on your remote flash, and range increases as you zoom the head. The disadvantage is that you obviously eat up one of your flashes by using it as a commander. Yes, you can still use the unit as an on camera flash/commander combo, but this could be a problem if you don’t want a flash up front and center, or if you only have one or two Speedlights. And you still have the potential blinking problem.

Radio Triggers: Radio Poppers the new dedicated Pocket Wizard MiniTTL system are all the rave now. They work great, don’t need line of sight and will work up to a quarter mile or more. The only downside is that they’re much more expensive. After you buy the controller, you need a receiver for each unit, and each one costs over $200. If you have three Speedlights, you could end up spending a grand to trigger them all. (Extra credit: How much does Dave Black’s 8 SB-900 Radio Popper rig cost?)

The older Pocket Wizard Plus models also work fine. They’re a little less expensive than the newer TTL models, but they only work in Manual mode on your Speedlights.

Nikon SU-800 Wireless Commander: The SU-800 will allow you to trigger an unlimited number of Speedlights and control them in up to three separate groups. At only $259, it’s WAY cheaper than buying a radio system, and since it’s infrared, it pretty much solve the blinking problem when shooting models. Also, you don’t have to burn one of your flashes by using it as a controller.

Inside, the SU-800 absolutely rocks. It’s signal will bounce all over the place and even travel around corners; you can trigger flashes that are not line of sight or that are even in the next room.

It’s capabilities are a little more subdued outside. Since there is nowhere for the signal to bounce, it has to be within sight of all the other units. And, if your flashes are off axis from your commander, you might have to couple the unit with a sync cord and stick the thing on a clamp or a light stand in order to get the signal to point the right way. In really bright sunlight, you often need to shade the unit with your (assistant’s) hand or tape on piece of cardboard to shield it from the direct sun.

So, Should You Buy The SU-800?

Before I bought the SU-800, I considered just getting another SB-900, but the SU-800 is considerably smaller, and two hundred dollars cheaper than the 900. Although the SB-900 works great as a master/commander, it’s an awesome flash and leaving it on the camera doesn’t allow you to take full creative advantage of it’s impressive capabilities.

My thought is this: if you shoot off-camera flash inside, then it’s a no brainer- definitely consider the SU-800. It offers excellent versatility at a reasonable price and it gets rid of the blinking problem with models. For the same reason, it’s almost essential for macro flash photography.

If you shoot primarily outside, then you should weigh your needs and your budget. A radio system might be in your future, however if you’re not ready to make that kind of investment yet, the SU-800 will certainly get the job done while you’re saving up for all those receivers.

April 26, 2011
See this post
Nikon SU-800 Wireless Commander: Is It Worth Buying?

The end of April is quickly approaching, which means that you only have one more week to save 25% on my photography eBooks.

The special discount code will expire this coming Sunday, and all you have to do in order to get it is visit my Facebook Page and Like me. Yes, it’s that simple. The promo is good for either one or both titles, which are listed below:

Making the Image is a 50 page eBook that will guide you towards making more powerful photographs. By exploring how the human visual system responds to the world, it breaks down imagery into individual concepts, such as light, color, balance and viewpoint and shows you not only how, but why you should apply those concepts to your own photos in order to make them stand out.

How to Become a Pro Photographer is a concise guidebook for aspiring pros that longtime pro and social media gugu @photojack calls “27 page treasure of pertinent information for the aspiring and emerging photographer.” It’s designed to answer many of the questions that you probably have if you’re thinking about or just starting out in a photography career. Essentially it’s like sitting down with a pro over coffee, but on your own time.

Don’t miss this offer- Click here to get your copy now.

April 25, 2011
See this post
One More Week to Save 25% on My eBooks

I don’t know how I missed this one, I usually try to stay in the loop whenever Craft & Vision releases a new eBook.

The Evocative Image- A Photographer’s Guide to Capturing Mood by Andrew Gibson has been out for a couple of months now, and as with all of their other books, this one is another great title that’s filled with wonderful imagery and very insightful ideas.

Essentially, it’s about how to make imagery that translates not just what you see, but that also expresses how you feel about your subjects. Andrew explores the visual aesthetics of mood, and discusses how to use light, different lenses, apertures, different color palettes, and other technical aspects that help you evoke an emotional response from your viewer.

The book is beautifully done, both with Andrew’s impressive photographs and with the overall layout and design. I’d love to know who does their design so that I can hire him to do my next ebook!

I can’t say enough good things about the Craft & Vision eBooks, they impart so much great information, inspiration and, of course, visual goodness. They’re absolutely guaranteed to provide you with way more value than the paltry sum of $5 that they charge for each one. Think of how easily you could waste five bucks on any given day. Then think about how much your photography is worth and how much enjoyment you get out of making a truly compelling shot.

The Evocative Image is packed with creative fuel and exercises that will make you want to dig deeply into your artistic self and produce the best work that you can. Do yourself a favor, pick it up, spend the weekend learning, practicing and being inspired, and get on the path towards making more expressive imagery.

April 22, 2011
See this post
The Evocative Image by Andrew Gibson: A (Somewhat) New eBook from Craft & Vision

Photo by Bret Edge

Here’s a quick roundup of a 3 blog posts that sparked my interest this week.

1. Bret Edge- Using a Telephoto Lens to Create Dynamic Landscape Photographs

What’s that you say? Long lenses aren’t for landscapes? Yes, they are, and in this post, Utah photographer Bret Edge lays out the why you should ditch your wide angle glass, at least for awhile, and try shooting landscapes with the big glass instead.

I’m a big fan of this practice, in fact I even wrote something like this on The Photoletariat last year. However, Bret’s piece is much longer and really well done, so check it out.

2. APhotoEditor- Licensing Image For Facebook

Facebook is very quickly becoming a legitimate and widely used advertising medium by many companies. Begin such a new type of usage, there is no set consensus by stock photographers yet on how to price these types of usage.

Add to that the issue that any once you upload a photo to Facebook, you essentially grant unlimited usage rights of that image to Facebook. Aside from the difficulties of pricing this kind of thing, there could be some real exclusivity issues at play here.

The post itself is short, but the discussion and ideas that are being tossed around in the comment section make it worth checking out.

3. David duChemin- Choose Your Risk

David duChemin is the man. In my mind, he’s picked up where Galen Rowell left off in terms of his writing, his world imagery and his philosophy about visionary photography. Everything he writes is worth reading. (Check out his incredible eBooks at Craft and Vision.)

In this post, David reminds us that life goes by and it only goes by once, so you’d better make the best of it and choose how you want to manage your fears and your risk. Compare these to what potentially lies on the other side of the risk and you might just take on a new outlook on your own life.

Well said, David. Thanks for the reminder.

April 21, 2011
See this post
3 Blog Posts That Caught My Eye This Week

Easter, the one holiday that never occurs on the same day of each year, is right around the corner. To celebrate, I thought I’d go ahead and put my Easter Photography Wish List out there, in hopes that The Easter Bunny brings me some real goodies in addition to all the chocolate and spring spheres that I’m hoping to get in my basket.

1. Maha PowerEX 8 Cell Battery Charger

With my growing arsenal of Speedlights, and increasing addiction to AA batteries, I need a battery charger that’s up to the task. The Maha PowerEX  MH-C801D will charge 8 of these bad boys in an hour. Enough for a pair of Nikon SB-900s, or 1 and 4/5 SB-800s. (I use the 5th battery compartment.)

Battery chargers are not all the same. The cheap, so called “quick chargers” simply don’t do the job right and are not worth it if you demand high performance out of your batteries. Of course, I’ll also need a few PowerEX AA 4-packs as well to go with my new charger, or a few sets of Sanyo Eneloops, which also get very high ratings from many Speedlight users.

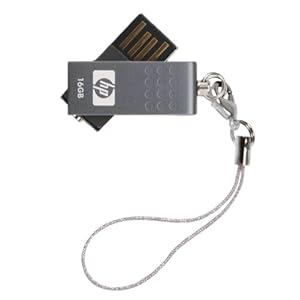
2. HP v115 16GB USB Flash Drive

Can you say small? I mean really small. This thing is barely the size of your thumbnail and holds more data than my first two Macs.

It has no cover to lose, it simply folds into itself and fits on a keychain, around your neck, in your pocket- no wait, you might lose it in there. And it’s small enough that you could fit two or three of them inside a plastic easter egg. Hint hint.

3. Another Manfrotto 74″ Nanostand

I’ve got a couple of these already, but since I just acquired another Speedlight, it might not be bad to have a third. They’re built well, they’re super lightweight, and they fold up smaller than most tripods. Three of these things, a couple of umbrellas and a few flashes will easily fit in carry-on size baggage. Plus they’re only 50 bucks.

Happy Easter!

April 20, 2011
See this post
3 Things on My Easter Photography Wish List