Last year was my first time going to the May Day Fly-in down in Valdez, Alaska.
If you’ve never been, it’s basically this: Beavers, Otters, Super Cubs, Cessna 185s, 35-inch bush wheel tundra tires, STOL kits, beach landings, tricked out bush flying mods and guys who can take off and land an airplane in a space that’s shorter than my driveway. Yea, I burned through multiple cards shooting airplanes, airplanes and more airplanes.
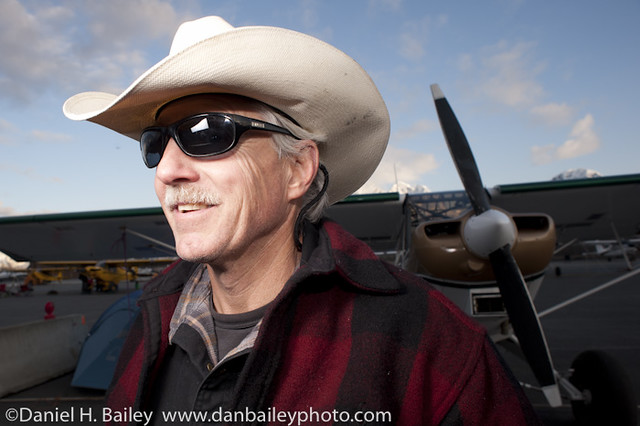
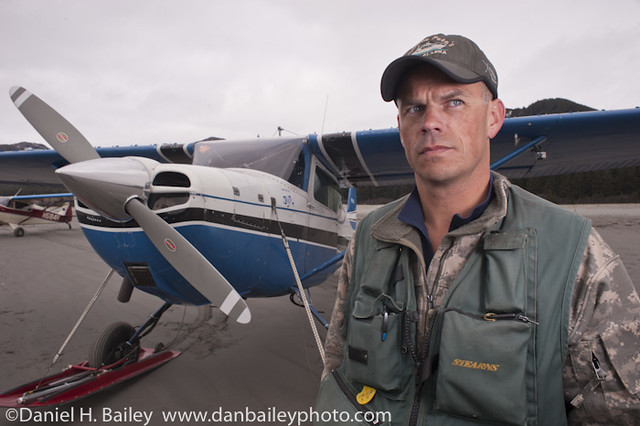
However, for this year’s Fly-in, I wanted to push myself with a different creative eye and shoot something besides just more airplanes. Fresh off The Flash Bus and armed with twice as many Speedlights as I had last year, I felt that shooting a series of bush pilot portraits would be the perfect opportunity for me to put to use some of the new gear and off-camera flash techniques that I’ve acquired lately.
Lighting Gear
My goal was to use a simple setup and go Hobby style, all light, fast and mobile so that I could make my way around the tarmac quickly and shoot as many portraits as possible on Friday night, when everyone is hanging around their airplanes and having a great time.
For lighting gear, I packed a single Manfrotto 6-ft Nano Stand, a Manfrotto 175F Justin Clamp, a Manfrotto Super Clamp, and a Lumiquest Softbox III, along with my 3 Nikon SB-800s, the SB-900, the Nikon SU-800 Wireless Commander, a Nikon SC-28 9′ TTL Remote Sync Cord and three Pocket Wizard Plus II Wireless Transceivers. (All of this fits in or on my LowePro MiniTrekker AW camera backpack with the rest of my camera gear.) I figured this would give me enough options for placing, holding, clamping, aiming and diffusing the light that I’d need to light up pilots and their planes.
Constructing The Shots
Since this is what I had to deal with, (see photo right) I knew that for each shot, I’d need at least two different light sources- one for the pilot, and one for the plane, if not more, although one light on the plane often did the trick.
With the stiff breeze that blew across the airport, I decided not to use the light stand, #accidentwaitingtohappen and instead just shot one-handed with the camera while holding a single flash off to the side with my left hand. For exposure, I used Manual mode with matrix metering to get light off of the sky, usually 1/160-1/250 at around f/9, and kicked the EV on the camera down about 2/3 stop to give a bit more drama to the background. TTL flash compensation to make up for the drop in exposure was tweaked, often +2/3 to +1, to get the desired light on my foreground subjects.
For diffusion on the pilot, I used the my new favorite tool, Lumiquest Softbox III, (attached to the flash with the Lumiquest Cinch Strap) which softens the light in a really nice way at close range and does a great job with head and partial body shots, which is what I wanted for these images. The closer you get, the softer the light is, so I tried to hold it as close as possible to the pilot while keeping out of frame. Having never used these kinds of on-flash diffusers before, I’ve quickly fallen in love with this great little diffuser. It gives exceptionally good results and folds up to fit right inside my camera bag.

Download My Free eBook
USING LENSES
A Guide for Getting The Most From Your Glass
In this 32-page eBook I'll show you how to effectively use the four main types of lenses, and give you straightforward tips that will help you maximize your creative options & control.
Then for the plane, I typically set my SB-900 and maybe another SB-800 on the ground with their included stands, placed them about 20-30 feet away, (or clamped them to something nearby) pointed them at the plane, making sure that the optical sensors were pointed back at me, and zoomed the flash heads anywhere from 70mm to 200mm. For some of the shots, like the first one above, I stuck on the CTO warming gel to add extra warmth. Lens choice was usually the 24mm or the 50mm.
To trigger all the Speedlights, I used an SB-800 as a commander on the camera, with the dome diffuser on, and the head rotated and pointed in the general direction of the ground flashes. The hand held flash was close enough that it picked up the signal no matter where the commander was pointed.
For some setups, especially during the daytime, (bottom shot) where I was just shooting pilots with a single softbox flash I just connected the Speedlight to the camera via the Nikon SC-28 9′ TTL Remote Sync Cord. This two-piece rig turned out to be light and compact enough to carry around all the time for quick people shooting. Remember, though, when you connect a single flash with the TTL cord, you need to change it from Remote to TTL mode.
Establishing Rapport
Of course, the most important ingredient for shooting great location portraits is the rapport that you establish with your models. During the course of the evening, I didn’t shoot as many different people as I might have wanted to, mostly because I ended up striking up rather lengthy conversations with all the pilots that I photographed. I showed them the results as I went shot and explained my methods for constructing my imagery with all those cool looking flashes.
Not only did this make for more comfortable and relaxed models and better looking portraits, I ended up learning more about flying and Alaska aviation, I made some great new friends and contacts and even got signed model releases from everyone.
Final Analysis
Looking back, I’m really happy with my imagery. In fact, I think it represents a new level of confidence, style and skill for my photography. Did everything work perfectly that night with all the flashes and my lighting technique? Yea, right, that’ll be the day! Did I learn and see things now that I could have done differently? Absolutely, but that’s all part of the learning process.
The exciting thing for me with this shoot is that I went in with an idea, did a whole lot of experimentation and walked away with some photographs that I’m really proud of. See more photos in my Flickr stream.
 I detail these lighting techniques and many more in my 83 page off-camera flash eBook, Going Fast With Light.
For other off-camera flash resources, check out The Hot Shoe Diaries: Big Light From Small Flashes by Joe McNally (I’ve learned a TON from this book) and Speedliter’s Handbook: Learning to Craft Light with Canon Speedlites by Syl Arena.


Great series of shots Dan, a set to be proud of. Absolutely great, I particularly like the yellow shot!
All the best,
Noel
I recently stumbled upon your work and having lived in AK for 6 years I love looking at your work. I’ve been studying the use of off-camera Speed Lights lately and am looking forward to jumping into the fray! Thanks for the images and thanks for the motivation. Your blog is terrific and I’m loving the Photoletariat.
-Brian
Thanks for the comments, Brian. It’s always nice to hear from the locals. I checked out your site- another adventure junkie! Keep up the good work and I’ll do my best to keep the content flowing on my end. -Dan
Glad to see someone local got off to one of the flashbus stops. My photography was totally changed by stumbling on to Hobby’s strobist blog about 4 years ago.
I really need to try carrying my flash in my hand for candid shots like this – the light stands can be pretty limiting and not very wind friendly.
Great stuff Dan!
Thanks, Denny. I carry my flashes with me almost everywhere now- even took one or two with me when I went out snow biking this past winter. Agree, those Nano stands can be handy, but they’re certainly wind prone. If anyone is going to have their gear blown over by the wind, it’s likely going to be me.
[…] Click here to see the behind the scenes post about how I got these images. […]
[…] creative ideas for photographing the 2011 Valdez Fly-in revolved around shooting bush pilot portraits and capturing not just planes, but personalities and […]
[…] photo that they chose is one from my bush pilot portrait series that I shot a couple of years ago at the Valdez Air show. It was shot with a Nikon D700 camera, a Nikon 24mm f/2.8D lens, two Nikon flashes and a Lumiquest […]