 The May 2018 firmware updates added the new Focus Bracketing feature to the Fujifilm X-T2 (which is currently $500 off) and X-H1. First introduced in the GFX earlier this year, and [now included in the X-T3 and X-T30], Focus Bracketing has been one of the most talked about and alas, one of the most confusing features since it was released into the two top shelf X Series models.
I’ve gotten quite a few emails from readers asking how it works. I finally had a chance to try it out myself, so in this post, I’ll give you the basic rundown on how the Fuji’s Focus Bracketing feature actually works and how to put it to practical use in your own photography.
First, a little background. Focus Stacking, is often used in closeup and macro photography, when you’re already dealing with extremely shallow depths of field. That said, you can get great results when shooting traditional landscapes at more “regular distances.” Either way, the technique involves creating a series of photos shot at slightly different focus distances, then combining, or stacking them in Photoshop or Lightroom.
All of the extremely narrow focus slices are added together, which results in an final image that a much wider depth of field than you’d normally be able to get with a single frame. The restyle can be pretty dramatic. Even if you don’t have an X-T2, X-H1 or GFX, you can still do Focus Stacking, you just need to put your camera on a tripod and perform your focus adjustments manually.
Step 1: Set Up The Focus Bracketing Menu
The new Focus Bracketing menu lives inside the Bracketing Menu. The easiest way to get there is to set the DRIVE DIAL to BKT and press the Fn Button that’s tied to your DRIVE SETTINGS. On both the X-T2 and X-H1, the default setting has the front Fn button assigned to DRIVE, although you can change this to any Fn button if you like. Otherwise, you can access DRIVE SETTINGS at the top of the SHOOTING SETTINGS MENU.
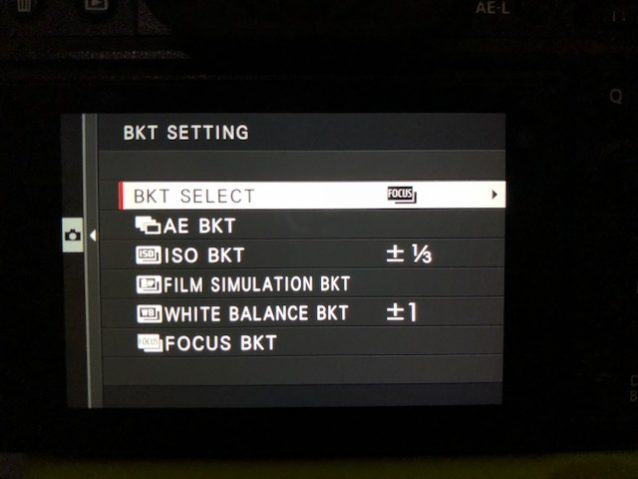
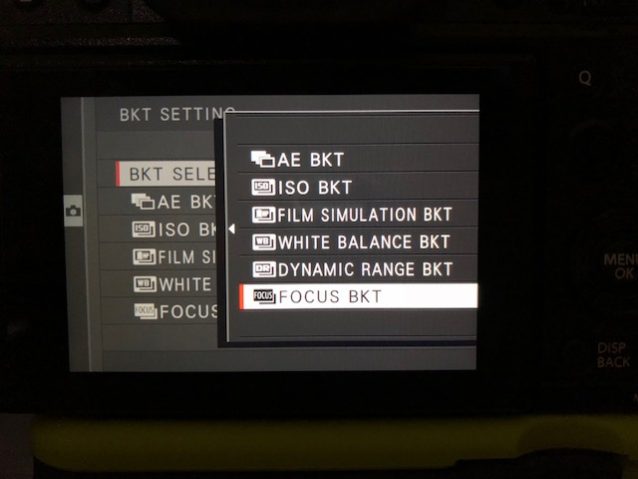
Once you bring up your DRIVE SETTINGS menu, the first step is to go to BKT SETTING —> BKT SELECT —> and choose FOCUS BKT at the bottom of the menu. This is actually the most important step; you need to select which kind of BKT you’ll be doing. It’s easy to miss this step.
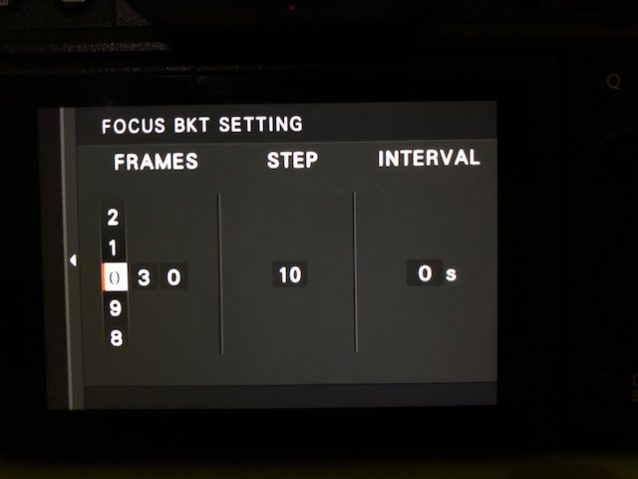
Once you choose FOCUS BKT, hit OK and you’ll be taken to the FOCUS BKT SETTINGS page. Here you choose the number of frames you’ll shoot, your STEP, which corresponds to the difference in focus distance for each shot, and your INTERVAL, which is how many seconds between each frame.
For FRAMES, I’ve experimented with anywhere between 10-60. For the example above, I had it set to capture 50 frames. If you have very shallow subject matter, you can easily get by with less. If you’re trying to show an extremely wide range of focus, you might want to choose a higher number of frames. The max setting is 999 frames. I can’t imagine how long it would take to load 999 images into Photoshop.
With regards to the STEP setting, 1 is the smallest focus distance difference between frames, from front to back, and 10 is the highest. It’s not an exact number, though. Fujifilm hasn’t provided any specifics on how far this is, so you’ll have to experiment and see what works for you. In my own tests, I’ve tried 3, 5 and 10, and I’ve found that 10 seems to work pretty well. For extreme macro, you may want to use a smaller number.
For INTERVAL, I just use 0 and let the camera fire the entire series in quick succession.
The nice thing is that once you’ve set up your Focus Bracketing preferences, and as long as the DRIVE dial is set to BKT, you don’t have to go through all the other steps again. The next time you hit the DRIVE button, you’ll be taken right to the FOCUS BKT SETTINGS Page. Unless, of course, you choose a different type of bracketing.
Step 2: Take Your Shots
Once you have your BKT SETTINGS all configured the way you want them, it’s time to shoot your series. You’ll probably want to use a tripod, and you probably want to get as close as possible with your lens. You can use any lens, but for super close macro, I recommend using a dedicated macro lens like the XF80mm f/2 Macro lens, or XF60mm Macro lens. This will give you the best edge to edge sharpness.
Another alternative is to use one of the Fuji MCEX extension tubes. I use the MCEX-11 with a variety of lenses. The general rule is that the wider the lens, the closer you can get, which means the more shallow your depth of field will be.
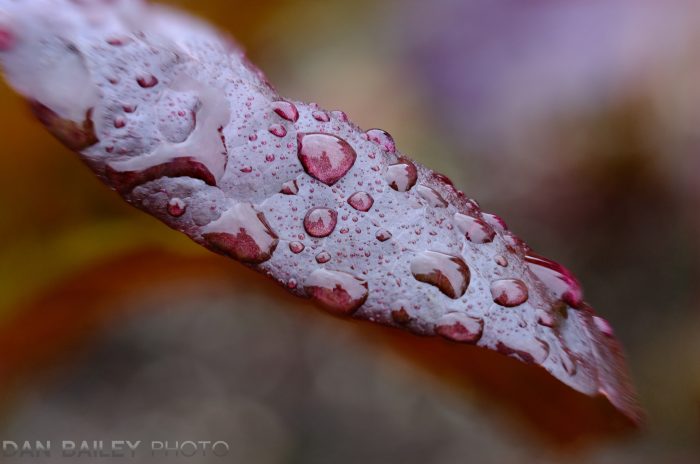
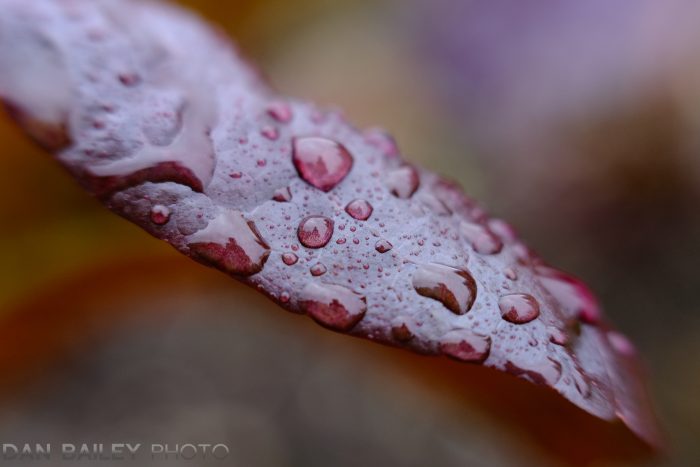
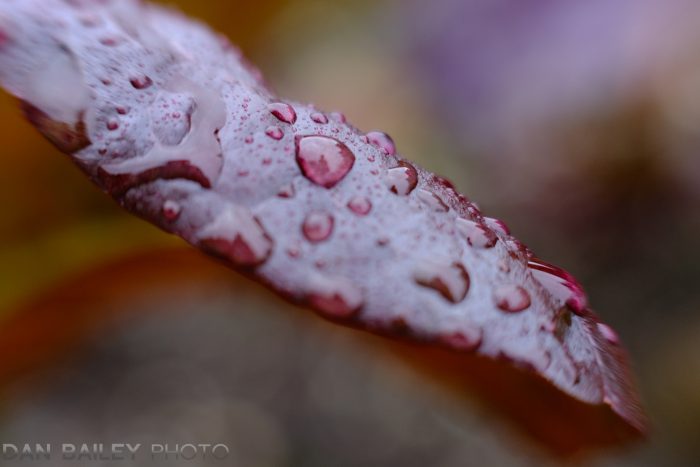
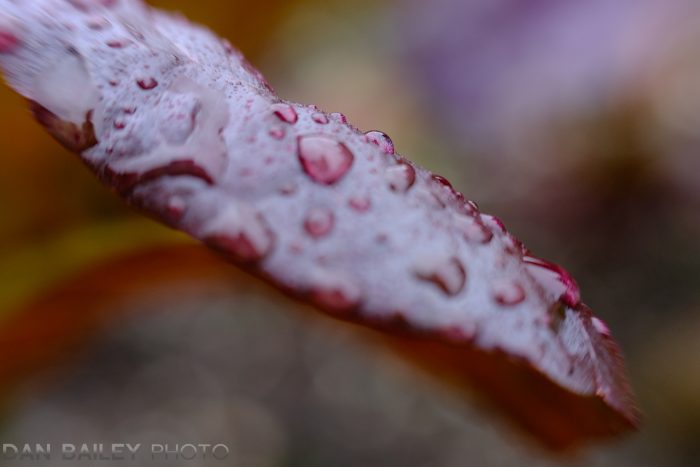
For this “Red Lettuce” image, I used the MCEX-11 in conjunction with the XF35mm f/2 lens. One of my favorite lenses for macro with the MCEX tube is the XF23mm f1.4, although I’ve used quite a few of my lenses with the MCEX, including the XF100-400. The nice thing about using long lenses, is that you have an easier working distance and increased DOF.
The technique for shooting is to set your focus on the closest part of the image you want to be sharp. For this example, I started with the very front edge of the lettuce leaf, which you can see in the shot above.
You can either focus manually or use autofocus to set your focus point. If you’re using AF, I recommend using Single AF and setting the green focus box to a relatively small point for the most accuracy. If you’re focusing manually, you’ll want to use FOCUS CHECK so you can zoom in and make sure you’re hitting the right spot. After you’ve got your focus nailed, you can go ahead and press the shutter. The camera will shoot the number of frames in the interval you specified.
When shooting macro, I usually set the camera to ELECTRONIC SHUTTER. This helps prevent any camera shake that may occur from the shutter slamming up and down inside the body. With the ES, there are no moving components during capture, it’s just individual pixels turning on and off.
The last thing to do be fore you hit the shutter is to pray that the wind doesn’t blow during your series. This is easily the most frustrating thing about shooting macro. It’s nearly impossible to shoot closeups if there’s even a slight breeze.
Step 3: Stack Your Frames
Once you’ve got all your shots, it’s time to combine them into a single image. The most common way is to select all of the frames you want to use and open them in Photoshop. (If you don’t use Photoshop, there are other programs that do Focus Stacking, including Affinity Photo, HeliconSoft, Zerene Stacker
Once they’re loaded, you need to set it up so that each frame is a separate layer. Go to FILE —> SCRIPTS —> Load Files into Stack… If you’re opening from Lightroom, you can bypass this by selecting all your images in LR, then doing EDIT —> Open as Layers in Photoshop…
Once they’re all loaded, you’ll have a single, multi-layered image. Now, you choose EDIT —> Auto Align Layers… This step automatically adjusts all your frames so that they match with each other, in case there are slight differences between frames. Like if the a slight breeze blew while you were right in the middle of shooting. That happened with my example, and it turned out OK.
 Next step is to do EDIT —> Auto-Blend Layers…, making sure you have the “Stack Images” box is checked. Hit OK and wait for it to finish.
As with the above, step, it can take a few minutes if you’re running a lot of images.
When it’s done rendering, you’ll have your stacked image, with all the focus layers combined. Chances are, it will look pretty cool.
You may need to do a slight crop to clean up the edges from when it auto-aligned. After that, you can save or export your final, finished, stacked image.
Here’s another example below. This was shot with the XF100-400mm lens and MCEX-11. It was made from 60 frames, set at STEP of 10 and INTERVAL of 0, using a 2-second self timer and the Electronic Shutter. Fist, three random images from my series, showing some of the different focus points used, and then the fourth, final stacked image.
Once you get the hang of it, Focus Stacking is pretty easy to do. The new Focus Bracketing feature on the two high end Fuji’s makes it even easier. You probably won’t use it all the time, but it can be a fun technique that opens up a whole new world of photography for you. I guarantee, once you open this box, you’ll start scanning your world for potential macro scenes. You might start seeing your subject matter in a whole new way!
Have fun!


Hi Dan, As a macro shooter I was happily surprised when Fuji added focus stacking on my X-T2. I had great fun with my XF80mm F/2.8 Macro lens and experimenting with focus stacking, like as you nicely described it, until my lens stopped working and now I have been two weeks out waiting on Fuji repair department.
Ugh… I hope you get your lens back soon, Michael! I do know this, modern lenses are really complicated and extremely precise inside, which means that even a simple lens repair can end up taking the better part of a day, because it has to be completely recalibrated. Given that time frame on a single lens, even a handful of lens repairs can really slow turnaround time. Rest assured, the Fuji repair guys know what they’re doing and I know they’re working as fast as they can. I’ll keep my fingers crossed for you!
Hi Dan
Many thanks for this article (and of course the exellent X-ebooks) a One question left for me: do you recommend jpeg- frames because of the big number of frames and the big amount of Megapixels?
Walter
Hi Dan, great post, easy to understand. Two ‘comments’ I think that “starters” who begins with stacking has to know:
first set the aut. stabilizer off by using a tripod, and the aut. sharpness off. In the past I used a slider by photo stacking for “close-up” and gives me great result. By using the stacking technics of Fuji we don’t need it.
I am a serious amateur photographer, age 71 start using Fuji from the moment the X-Pro 1 (and XT-1/XT-2) came out. Have various lenses but not the beautiful macro 80mm (a wish). More or less a year ago I start blogging “Fred’s Foto”(www.fredgeschiere.nl). Presenting nature and som actual pictures with a short story (sorry, only in Dutch).
Walter- Yes. Unless you have a very powerful computer, it’s probably best to shoot JPEGs when using this technique. Loading 30-40 RAW files into PS will no doubt put a huge load on your system.
Thanks for the info Dan. This is a wonderful new feature and one I am anxious to try out. A question: For those of us who are not shooting macro subjects, ie, landscape and similar situations, what are the number of steps recommended. With the relatively large DOF of f5.6 to f11 at these distances, I would think that 5 to 10 steps would easily suffice. Your thoughts?
Lew, since we don’t have any official charts or specific distance information from Fuji, there’s no hard way to determine this. While using a larger number f/stop would probably mean you could get away by using smaller steps, especially with non-macro subjects, I think the best way to figure this out is to experiment on your own and see what works.
You can always do a quick and dirty test by setting the camera up, and doing a quick burst while looking through the viewfinder. You should be able to see the focus distances change as you shoot the series, and you can inspect for your distances between the first and last photos. Just remember to delete your test images so they don’t clutter your card or computer.
Hi Dan,
great to read on the subject with a certain time distance from the appearance of FW 4.0 (4.1). You emphasized some points that I already forgot and some others that so far I haven’t paid much (enough) attention.
I have some comments and a question.
Regarding the number of frames taken you do not mention that the camera stops taking shots once the infinity is reached. So the number of frames taken is a game of the preset parameter FRAMES or of the minimum number of shots needed to reach infinity at the given lens DOF and of the parameter STEP, whichever comes first. At the moment I am not sure what an infinity would be in the macro but for landscape I think is quite obvious.
Consequently in FOCUS BRACKETING we have the special situation regarding the number of shots taken. While the bracketing method gives a predefined number of shots per shutter click, at FOCUS BRACKETING the number od shots varies depending on the steps it takes the camera to reach infinity. Anything from 1 to 999 is possible. I find is very hard to structure the groups of focus bracketing shots that belong to a particular shutter click. If the motive, setting, etc, do not change drastically between consecutive shutter clicks and make sufficient visual difference – than it is very hard to determine which shots to take in batch for post processing.
In this respect, could you please recommend some “best practice” to make life easier in post processing of focus bracketing images?
Kind regards,
Tone, thanks for your comment. You’re right, “infinity” in a landscape photo is a clearly defined concept, whereas in a macro photo, depending on how you compose, infinity may not even come into play. With this in mind, you may not need to shoot such a large series when focus bracketing on a landscape scene. Again, this depends on how you compose.
Regarding how to make life easier when shooting a large series of images, I have a very simple technique to separate my batches. After I shoot a particular group, I put my hand in front of the lens, switch the Drive Dial to S and shoot one photo of my blurry palm. This lets me easily identify where each series begins and ends when I’m browsing through a few hundred photos on my computer.
Hope that helps. -Dan
[…] You also have the new FOCUS BRACKETING feature, which was introduced earlier this year. (I explain how to use this feature in detail here.) […]
Excellent tutorial. I just got a X-T2, which I upgraded to 4.20 firmware, including the focus bracketing feature, so now I am ready to experiment with focus stacking, thanks to your clarification of this feature.
That is brilliant. And it gives me a host of spin off ideas, such as using a small plastic board and a felt tipped pen to write comments on and take a photo of that at the end of a series.
this is very helpful, thank you so much for taking the time to do this article. really saved me a lot of time
HI DAN I JUST GOT MY NEW XF80MM LENS. ON THE AF STACKING PART. DO I NEED A PROGRAM TO WORK THIS OUT ? MARK…..
Mark, you don’t need a special program to do stacking, aside from what I talked about in this post. If you follow these steps, you’ll be able to use Focus Bracketing to create a stacked image like the examples I show above. -Dan
Great article! Keep up the good work!
Great article.
I used to shoot Nikon Dx with the 105 Nikon Micro lens with great result. Lots of times freehand while moving the camera into focus, with pretty great results quite frequently. Really not so hard as it may sound.
Now that I switched to Fuji (presently X-T20, hoping for a X-h2 as a second Fuji-body) I shoot macro with third party lenses with manual focus only. I don’t feel there is a real need for auto-focus in macro shooting. I intend to do some focus-bracketing by using my tripod-head that enables quite some welcome sliding for macro focus-stacking. A future Miops slider will even add more options. My reason for X-h2 as a follow up is the benefit of IBIS for manual lenses.
I have used the focus stacking on both macro and landscape with my xt2. It works great.
Hi Dan
Thank-you for another great article. I enjoy macro photography and have used the focus bracketing feature with mixed results. Your tips will hopefully improve my future attempts. I discovered a focus stacking article on the Fuji website, see below. In my case the two points that were most helpful in the Fuji article were the explanation of what a “step” meant, and that once your lens reaches “infinity” the focus bracketing stops regardless of how many steps have been programmed.
https://fujifilmxgfx.com/gfx-techniques/advanced-technique-focus-bracketing-with-fujifilm-cameras/
Thanks
Ken
I have a small issue…. I am shooting (now) with the GFXr50. Focus stacking sounds wonderful, but I think my iMac is going to choke on the raws… Should I convert to JPEG first (not that they are that much smaller…)? I’m curious
Yes, I would go ahead and shoot JPEG. You’ll still get excellent quality without having to process every single image in your series, and the files will be significantly smaller.
Isn’t it necessary to be in S focus mode (single-shot AF), with smallest square focus point on the point closest to the camera, for focus bracketing to work? You seem to suggest the focus mode can be M (manual).
Yes Dan, you can have the AF switch set to M and still adjust down to the smallest focus point. Of course, it’s kind of a moot point, because if you’re using Manual focus, you won’t really be depending on the focus points, you’ll be using your eyes, or the focus peaking to fine tune.
What is the distance per step ?. Does it vary with the lens or the initial focus point
Unfortunately, there is no documentation that specifies what each step is. My guess it that it varies by distance and the steps are calculated specifically for each situation, based on initial shooting distance. For example, if you’re shooting a macro very close, then the steps need to be very close together. However, if you’re shooting at subject that’s 20 feet away, then the steps don’t need to be so close. They’ll be spaced out in inches, instead of fractions of an inch for a close subject. Does that make sense?
i’d love one clarification – once i have set the distance for my first image (i prefer focus peaking/manual focus for this), should the body be left in M, S, or C for the series?
Bruce, you can leave the camera’s AF selectors switch set to S and the focus bracketing will work as specified.
While I see this feature in the menu of Fuji X-H1, I don’t see the facility to merge within the imaging software provided by Fuji, e.g. Capture1 express. Does Fuji provide the software to merge? If not are there any free applications to undertake the merge process?
Thank you for this excellent tutorial. I experimented over and over again and couldn’t get the results I expected. After reading your article and applying the techniques, I got a wonderfully in-focus picture the first time.
Awesome. Yea, it’s a little tricky to figure out the settings for this function, but once you get it, it’s really fun to play around with!
Jules, sorry for the long delay. I just saw this comment in the moderation queue. Fujifilm does not provide any focus merge software, but in my post, I describe the methods to merge the photos in LR/PS. I do not know how to do this in C1, though. Hopefully, by the time you read this, you will have figured it out.
Tried to focus staked. All my settings seems OK, but nothing happens. I see BKT (in yellow) diagonally strike on the LCD screen. Have no clue what to do.
Hi Frank, sorry to hear that you’re having problems with this. Which camera are you using and are you still experiencing the issue?