Finding new clients and getting them to hire you is the crux of being a professional photographer. However, keeping them is the easy part, which explains why the crux of being a professional photographer is finding new clients and getting them to hire you.
Let me explain.
Marketing and self promotion is tough work. You know that. It requires the genuine discomfort of activities like calling strangers on the phone who don’t have time to take phone calls from strangers. It also requires a special brand of creativity that lies entirely outside of your usual creative comfort zone of taking pictures. You rack your brain trying to come up with eye catching mailers that will get thrown away, witty slogans that will get ignored and a web presence that must compete with the other 227,469,346,154 web sites out there. Oh yeah, and then there’s social media. Haven’t even talked about that yet.
If you’re not comfortable doing all of this stuff, then you hire someone else to do it, which of course, requires spending money that, frankly, you would much rather spend on a cool new lens, a Nikon D800 or a new mountain bike. And still, there’s no guarantee that any of this will actually get you a single new client. You do it anyway, because you know that it’s a numbers game. The more impressions you make on your carefully culled client list, are more chances for someone to finally give you a chance.
Which, of course, is why, when you actually DO get a new client, you fight like hell to keep them. Aside from working your ass off for them and delivering the images that they need WHEN they need then, you do the little things that let them know they’re special. You give them presents. You call, visit and touch base with them every so often, now that you’re not a stranger anymore. Basically, you do everything you can to give them a reason to call YOU the next time they need a photographer.
It feels good to get these kinds of clients. It feels like success, because it is. It’s this building block of establishing and fostering client relationships that lies at the core of every kind of business, whether you’re a photographer or a washing machine salesman.
Go ahead and picture yourself there for a minute. Think about one of your favorite clients with whom you’ve built up a special working relationship. Think about what it feels like to know that they next time they have a project, they’ll likely to bring you on board again. Think about the sweat, the creativity, the overtime and everything else it took to get you that status.
Now, imagine another photographer approaching this favorite client of yours and trying to market their work. You would hope, and in some cases, even expect, that while your client might give them the time of day, they’ll still hire you. They might even just come out and tell that other person, “Your portfolio is good, but we always use insert your name here.” Yea, you’ve heard that before, haven’t you. Don’t worry, we all have. I still hear it, in fact.
Of course, what this really means is, “We’ve built up a strong relationship with insert your name here, over the years and (s)he’s worked hard for us on every project, so we prefer to use him or her, but we’ll certainly keep you in mind for future projects.” It may be nothing personal on your end, but for the guy at the top, it’s entirely personal.
This illustrates why getting new clients is so tough. No matter how good your work is, you’re not just competing against other porfolios, you’re competing against relationships. And as tough as it is to hear this from a prospective client, if you’re the established photographer, it’s what you hope that your client says to every other photographer out there. Why? because you don’t ever want to hear it again. You want to be the guy at the top and you’ll do whatever it takes to hold onto that position.
So how do you break in? You keep marketing yourself. You keep shooting new work and improving your creative eye and style. You keep busting your ass, because sooner or later, there will be a scheduling conflict with the other guy, a new art director, a new project, a personal recommendation, the need for a fresh look, or a photo editor who just really digs your imagery and wants to give you a chance.
If your work is good, then you will eventually get your foot in the door. Your turn will come. Trust me. And when it does, start building those relationships. Do everything you can to make it that much harder for the next guy in line.
That little square or rectangle of plastic that has replaced the film canister as the image storing apparatus in the photography industry.
While they may lack the style and vintage feel of film, memory cards have a couple of huge advantages- they’re durable as hell, and they store a huge number of photos. In all those years, film never got bigger than 36 frames per roll, maybe 39 if you stretched it, but today, we’re talking hundreds, or even thousands of images per card.
Not all cards are created equal, though, so how do you find the fastest memory card that will allow you get the fastest in-camera write speeds for your particular camera?
For each camera and card, the list shows you the write speeds for storing both JPEG and
RAW files, as well the max number of RAW+JPEG frames the camera can shoot and store in a 30 second burst. You can use this list to help you determine which cards will perform the best in your camera and allow you the fastest shooting options and card-to-computer workflow.
Generally, you’ll find that Sandisk and Lexar cards are most consistent performing Compact Flash and SD cards and you really can’t go wrong with either brand. (I’ve always relied on Sandisk cards in my photography.) However, don’t get sucked into the notion that you need the best and fastest card; they’re more expensive and unless you’re shooting continuous mode bursts of fast action sports all the time, anything on the upper half of the list will probably perform adequately to your expectations.
If you haven’t checked out Rob Galbraith Digital Photography Insights, before, definitely bookmark the site, it’s a great resource for gear reviews and other cool photo news and features. It’s been on my regular read list for a number of years now.
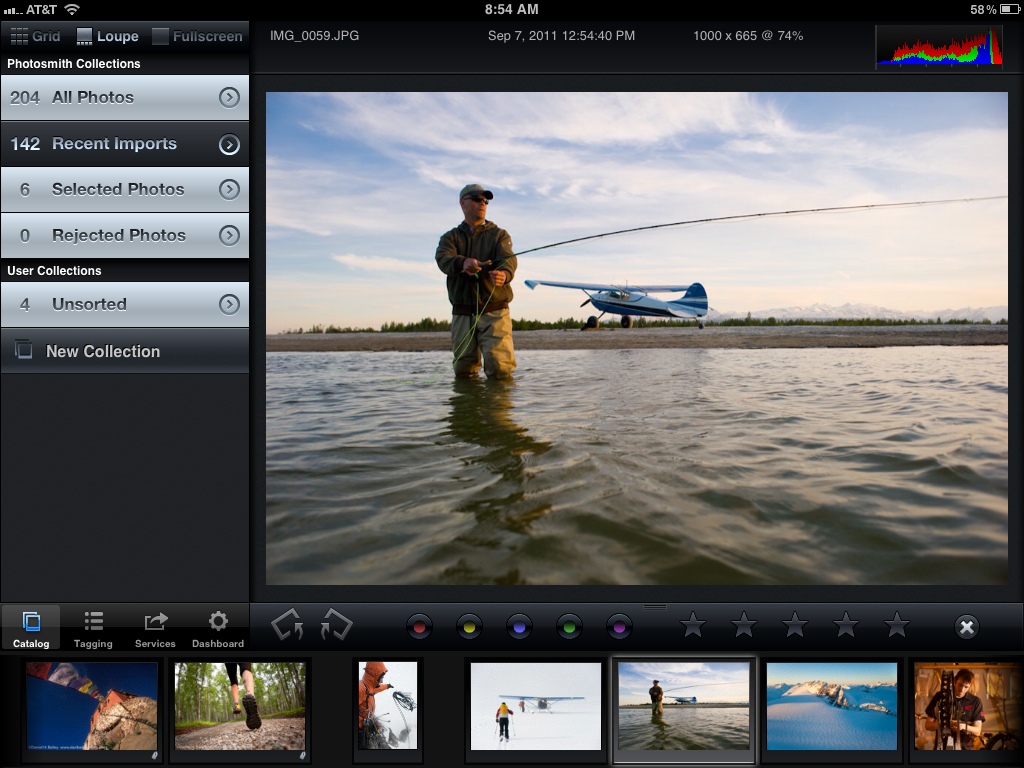
Here’s one more: Photosmith app. Yesterday, Photosmith 2 hit the iTunes store with a brand new user interface, as well as big improvements in speed and memory usage. The updated version looks great, and it gives you even more strealmined functionality for editing and tagging your photos when you’re away from your computer.
Photosmith offers a complete mobile photography worflow by letting you import, edit, tag, rate, keyword, label and group your images into collections right on your iPad. You can then export or share them via Dropbox, Facebook, Flickr, email, or to a new iPad photo album.
However, the real strength of the Photosmith app is that you can sync it back to Lightroom and import your new photos with all of the your added metadata, ratings and other info that you attach to each image. This process gives you the untethered ability to sort, edit and tag your photos from anywhere. Have a few minutes to spare in the airport terminal? At the coffee shop? In your backyard lounge chair? On the couch in front of stupid late night TV? Be productive and get some editing done.
Version 2 has a few significant improvements, including histogram and EXIF info visible at the top of the image, the Quick Tag Bar, Grid, Loupe and Full Screen View, batch tagging, smart groups and the ability to import existing photos that you’ve already imported into Lightroom, but may not have keyworded yet.
If you truly want to be a mobile photographer and leave the laptop at home, then Photosmith is an absolutely essential and powerful app to have. At $17.99, it costs a little bit more than most apps, but the enormous flexibility and freedom that it offers is well worth the investment. (Version 2 is a free update for existing users.) I updated as soon as it came out and am very excited about all the new features. Very simply, if you have an iPad, then this is a must-have app.
Check out the Photosmith Info Guide for a full intro to the program and complete rundown of all the new features in the new version. For you Aperture people, check out Pixelsync, it’s a similar utility designed to work with Aperture.
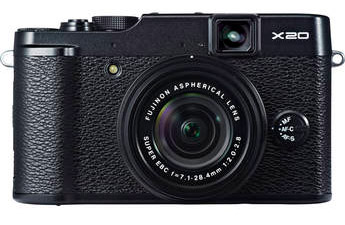
Between the two models, I’ve been using the Fujifilm X10 and X20 for almost two years, which would normally be more than enough time for my infatuation to wear off. It hasn’t, though, which convinces me that I’m not dealing with some mere schoolgirl crush here, but true, unbridled love.
The X20 is packed with so many usable features and has such good image quality that I’ve come to believe that the guys at Fujifilm have created a true classic. It has such broad appeal to just about any type of photographer, and these days, I rarely leave the house without it, even when I head out the door with my D700.
My own seemingly blind obsession aside, here are 10 reasons why I think that the X10 is the best little compact cameras in its class.
NOTE: Of course, the brand new Fujifilm X20 is now out, and it’s even better than the X10 in every way. Read this post to see my first impressions of this camera. So, everything I say below applies to the X20 as well.
Note: The Fuij X30 has now replaced the X20, but it’s built on a very similar chassis and has all the features of the X20, plus a few more. The optical viewfinder has been replaced with a newly designed EVF, battery life has been improved, it has a tilt screen and WiFi that enables you to remotely shoot and share images from your smartphone or tablet.
1. It’s Not the X100
I keep reading about how much better the X100 is than the X10, but in my mind, those reviews miss the point. The X10 is clearly NOT the X100, nor is it meant to compete with that particular product.
The Fujifilm X100 costs $1,200 and has a fixed 35mm lens, and is targeted as an expensive camera for the pro user, or the luxury guy who sports a Visa Black credit card. Just kidding. The X100 is a fantastic camera, but the higher price is certainly harder to swallow for some photographers. By contrast, the X10 is an affordable, all around camera for the all around user. It has a zoom lens that offers more creative options, and at only $600, you don’t have try so hard to justify the price or be to paranoid about it getting dinged up.
2. It’s Good Enough for Pro Work
Even though the 12 MP 2/3″ X-Trans CMOS sensor on the X20 is not as big as some small camera sensors, the Fujifilm engineers have done some amazing things with the RGB pixel placement and alignment on the sensor that give the X20 outstanding image quality. They may not be as good as photos from an APS-C sensor camera, but shots out of the X20 are good enough for a wide variety of pro work, and certainly good enough for just about any kind of enthusiast photography.
The X20 allows me to go virtually unencumbered and still create pro quality work, even during those times when I don’t have my DSLR with me. I’ve taken the X10 hiking, skiing and traveling, and I love using it on my bike and in my airplane. I’ve already sent X10 and X20 photos to clients and I anticipate sending more in the future, and recently had an X10 image used as a 4 x 6 foot corporate display print. Turned out just fine!
3. It Triggers Remote Flashes
Both the X10 and X20 have an External Flash option that lets the camera trigger other optically controlled flashes and strobes. It doesn’t offer the full flexibility of the on-board flash on my Nikon D700, but it still offers some pretty cool off camera flash options. I’ve used the X20 to trigger SB-800s, SB-900s, older SB26s, and even my Photoflex TritonFlash battery powered strobe. If’ the flash has an optical sensor, the X20 will fire it. Way cool.
With the X20 and even just a single small speedlight, you can potentially to really fast with light and still have some good creative options. There’s even a dedicated flash for the X20- the Fuji EF-20 flash. Great little light. Add a Canon compatible sync cord and you can open up your off-camera flash options even more.
4. It Fires at 12 Frames Per Second
Today’s CMOS sensor technology allows for incredibly fast capture and write speeds. The X20 can fire at an staggeringly fast 12 fps at full 4,000 x 3,000 pixel resolution. Not only is this great for shooting sports, it’s awesome for capturing portraits and fleeting expressions. I used this feature when trying to take photos of my 3 year old niece during a recent family vacation. Have you seen how fast a 3 year old moves? Shooting regular sports is easier. Seriously. High speed capture really helps here.
5. It Does Full Manual
As good as the exposure, sensor and image processor on the X20 are, let’s face facts: There will be photographic situations where shooting on auto will simply not give you what you want. The X10 and X20 have three different exposure meters, full manual mode, even manual focus, and everything in between. Plus it shoots Full HD video. If you have skills, the X20 will allow you to use them.
6. It Has Metal Dials
I love the fact that the X20 has real dials. Milled aluminum dials with textured edges. Just like old cameras. (One for exposure mode and one for +/- EV compensation.) Not only are real dials cool, they allow you to change modes and exposure way more quickly than if you had to go in and scroll around some menu. Some cameras today require you to do everything inside the menu. For me, this is just not desirable or practical, let alone fast enough.
7. It Shoots RAW
Unlike some compact cameras, like the Nikon AW100, the Fujifilm X10 and X20 both shoot RAW. With a simple press of a button on the back of the camera, you can set it up to shoot in either RAW, or RAW+JPEG. It’s files are recognized in Adobe Lightroom, but with it’s on-board RAW converter, you can process and distill your RAW photos down to JPEG right in the camera.
That said, the X20’s dual CPU image processor is so good that I rarely find the need to shoot RAW with this camera. However, if I’m facing a tricky lighting situation, or if I want full control, the feature is there.
8. It Has Awesome Macro Capabilities
The X20 has super macro that focuses down to an unbelievable 1 cm. You can pretty much get as close as you want to a subject and still capture it in focus, as long as it isn’t touching the lens. I’ve played around with macro photography a bit in the past, but I’m totally blown away by how well the X20 allows you to shoot extreme closeups and details without having to resort to using closeup lenses, extension tubes or even a seperate macro lens.
9. It Has a Viewfinder
The X20 has an optical viewfinder that shows about 80% of the image. With the X20, they added shooting info inside the OVF, including shutter speed, aperture and focus zone. The reality is that most of the times I shoot using the LCD panel, but if I’m shooting in really bright sunlight, or if I want to conserver batteries, the zoomable viewfinder definitely comes in handy.
10. It’s Just So Damn Stylish
The X20 is a dream to handle. It’s such a great size, and the styling and ergonomics of the camera draw you right in. Plus, you can’t beat the cool retro design. Like I said above, it’s an instant classic; a fully capable “gentleman’s camera,” or “ladies’ camera,” if you will, that does it all.
The Fujifilm X10Fujifilm X20 may not be the perfect compact camera, but I’d say it comes pretty darn close. There are some cameras out there that do a few things better than the X20, but with the impressive amount of features, technology and quality that the X20 carries, you’d be hard pressed to find a better overall camera in one self contained package at this price.
Support This Site: If you do decide to pull the trigger on this one, or any other camera for that matter, please consider clicking through these links. It doesn’t cost you anything extra and it helps compensate me for the time and effort that it takes to run this site. Thanks! -Dan
The poor telephoto. So often the it gets relegated to shooting the tough subjects like sports and action, or the really far away stuff. Maybe the occasional portrait. When it comes to landscapes, though, the big glass often gets left behind in favor of those nice compact wide angles. Why? Because wide angle lenses portray the grand scene with such magnificence; such… “wideness.” And besides, everyone knows that wide angles are the best lenses for shooting landscapes.
Whatever…
Telephoto lenses rock for shooting landscapes. They let you get right in there and pin the details with tack sharp focus. They let you accentuate specific subject elements and suggest the grand scene, and as you know, anytime you engage the viewer’s imagination through the power of suggestion, you go a long way towards making a compelling image.
Long lenses bring distant subjects up close and they compress perspective in such a way that accentuates depth and juxtaposition within the image. They clearly communicate to your viewer what YOU liked about the scene and they tell the story of your own vision. Plus, with their limited depth of field, telephoto lenses let you isolate your subject against soft backgrounds and do that whole bokeh thing.
So, next time you find yourself heading outside to shoot landscapes, grab the long lens and get yourself into a different creative space. Oh, and don’t forget your tripod.
Wonder Lake and the Alaska Range, Denali National ParkPine trees in winter, ColoradoAlpenglow on the Chugach Mountains, Anchorage, AlaskaMorning view from Horsetooth Reservoir, Fort Collins, ColoradoFireweed, Wrangel St. Elias National Park, Alaska
If you’re a veteran Kelby reader and Lightroom user, then you’re well aware of his teaching style: quick, efficient and to the point. His books are designed as a guide book that walk you through an entire digital workflow, all the way from import, to editing to output.
Kelby doesn’t explain every single aspect of the program, and that’s not necessarily a bad thing. If you’re busy, you need to know how to get your photos in and out of the program quickly and how to make them look great. Period. You simply may not have time to explore every single facet of Lighroom, but you do need to know how to navigate the new features that have been included in version 4, such as the new processing engine and Development Module controls, which have been changed since v.3, the Blurb photo book menu, video editing, the new email export option and the updated Soft Proofing window.
At 504 pages, Kelby’s Adobe Photoshop Lightroom 4 Book is laid out as a real world reference manual that goes step-by-step through pro tested studio and location techniques. As the world’s foremost Photoshop and Lightroom instructor, he offers expert advice, killer tips and shows you the exact methods that will get your own workflow up and running.
I’m a big fan of Kelby’s books and made extensive use of his previous version when I finally made the jump to Lightroom a couple of years ago. His manuals are highly regarded and are often rated as the best books for learning the ins and outs of Lightroom. Whether you’re coming from an older version or are brand new to the program, I can’t stress how helpful it is to have a good book to help guide you through the new features and get you up to speed. If you want to dive right in and move quickly, then I’d highly recommend the Kelby Adobe Photoshop Lightroom 4 Book.
At any rate, if you haven’t made the jump to Lightroom 4, you should definitely do so. It’s better, stronger, faster and half the price of Lightroom 3.
The other day I wrote a post called Photography solutions for going on the road with your iPad. I covered some adaptors and hard drive options that can turn you iPad into a viable alternative for travel and location photographers who want to go light and leave the laptop at home.
But what if you’re going on an extended trip and plan to live out of a tent or your car for a few days or weeks? Sure, you can always charge your camera batteries when you stop at restaurants and rest stops, but realistically, how many outlets can you take up between all of your photography and mobile devices? Also, it takes a lot longer to charge an iPad than a camera battery.
The easiest solution for vehicle travel is a car charger with a 30-pin iPad/iPhone connector. The other option, especially if you’ll be on an extended backpacking, climbing or bike trip is getting a solar charger that will power your iPhone, iPad, GPS, and other battery powered or USB devices. Based on durability, reliability, size and compact design, here are the best 3 solar USB charging systems that you might find useful on your next outdoor photography road trip.
1. Joos Orange Personal Solar Charger
The Joos Orange is rated as the most powerful and durable solar charger on the market. It will charge smartphones, iPads, Kindles, some digital cameras and just about any other USB device. It can even power the Sanyo Eneloop AA travel USB battery charger. Think speedlight batteries.
It’s also waterproof and durable enough to be left in the sand and dirt, left outside to keep charging in light rain, and stuffed into your pack. At 8.5″ x 5.7″, it’s a pretty compact unit.
Seems like if you’re looking for a well made outdoor proof charging system, the Joos Orange Personal Solar Charger looks like the best option. Nonetheless, if you’re not ready to be done reading, here are two more possibilities.
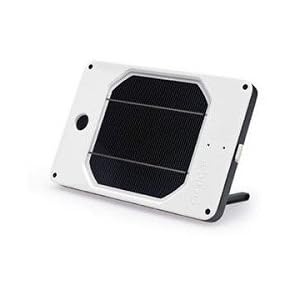
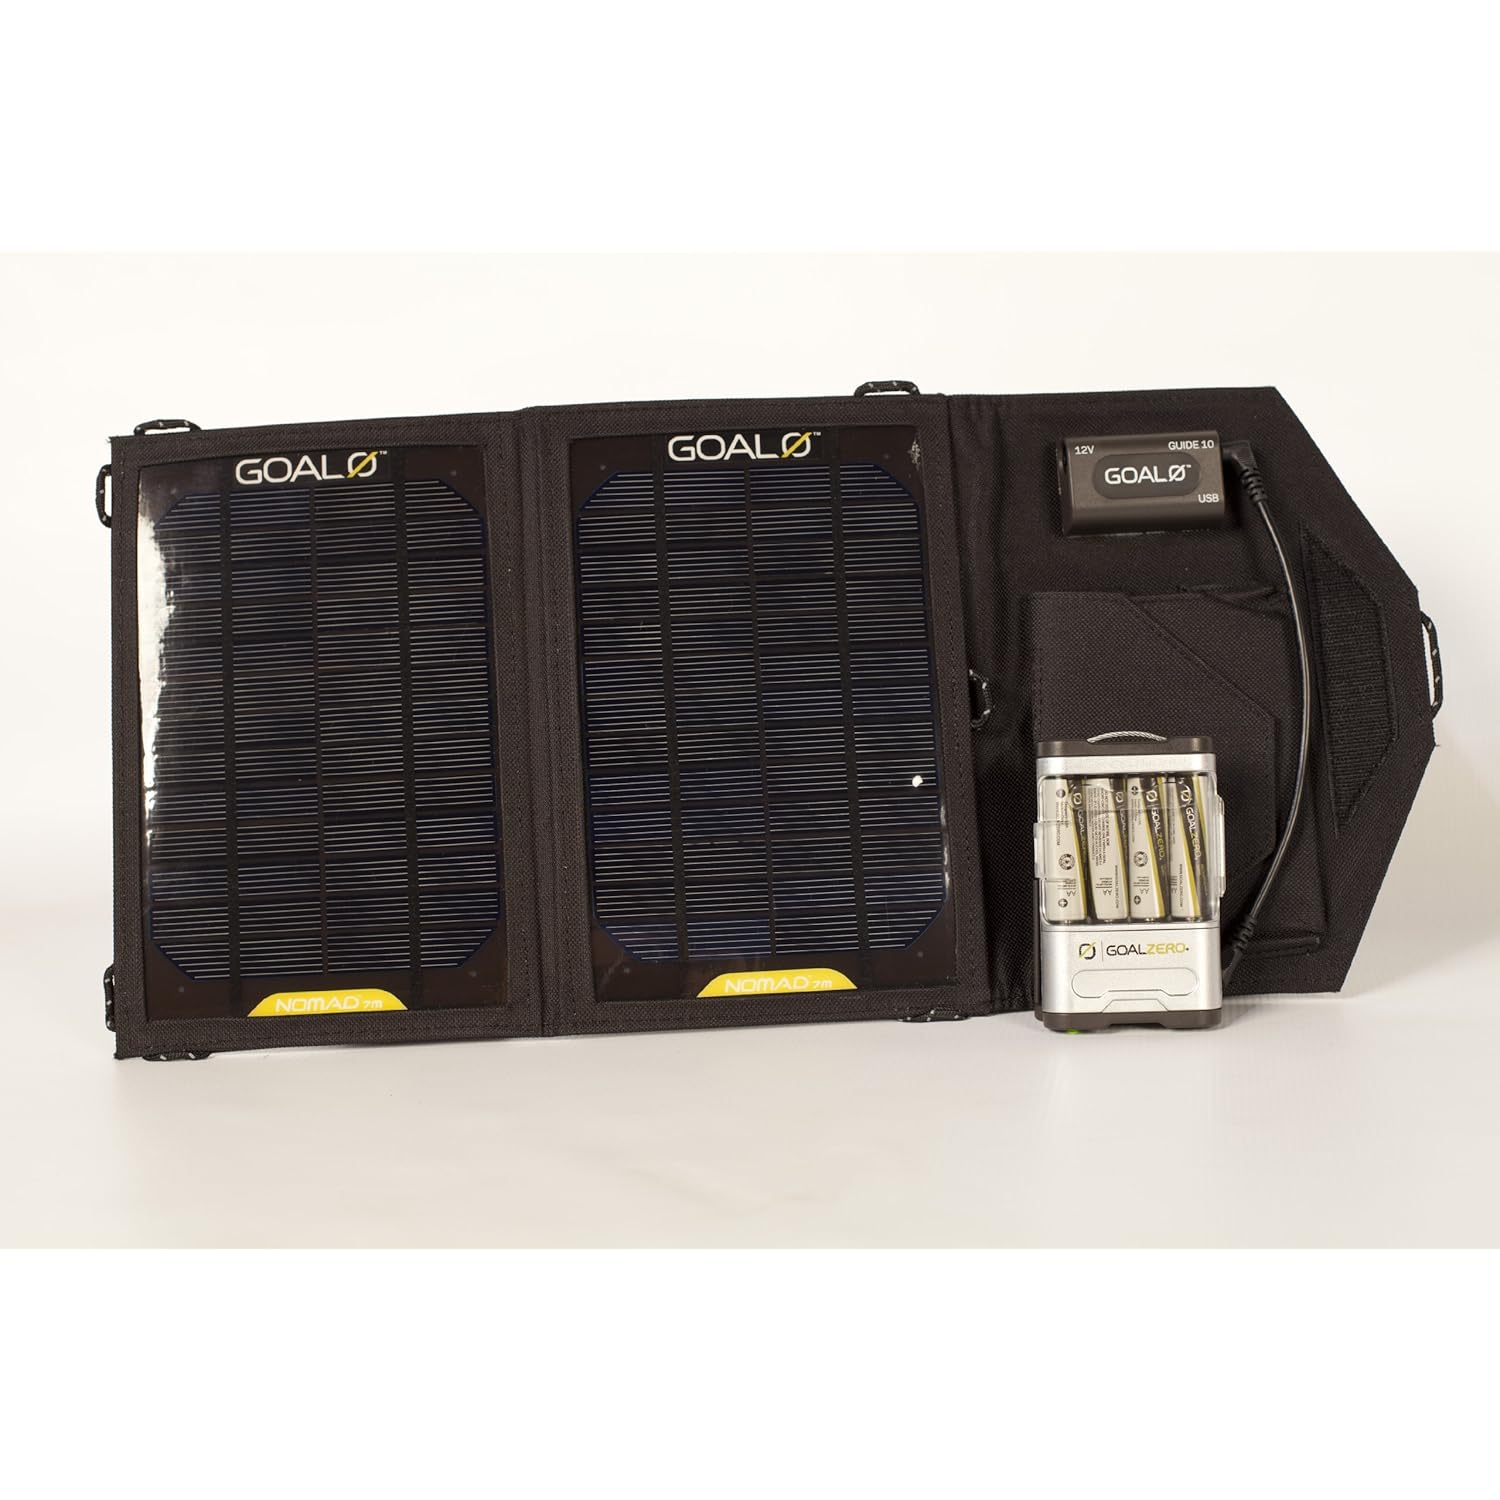
2. Goal Zero Guide 10 Adventure Kit
The Goal Zero Guide 10 Adventure Kit is a an ultra-lightweight pocket sized complete USB solar charging system. It includes a solar panel, a 12v USB port, 4 rechargeable AA batteries, battery charger pack with LED light and a 12v car charging adaptor.
The batter kit is nice, because you can use them to power your camera flashes. And, if four is not enough, you can buy add on kits of extra batteries.
The Goal Zero Guide 10 Adventure Kit is lighter, smaller and more powerful than the Brunton solar charger, which has been the standard option for a charger of this type. The whole kit folds up into a small flat bundle that you can easily throw into a pack, glovebox or even your camera bag and it seems like a great mobile charging option for outdoor and adventure photographers, and it’s a little more affordable than the Joos Orange.
2. Soladec Hybrd Solar Charger and Battery Pack
The Soladec Hybrid All-in-one Solar Charger and Battery Pack will charger just about any mobile and USB device. The lithium ion battery will hold a charge up to 2 years and it can be charged via sunlight, AC outlet or USB port.
The Soladec also features a LED lamp that is way brighter than most other devices of this type. It’s highly rated as a reliable, compact and durable unit for backpacking and backcountry travel charger that will withstand the rigors the outdoors.
Support this site: As always, buying gear through these links is like giving me a USB powered thumbs up for writing these tips and gear reviews. Thanks! -Dan
In just two years, the iPad has become an essential tool for many photographers, especially for those who want to go mobile and leave even the laptop at home.
The iPad is certainly the perfect solution for blogging from the road, sharing and emailing your work with friends or clients back home or uploading your new imagery social media sites like Facebook, Twitter, Tumbler and Google+ etc… However, as we all know, you can’t freely transfer photos back and forth between iOS devices and other hardware devices without first syncing to a computer.
Fortunately, there are a few hardware solutions that provide workable options, while still obeying Apple’s iOS design restrictions. These devices allow you to build an iPad photography workflow and make the iPad a truly usable tool for mobile photography.
1. Apple iPad Camera Connection Kit
The Apple iPad Camera Connection Kit is the necessary device for any iPad photography workflow. It’s the first thing you need, so if you don’t have one already, get it.
The Camera Connection Kit comes with two adaptors, one for USB/direct camera transfer, and one for SD cards. With this kit, you can transfer and/or backup photos to your iPad for sharing, uploading to social sites or editing in Photoshop for iPad or in the iPhoto app.
Or you can edit, keyword and tag your photos using the the must-have mobile photography app, Photosmith, which allows you to sync your metadata and images to Lightroom when you get home, and share/export/upload your photos to Dropbox, email, Facebook and Flickr right from the iPad.
The Camera Connection Kit even allows you to shoot tethered with your DSLR right to the iPad. Sort of. Your photos (even RAW) will be uploaded to your iPad as you shoot, but only as thumbnail previews. In order to edit or view them full size, you’ll need to manually select and import them to the iPad’s Photo Library.
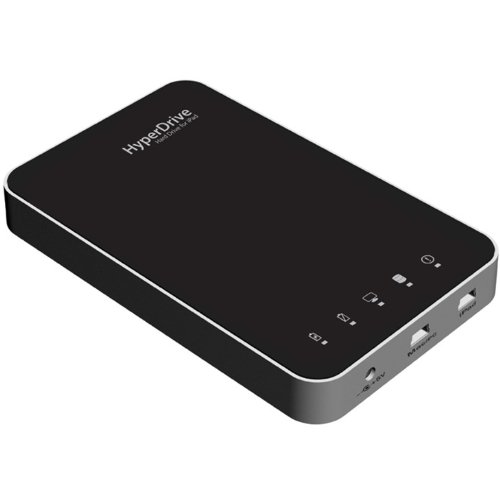
2. Hyper Drive for iPad
The Sanho Hyper Drive for iPad is a USB iPad compatible hard drive. Whenever it’s connected, the iPad will recognize and display the Hyper Drive as an external volume.
You can then view and/or import photos and video files to your iPad photo library, just as if you were importing from the Camera Connection kit. You’ll need the Apple iPad Camera Connection Kit to connect the Hyper Drive to the iPad.
Essentially, with the Hyper Drive, you can hit the road with just a drive and an iPad. It allows you to bring your image archive with you and remotely manage your photography empire as needed without needing a laptop. The limitation to the Hyper Drive is that it only works one way. You can get photos onto the iPad, but not off. That’s better than nothing, though.
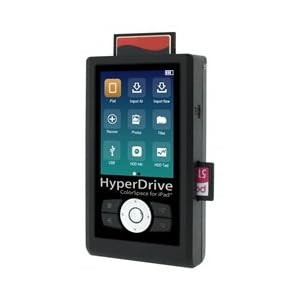
3. Sanho Color Space for iPad
Sanho Color Space for iPad is a USB iPad compatible hard drive that offers plug and play capabilities, just like the Hyper Drive above. The main difference is that the Color Space lets you import and backup photos straight from memory cards right onto the drive. (This is the system that the Pattitucci couple uses.)
The Color Space for iPad is the device that allows true flexibility and lightweight mobility for photographers on the road. Your workflow goes like this: Shoot. Backup cards up to your Color Space. Connect to iPad using the Camera Connection Kit. View, import, process and share your photos and video right from the iPad.
Of course, once your images are on the iPad, you can blog, share, email, edit, tag, backup to Dropbox of send right to your clients. With this kind of operation, I see the Color Space for iPad as the most workable solution for travel and adventure photographers who want to go light and fast.
The Color Space comes in different drive sizes up to 750 GB, but for most people, the smallest model (250GB) is probably adequate. That’s enough space for over 16,000 15MB RAW files.
Even if you have a D800 and shoot full 36MP resolution, that’s still over 3,000 images, and besides, once they’re on the Color Space, you can always preview, rename and delete as needed.
And, since both of these devices act as standard USB hard drives, you can always use them to store and bring your entire music library on the road with you or use them as external drives with your “regular” computers.
Mountain biking, Alaska Style. Shot with the Lensbaby Edge 80 Optic
Tilt shift photography for me is like candy. It tastes good, but way too much of it and you get a little sick to your stomach, which is why I just can’t seem to justify spending $1,700-ish on a real tilt shift lens. Since I’d rather put that kind of money towards a new mountain bike, which is something that I’ll use way more often, like many photographers, I use a Lensbaby whenever I get the urge to tilt.
Lensbaby just released a brand new gizmo called the Edge 80 Optic. It’s an 80mm f/2.8 optic with a 12 bladed adjustable aperture that you can pop into any of the Lensbaby lenses. When aligned straight, the Edge 80 gives a flat field of focus, but when tilted, it creates a slice of sharp focus in a soft field of magical sugar filled blur.
Since I’ve already got a Lensbaby Composer Pro, and since I’m a big fan of the 80s, I couldn’t wait to get my hands on the Edge 80 Optic. Nice Mr. UPS man dropped one off at my door the other day and so I slapped it on my D700 and took it on mountain biking yesterday afternoon to give it a review.
Bear with me. Being my first time using the Edge 80, I probably over-tilted a little bit, but hey, I might as well get it out of my system, right? Despite being limited to your own artistic whimsy, you can actually over tilt the Edge 80 with some subjects. Yes, you’ll get a nice wide blur, but you might lose needed subject matter that helps tell the story. That’s all I’ll say on the matter.
As for quality, I was impressed by the heft, weight and overall build quality of the Edge 80 Optic as soon as I pulled it out of the box. (Lensbaby does really nice packaging!) It’s built with 5 multi coated glass elements in 4 groups and it feels quite solid in your hands. It’s also solid enough to hold up to when you accidentally bang the front of the lens against your metal bike stem. Believe me. I hit it pretty hard while riding with the camera around my neck with no damage done.
Being 80mm, it falls right in that sweet spot of a great fast short telephoto lens, which makes it an extremely versatile tool for all types of photography, and gives your imagery a more professional look. I love my 85mm f/1.8 for portraits and as a lightweight outdoor lens, so the Lensbaby Edge 80 Optic was an easy visual transition for me. Even without tilting, it’s got a shallow depth of field and produces wonderful background blur.
In use, the glass is good. They’re sharp, especially when you stop them down. Outside, though I tend to shoot fairly wide open, mostly so that I can see better. Since the Lensbaby has a manual aperture control, the blades stay stopped down when you turn the dial. Add to the fact that they’re all manual focus and manual exposure, Lensbabies can be pretty challenging to use outside. If you like to make things a little harder, though, you can definitely get some cool results.
I find the key to using a Lensbaby on fast breaking scenes like sports and adventure, where you’ve got constantly changing subject distances, is to put the camera on high speed continuous mode and just go crazy with the shutter. Shoot tons of frames. Shoot more than you normally would in the hopes that as you keep focusing on your moving subject, you’ll nail at least one sharp image. So far, this technique has worked for me.
Also, with such a variable amount of shifting, you can tilt your way into a corner with a very narrow slice of focus. Depending on your subject matter, your slice might be overly visible, or else you can have such a tiny delineation between what’s sharp and what’s blurred on your subject. Again, that’s where shooting lots of frames helps.
Overall, the Lensbaby Edge 80 Optic is a cool lens. I might even prefer this over the Sweet 35 Optic, but only because, as I said, I love the short telephoto look. It also might be sharper at the edges, simply because it has more narrow field of view, however, I’ll have to test further to confirm this. One nice difference is that even if you tilt the Edge 80 all the way, you don’t get vignetting like you do on the wider angle Sweet 35 Optic.
It’s a versatile lens for a wide variety of outdoor photography subjects, and if you already have one of the Lensbaby bodies, such as the Composer Pro, the $299 price tag is pretty easy to handle for a well made piece of gear that will give you tons of creative options. This is especially true when you consider that by using it flat field, you effectively get a nice sharp and fast 80mm f/2.8 lens thrown into the deal. Check out this video tutorial for a full explanation of the Edge 80 capabilities.
I’ll post more Edge 80 Optic shots as I take them, and I promise, I won’t tilt quite so much next time.
You want to take the next step from amateur to pro, but you have no idea how you can start earning a living from photography. This e-book answers many of your questions about the industry and the business-side of photography.
With this e-book, you will learn the ins and outs of the photography business. This book isn’t about how to take better photos, it’s about taking your hobby into a full-time career. This is the book to read if you need to know about the business and logistics side of a photography career.
Making the Image
Making the Image is a conceptual guide to have you thinking outside of the box so you can start creating beautiful images. With this guide, you’ll be able to learn how you can take beautiful photos in order to create true emotional impact with your audience.
Bailey utilizes beautiful imagery from his own portfolio so you can easily grasp the concepts that he’s teaching. For your convenience, the book is horizontally formatted, making it easily readable on computers and iPads.
Going Fast with Light
Going Fast with Light teaches you the nitty-gritty technical details so you can properly use your tools to take better photos. Specifically, you’ll learn about using off-camera flash in outdoor settings, where even the best photographers have trouble against the elements of nature.
With the techniques used by Dan Bailey, you’ll be able to efficiently take control of lighting situations even when you face great challenges such as the sun, and you’ll be able to do it without having to lug cumbersome, heavy lighting equipment.


 The Sanho
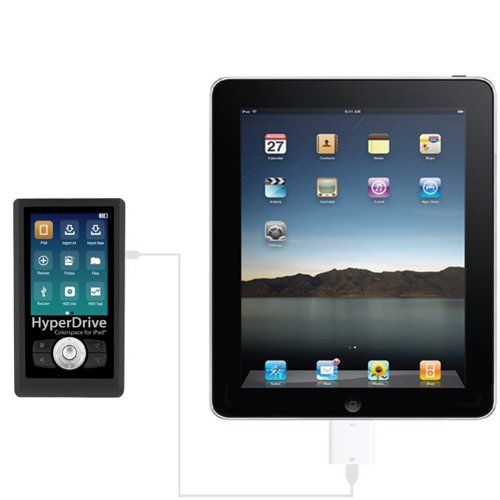


 How to Become a Pro Photographer


