Patagonia has long been on of my favorite and best clients. Over the years, they’ve used quite a few of my shots in their catalogs and advertisements and so I’m very excited that the editors chose one of my images to be included in this book.
Filled with awesome shots from around the globe that were taken by a long list of legendary adventurers and photographers, I feel like I’ve been invited to sit at the head table in the giant’s throne room.
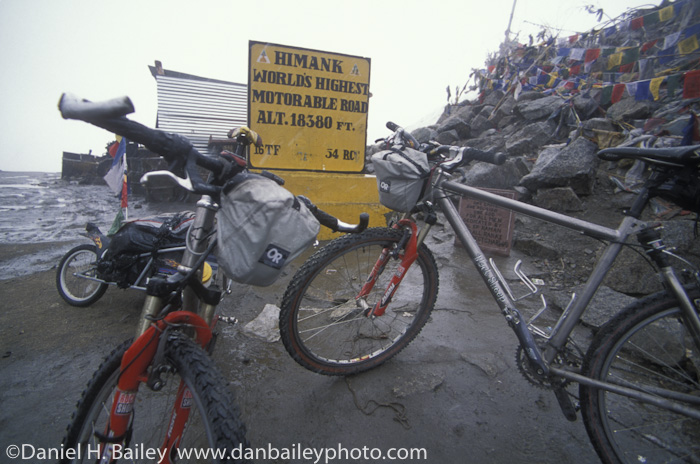
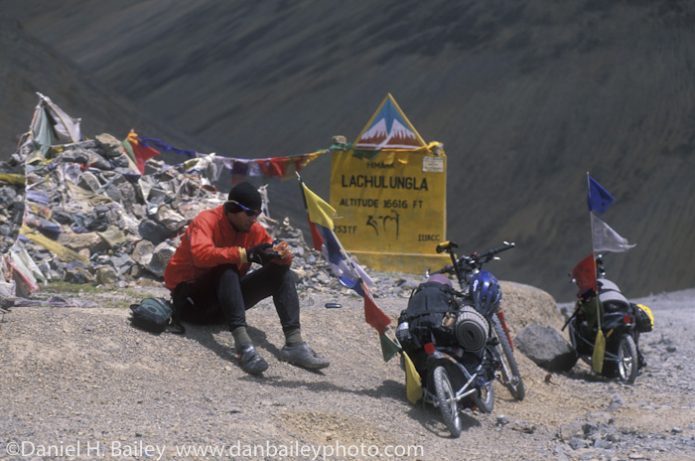
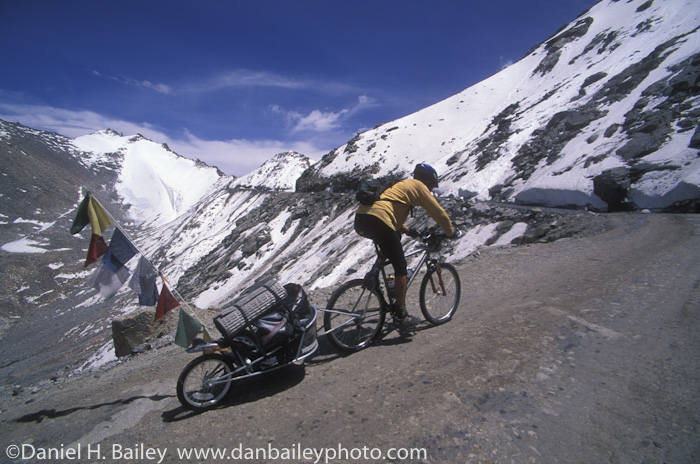
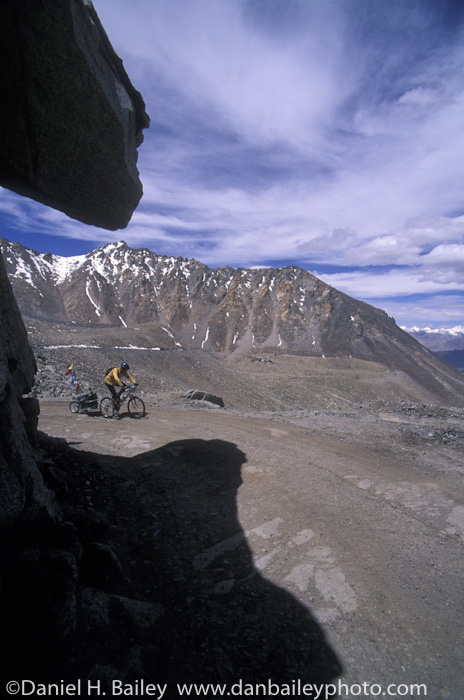
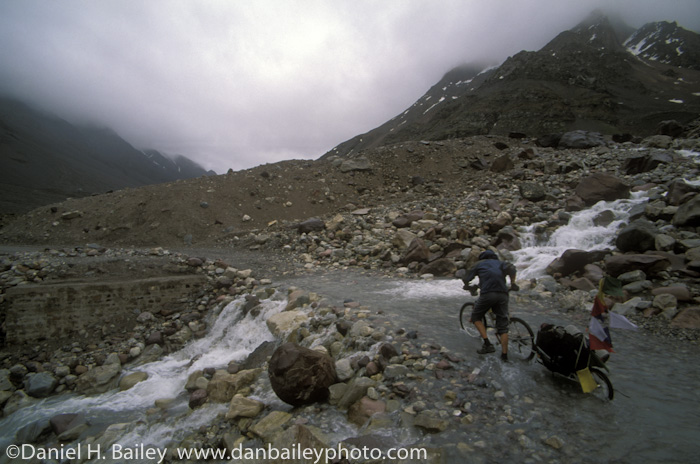
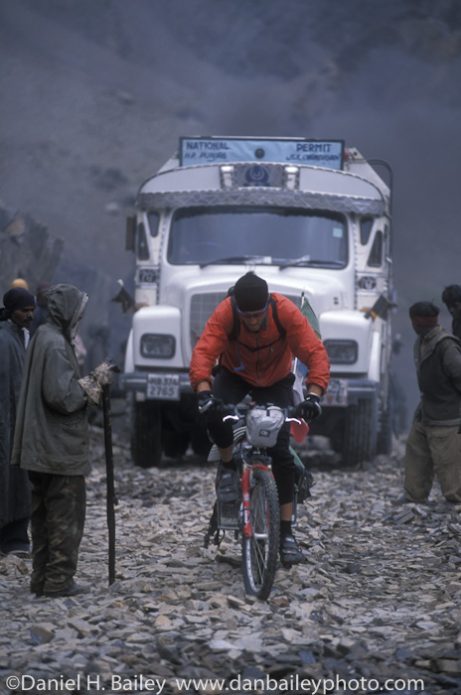
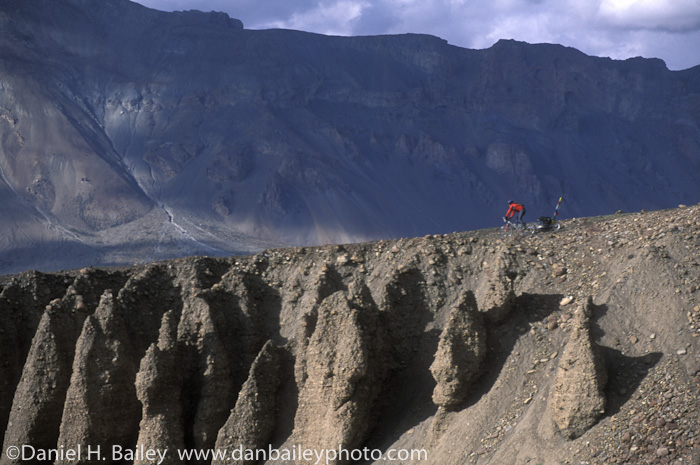
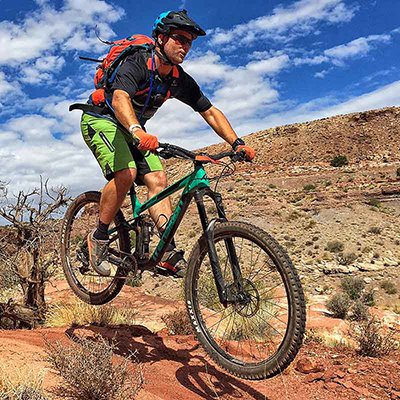
The editors selected one the shots from the mountain bike trip into Himalayan region of Ladakh, India that I took in 2001 with my good friend, Eric Parsons. During the trip, we pulled trailers up and over four passes over 16,000 feet, plus the Tanglang La, at 17,500 feet and the Khardung La, which at 18,380, feet is the highest established road on the planet.
It was during that trip that Eric began developing the ideas that have evolved into his successful adventure bike bag business, Revelate Designs. Check out his website to see an innovative selection of rackless lightweight touring gear that’s designed for bikepacking, distance road biking, expedition touring, winter riding / racing and everything in between.
Get “Unexpected” here. Makes a great gift for the dirt bag adventure lover and armchair expedition leader in your life.
As a photographer I spend much of my time outdoors, exploring the landscapes and cityscapes, photographing as I go. I rarely know ahead of time exactly which focal lengths I’m likely to use, how close I’ll need to get to a subject, etc. For this reason I have always used Nikkor zoom lenses from Nikon. The zoom provides the flexibility I need to keep from constantly swapping lenses on my Nikon D700. One of the drawbacks of pro zooms though, is that they tend to be heavy, and they usually cover a somewhat limited focal range when they carry a fast aperture.
For example, the Nikkor AF-S 24-70mm f/2.8 is a fantastic lens, but if you need to really reach out and grab a distant subject, 70mm is not going to cut it most of the time. It’s also fairly large and heavy as standard zooms go. A full compliment of Nikkor pro zooms could include the above-noted lens, the AF-S 14-24mm f/2.8 on the wide angle side, and the new AF-S 70-200mm f/2.8 VR II on the telephoto side. That camera bag will get heavy in a hurry!
Enter the new AF-S 24-120mm f/4 zoom with 2nd Generation Vibration Reduction technology from Nikon. Rarely does a lens come along that has both a wide focal range and professional grade optics, while maintaining a relatively fast aperture through the entire focal range. This lens has all of those qualities and allows me to shoot close-in macro shots and wide landscapes equally well.
The first thing I noticed is that the lens balances very well when hand-held on my D700. It doesn’t create a front- or back-heavy feeling, and the zoom and focus rings are situated in the perfect spot. Essentially I can balance the lens near the base of my index finger, while using my thumb and index fingers to quickly rotate either the zoom or focus ring without moving my hand around. Also worth noting is that the Manual/Automatic focus switch, the VR switch, and the VR Mode switch are all easily adjusted my thumb as well (on the balancing hand).
The only complaint that I have about the ergonomics is that the focus ring is narrow and can be a little difficult to find by feel, if you have any kind of glove or protective outerwear on your finger tips when shooting. This past weekend I was shooting in a wet, snowy environment with fingerless gloves and one covered thumb, but I did have to stop, look and place my (slightly numb) fingers on the right spot two or three times. Not a major issue but worth noting if you’ve had this problem with other lenses before.
Performance-wise, this lens does a great job, considering the focal length it covers. It even does well with some Macro subjects, although the minimum focus distance (about 1.5’) is not comparable to a true macro lens. The Vibration Reduction feature is pretty amazing. I’m out there shivering in the snow, trying to use my elbows (pulled into my chest) as the makeshift tripod, and I’m thinking, “there’s no way the VR is going to work like this”. I could see clearly through the finder that I wasn’t holding the camera steady, but it worked. Repeatedly. I think in most shooting situations, you won’t need the “Active” mode, which really kicks the VR into high gear.
The auto-focus also works seamlessly, which is what you’d expect from an AF-S lens. During two full days of relatively low contrast lighting, I only had one or two instances of “focus seeking” where the lens focus switched rapidly between adjacent objects or textures, forcing me to change the zoom slightly and refocus. Bokeh at F4 and is decent when zoomed in on close-by subjects. Optically the glass produces very sharp detail and accurate colors, with modest vignetting at the low end of the aperture spectrum.
While the MSRP isn’t cheap, at $1299 this lens is a solid value considering what it delivers. High quality optics, easy to work with on the camera, light weight, and can work equally well for portraits, landscapes or macro. How many lenses can you say that about? Highly Recommended.
Welcome to Day 4 of Landscape week. Yesterday we took a look at all essential tool of the landscape photographer, the tripod, and reviewed a few models by Manfrotto, Slik and Gitzo. Today we talk bags, specifically camera backpacks.
A good camera pack will not only allow you to cart all of your camera gear into the backcountry, it will keep your equipment organized, and it will be comfortable to wear during those long wilderness treks that you take to get the ideal vantage points for your imagery.
When shopping for a camera pack that’s ideal for outdoor photography, you’ll want to make sure you choose a bag that’s big enough to fit the gear that you’re likely to take out with you, while leaving room for the other essential items that you’ll probably want in there, like food, water and a jacket.
There are two schools of thought here: You can either get a bag that’s small enough to let you go light and fast, or one that’s big enough to carry everything. It all comes down to what works best for you. Some photographers like to go out with a single body and one or two lenses, while others like to take their entire inventory of gear with them. Like I said, whichever works for you. Of course, I make this sound so simple, but anyone who’s followed this blog for awhile knows that I have camera bag issues.
There are so many good choices out there, so here are 5 options to get you started, in no particular order. As you shop around, you’ll start to get a feel for what works for you and your style of photography.
One final note. If you click through one of the Amazon links on my site and make a purchase, you’ll actually be helping me out. It won’t have any affect on your price, but I’ll receive a small commission from Amazon for the referral. So, if you value the content and reviews that I post here, then consider that your way of making a free donation and showing me your appreciation for my efforts the next time you’re ready to buy some new gear.
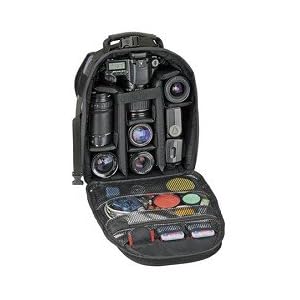
Tamrac has been making high quality, durable bags for outdoor photographers for a number of years. Their Adventure 75 is a compact photo backpack that will hold most DLSRs with an attached lens, as well as 3-4 additional lenses, flash and accessories.
Padded with close-cell foam, it includes a cinch strap to keep the camera in place, a foam-padded backpack harness, adjustable waist strap, a tripod attachment system, customizable dividers, reinforced mesh pocket and front accessory pocket.
This is a great sized, all around camera backpack. It offers lots of flexibility, and it’s rugged enough to weather the elements. My first waist pack was made by Tamrac and it lasted for years. I think I still have it somewhere.
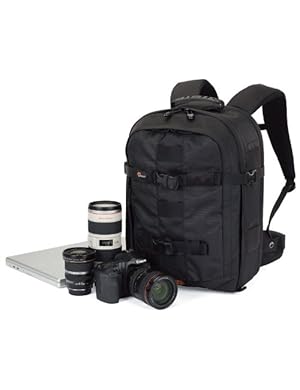
This thing is big enough to carry a couple of DLSRs, a handful of lenses, including my 80-200mm f2.8 and 14mm f2.8, a flash or two and other accessories. It even has a laptop compartment.
It’s a pro quality bag that features a rain cover, a tripod holder, compression straps, multiple storage pockets where you can keep your spare model releases, promo cards, phone, cookies, windbreaker and other essential items. It gets very high reviews
LowePro has been making bags since 1967 and they’ve got it right. They’re among the most used bags by professional outdoor and adventure photographers and for good reason. They do the job and they stand up well over time. I’ve got two Lowepro packs and know lots of other shooters who use them.
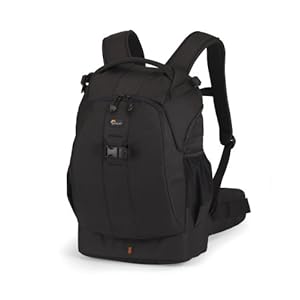
These Lowepro Flipside packs are really catching on. They have great function and value, they’re big enough to hold a good amount of essential camera gear and small enough to be unassuming easy to carry onto an airplane.
The unique back entry compartment allows access and security to the bag when it’s being worn. Outer storage panels hold all your personal gear, and a removable accessory pouch allows you to take all your chargers and manuals with your and leave them behind when you don’t need them out on the shoot.
It has a tripod holder, a mesh side pocket, memory card pockets, mesh side pockets, front storage panel, silent zipper pulls, accessory loops and all weather cover. It will actually hold quite a bit of gear: single DLSR body with attached lens and a handful of other lenses and flash.
The Flipside packs are perfect for the travel photographer or the landscape shooter who wants to go with a more streamlined pack. The Flipside design also comes in a number of other sizes, and also encompasses the Fastpack series. See the rest of the Lowepro Flipside packs here.
Click Elite is a new company that makes performance packs for adventure photographers. They feature well made, rugged construction, and sleek designs that are designed to allow mobility while carrying your gear.
They’re not just camera backpacks, instead they function like a regular backpack that also carries your photo gear in an efficient and accessible way. They’re made for active photographers who move light and fast over long distances as they pursue their craft.
The Medium Nature Pack offers 600 cubic inches of space in the top compartment, where you carry your regular outdoor clothing, food and water, and a 450 cubic inch camera compartment on the bottom of the pack.
Modular organization allows you to secure and protect your camera gear as well as your memory cards, hard drive, cables, business cards, etc… and they also have a rain cover and a hydration system. Also, their chest pouch attaches to the shoulder straps in case you want to carry your camera out front.
They’re great all around packs for hiking, biking and even skiing. I haven’t tried one out yet, but I’ve give them a pretty thorough look at the store and I must say, I’m impressed with what they’ve come up with. They’re good packs that could even make for a functional day, overnight or weekend travel pack. If you’re an active photographer, I’d highly recommend checking these out.
Tenba is another company that makes great outdoor camera backpacks. They’re rugged, well built and can hold as much gear as you want to cram into them.
The Shootout series comes in four sizes, plus a rolling case, but the Mini seems like the perfect size for most landscape photographers. It holds a surprising amount of camera gear, lenses, accessories and personal items. It’s listed size says that it will hold 2 DLSRs, 4-6 lenses up to 70-200mm and a flash. I’d say that’s enough gear to make great photos outside!
It comes with a wraparound weather cover, a tripod holder, rear bungee cord, detachable media card wallet and a second pouch for a phone or iPod, and a decent backpack harness system.
All in all, the Mini looks like a great little pack, but if you need more storage, you might want to move up to the Shootout Medium.
Perhaps more than any other piece of gear, the tripod says “Landscape Photographer.” It’s our easel. Our drafting table. Our number 2 pencil. It’s what holds our camera steady as we study the world in front of us and painstakingly compose what we hope will be the beautiful photograph that defines the rest of our photography career and launches us into the realm of the masters.
Of course, not all images that we create end up being stunning, one of a kind images that sell over and over again. In fact, some of the images we make are just practice sketches, but whether we’re shooting for practice or for real, if there is such a difference, the fact remains that a good tripod is an essential piece of gear.
Sturdy, solid and lightweight. That’s how we like them. Sturdy because they get used and abused as we’re lug them around outside through the wilderness and under the elements and lightweight because, extra pounds slow you down when you’re trying to hike to the top of the peak for sunset.
With that criteria in mind, here are seven of the best tripods on the market that fit the bill for outdoor, mountain and travel photographers. The list is by no means complete, so if you have a favorite that I left off the list, you can add it in the comments section below. I’ve limited the list to legs only, figuring that everyone has their own preference for tripod heads.
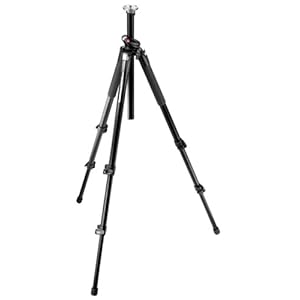
This is the Toyota Truck of tripods. Formerly the venerable Bogen 3001, it’s been reworked and renamed. The big new difference is that it has a unique center column design that allows you to extend it all the way up and swing it to a horizontal position. It also features a new bubble level.
It’s not the lightest, tripod on the market, nor is it the heaviest, but it’s a reliable, versatile choice for pro and amateur photographers everywhere. It’s got three sections that extend up to 63″, and it closes down to 23″. The legs open super wide allowing you to set it up in an exceptionally low profile, and it even allows you to reverse the head and place it on the bottom of the center column for macro and extreme low angle shooting.
With flip lock legs, it sets up very quickly. It weighs 4 lbs, and it will hold 15 lbs, which is plenty strong for just about every DLSR. I’ve had 2 Bogen 3001s for years and they’ve served me quite well. With the new design, I’d highly recommend this tripod as a great all around model that most photographers would find perfectly adequate for their landscape shooting needs.
If you need slightly higher load capacity, then you might consider the Manfrotto 055XPROB, which is identical in features, but extends to 70″, weighs 5 lbs and supports 15 lbs.
This one is very similar to the one I mentioned above, but it’s made of carbon fiber, which has very high strength to weight ratio. It also has a removable center column, which, if you leave it behind, makes the tripod even lighter.
This one has no level, but some heads come with levels if you decide you need that feature. Another great all around tripod, this is ideal for backpacking, traveling and those times when you need to go light and fast.
Overall, I think that the Manfrotto 190CX3 is one of the best carbon Fiber Tripod values around.
A compact tripod with a bargain price, this one is surprisingly good for it’s weight and size. Weighing in at 2.5 lbs, it will extend to 67″ and collapse to 19″. Features include a reversible center column for low-to-the-ground shooting, liquid level, legs that splay out to wide angles for added stability and low angle photography, a quick release head and padded legs for comfort when carrying and handling it in the cold.
At just under 90 bucks, this is a great affordable tripod that’s ideal for photographers who use some of the lighter weight DLSRs. The head is not strong enough to support heavier cameras and lenses, especially when shooting verticals, but it should hold up a Nikon D300 with a wide angle or short telephoto lens just fine.
If you’re looking for a good budget tripod or just want one that has a lot of bang for the buck, this might be your choice.
Oben is a lesser known brand, but they make high quality tripods that are both lightweight and affordable. The CT-3561 is a 5-section tripod that folds down to 16.8″, extends to 64.3″ and only weighs 3.1 lb.
It’s very compact because the legs fold back on themselves, making it an ideal choice as both a backpacking tripod and travel tripod. It’s also heavy duty enough for pro use, as it has a 12 lb. load capacity.
With twist lock legs sections that allow for one handed operation, a center column hook that lets you attach a weighted pack or bag for added stability and a full pan and tilt ball Arca style quick release head, the Oben CT-3561 is certainly worth considering. In fact, their entire line of tripods is worth a second look.
Noone ever said Gitzos were cheap, but you get what you pay for. Anyone whose ever owned one will tell you that Gitzo tripods are the best tripods on the market. Period. They’re rock solid, incredibly well built, lightweight and get the job done every single time.
I realize that many people will balk at spending over $500 on a tripod, but how much did you spend on your high megapixel camera? How much on your really good lenses? If you’re serious about landscape photography, then a good tripod is an absolute necessity and well worth the money you spend on it. And if you sell you work, you could easily pay for it with one or two sales of that fantastic image that happens to be tack sharp because you used an exceptionally sturdy tripod.
The Gitzo GT1545T Carbon Fiber Traveler has 4 leg sections and a head that folds inside the legs when collapsed, which makes it one of the smallest collapsing tripod at just over 13″. It extends to 57″ and will easily support any DLSR and all but the heaviest lenses. The legs open in two positions and you can remove the reversible center column to save weight and set the tripod a just above ground level.
Pound for pound and ounce for ounce, this is one of the best, most versatile tripods you can buy. Does your photography deserve that? (I recently bought my first Gitzo the GT0545T w/head. It’s the smallest model in the Traveler Series. I like it because it’s more compact, but definitely sturdy enough for mirrorless cameras.
Cost: Around $699 w/o head
“
Lovin' my Gitzo 1541 > RT @Danbaileyphoto: 3 Ultra Lightweight Tripods for Outdoor Photography http://t.co/IZurlQpJ
The Ferrari of tripods, the Gitzo carbon fiber Mountaineer is the tripod that sets the standard for performance and quality. With exceptional strength to weight ratio, this tripod offers maximum rigidity, vibration absorption and lightweight. It weighs less than 3 lbs, closes down to 16″, extends to 53″ and will support 26 lbs of camera equipment.
It has a reversible and removable center colum, legs that will open to a minimum height of 8″ off the ground. Put simply, the Gitzo Mountaineer will hold steady any camera gear setup that you can put on top of it.
It’s one of the best tripods you can buy. Period. Take this one into the backcountry and you won’t regret it.
Cost: Around $700 w/o head
Edit: Slightly less in cost is the Gitzo GT0531 Series Carbon Fiber Tripod. At around $400, it offers extreme lightweight (it’s over a half pound lighter than the Traveler) 3 leg sections that can splay out, and an great durability for it’s weight. The GT0531 is rated for 11 lbs and only weighs 1.59 lbs without head.
“
@Danbaileyphoto I love my Gitzo Mountaineer.
Steve Coleman
“
My vote? Gitzo Mountaineer > RT @Danbaileyphoto: Great tripods for outdoor and landscape photography
You want easy? You want inexpensive? You want convenient? This is the one.
Every photographer should own a Gorillapod. It’s a remarkable and versatile little beast that will get the job done in a pinch when you find yourself out in the wild without your regular tripod. It stands up. It wraps around trees and poles. This thing lets you mount your camera just about anywhere, and it fits in or on any camera bag, pocket, purse or glove compartment.
They’re also great for holding remote, off-camera flashes in unique places. All in all, they’re awesome little supports that are great for a variety of outdoor and travel photography applications.
After writing my 3 Simple Tips for Shooting More Dynamic Landscapes post yesterday, I just figured that I’d spend the rest of the week on landscapes. Why? because as outdoor photographers, we LOVE shooting landscapes. And besides, it’s the holidays, and I figured that I’d give you a few more ideas that you can put on your gift wish lists!
Today we look at 5 great books that teach you how to shoot better landscapes. We can always learn from books, and I’ll venture to say that most of us have quite a collection of books on the subject on our bookshelves at home. These photographer authors are all masters at their craft and they have great things to say about the creative and technical process of making great landscape images.
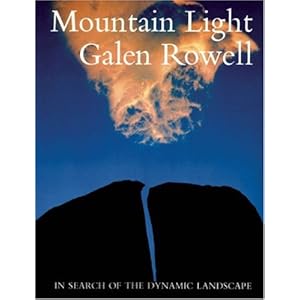
This is still my all time favorite book on outdoor and landscape photography. Galen Rowell was the father of modern day adventure photography and his vision has inspired countless photographers around the world. Considered the bible for mountain photographers, this book contains 80 of Galen’s finest images and essays about the creative, technical, environmental and even philosophical considerations that went into the process of creating them.
The son of a philosophy professor father and a musician mother who were both avid naturalists, Galen had a unique insight into the outside world and his writing style is very mature and intelligent. This is no mere “use this lens and this filter with this shutter speed” type of book, it explores the craft of outdoor photography with well thought out expertise and passion.
Unfortunately, Mountain Light has been out of print for years, but there are still used copies hanging around. Not sure why anyone would want to sell their copy of this excellent book, but if you find one out there, grab it and consider yourself fortunate to own one of the finest photography books ever published.
I’ve long been a fan of Tim’s work. In some ways, he seems like the quintessential landscape photographer- friendly, unassuming and totally immersed in his craft. That, and he’s makes beautiful imagery!
This book is a full, step by step manual of landscape photography. With chapters that start at “Outfitting for the Landscape,” and move through “Shooting Fundamentals,” “Creating an Image,” and “Spectacular Settings,” Tim explains exactly what he does in each situation and how he thinks about the light, the composition and the setting, and how he manages the equipment for each type of image.
He explores how to use filters, how to recognize and find great shooting sites, how to get correct exposure every time, how to record panorama and reflection type imagery and more.
Written in a simple, yet detailed, insightful and intelligent style, this book is an excellent reference manual for anyone from beginner to pro who wants to learn the craft of landscape photography and improve the quality of their imagery. Plus it’s published by the Audubon Society. Who else looks out more for the environment than they do?
Written by a photographer who literally lives in the shadow of Ansel Adams at the edge of Yosemite National Park, this book presents a unique look at landscape photography. Michael Frye explores the detailed methods that Ansel Adams used in his photographic process and applies them to the modern methods of digital photography.
Using well known photos by Ansel Adams, Edward Weston and Elliot Porter, this book breaks down the art of creating iconic images and explains the Zone System in a way that digital photographers can understand and apply to their own style of photography.
Exploring the technical, creative and post processing aspects of landscape photography with images of his own, as well as those of the maters, Michael Frye shows you how to visualize, shoot and create powerful photographers using today’s technology.
If you’re a beginning photographer, you may find some parts of this book a bit too advanced; it may be one of those you grow into. However, you’re adept with your equipment and have solid experience with using Photoshop, then this is a excellent learning reference.
Written by regular contributor to Outdoor Photographer magazine David Ward, this book explores the essential attributes of a great landsscape image and discusses how simplicity, ambiguity and beauty are found and translated into successful photographs.
More than just a technical How-To manual, this book delves into the more philosophical and aesthetic aspects of landscape photography and explores how our own personal viewpoint and interpretation of the world around us affects the images that we create.
Put simply, David’s book will make you think. You may even be surprised at what ruminates in our mind as you ponder his essays and insight, but he argues that you can’t create great imagery unless you put some serious thought into the process. He’s right on this point.
Beginning photographers might find this one a bit lacking in practical information, but then again, maybe it will spark your creativity in a new way. It’s definitely unlike most other photography books, and this is by no means a bad thing. It would actually be a great companion to to have alongside a more technical manual, because it has something special to offer that few other books have.
At any rate, Landscape Beyond is a well written and beautifully illustrated book that is certainly worth checking out.
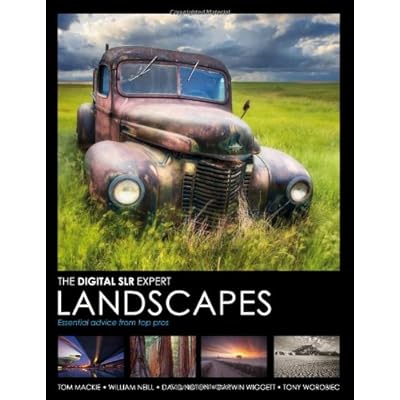
With input by five top photographers, Tom Mackie, Darwin Wiggnet, David Norton, Tony Worobiec and well known nature shooter William Neill, this comprehensive guide outlines the essential techniques and equipment for shooting great landscapes.
Filled with expert tips and hints, and illustrated with outstanding imagery, each chapter offers insight about a different aspect of photography by one of the five authors.
Chapters included are Controlling Exposure, Understanding Light, Composing Landscape Images, Landscape Locations and Landscapes in Black and White. They’re written in a insightful and informative style that’s easy to understand and digest.
One nice thing about this book is that many of the images include a sidebar the details all the technical information and equipment that was used to create the shot, including the type of camera bag that was used to transport the gear to that particular location.
This is a great book for the beginning and emerging photographer. It’s a great primer on both landscape photography as well as digital photography equipment, technique, methods, shooting RAW, color space and more.
As outdoor photographers, landscapes speak to many of us more than any other type of subject. Perhaps it’s because of our inherent connection with nature and because the process involves a solitary and individual method of seeing the world in our own way.
There is great satisfaction in creating dynamic landscapes. As we tromp around outside and lug our bag of gear over the mountains, across the prairie, or the tundra if you live at certain northerly latitudes, and through the forests, we strive not only to make photographs that simply document the location of our chosen subject, (a simple GPS would suffice if that was our goal) we look to make images that communicate a certain power and emotion to our viewers that transcend time, place and familiarity with the scene.
As we brave the cold, the wind, sometimes the rain, and often a long walk back in the dark, we seek to create dynamic representations of the landscape that we hope will work their way into the consciousness of the people who see our work, and that will become the universal visual idea of that specific location or region, even if our viewers have never seen the place with their own eyes.
Most importantly, we seek to create photographs that transmit our own personal ideas about these scenes to our viewer, which might be defined as simple concepts such as majesty, tranquility and wonder. Often times, images that do a great job communicating simple concepts end up being the most powerful and remembered photographs.
This eternal quest to create the perfect landscape is like some innate instinct that drives us to keep heading out into the wild with our cameras as we keep trying to perfect our craft. It makes us want to buy books and new lenses or tripods, study the works of others, and read magazines and blogs as we endlessly devour information that we hope will make us that much more prepared for our next outing.
It’s a never ending process, and probably one that we’ll keep pursuing for as long as we live. That inspires us, because we know that for all the landscapes that we’ve shot up to this point, we still have many of our best images ahead of us.
Here are three simple techniques that I try to incorporate into my own landscape imagery. They’re tried and true tips, and probably stuff you already know anyway, but hey, you can never read too much about how to improve your landscapes, right?
Maybe they’ll help inspire you, or at the very least least remind you, so that they’re fresh in your mind for the next time when you head outside with your camera.
1. Wait for the light
3 Rocks, Joshua Tree National Park, California. Nikon N90s, 17mm f3.5 lens
This is most the important one. If you don’t do anything else to improve your landscapes, make sure you shoot under the most dramatic, beautiful, serene, vibrant, moody, soothing, edgy and appealing light that you can find. You’ll probably have to wait for it, and if you stand around outside enough times, you’re bound to be rewarded on rare occasion. Good light doesn’t happen all the time and extraordinary light is indeed a special treat. You have to get out there and wait for it, over and over again. Be patient, and eventually, it will come.
2. Create simple compositions
Crescent moon and North Six Shooter Tower, Canyonlands, Utah. Nikon N90s, 80-200mm f2.8 lens
The best landscapes portray simplicity in their subject matter. Usually, this means focusing on just one important element in the scene, or better yet, the relationship between one element and another. Don’t mistake this for including only one piece of subject matter, because then you’ll lose your sense of place. Instead, accentuate your subject with proper placement in the frame and through it’s relationship to the other elements in your composition.
Treat your viewfinder like it’s your canvas and make a very conscious decision about every single thing you include in your photograph. Make the picture be what you want it to be and don’t clutter it up with elements that don’t relate to your main subject. A crowded photo is a lost photo that will only confuse and bore your viewer. Be deliberate and conscious of every square millimeter of your frame.
3. Choose the right lens
Rogers Pass, Selkirk Mountains, Canadian Rockies, British Colombia, Canada, Nikon D200, 85mm f1.8 lens
We often think that wide angle lenses are the best lenses to use for shooting landscapes. This if often true, but it’s not always the case. It depends on the subject matter and what you’re trying to communicate with your photo. There are times when a telephoto lens, or even that often neglected 50mm lens may be the best choice for the scene in front of you.
Think about what you’re trying to say with your photograph, and then consider your vantage point, your foreground, the distance to your subject and the environment around your subject. Maybe you want to isolate your subject against a soft, compressed background that draws the viewer’s attention right to a single sharp piece of subject matter. If so, then reach for your long lens. If you want to show the grand view that holds focus all the way from the foreground to infinity and that shows how your subject relates to it’s greater surroundings, then reach for your wide angle.
Well fellow photographers, December is here and it’s time to make your holiday gift wish lists!
Here are 10 photo related items that you that you probably want on yours. Ok, so it’s all stuff I want, but I figure that since these items are all so cool, them I’m probably not the only one who is hoping to get my hands on them this holiday season.
Of course, like any good photographer, I went out and bought a bunch of stuff for myself right before the holidays, like a Nikon SB900 Speedlight, a Bogen Fiction Magic Arm and a Manfrotto Justin Clamp. I just figured that I’d get some of that big stuff out of the way and leave room for on my list for all these other cool items.
With its 10.1 MP sensor, RAW capability, ultra sharp ED glass lens, built in VR and a host of other features, this thing is the ultimate point and shoot. I’d love to have one of these to carry around with me for those times when I’m not lugging around my D700 and big glass. Basically a bridge between a DSLR and a PS, having something like this would make it so that you were always equipped to capture pro quality images, no matter where you were.
If you’re like me, you keep your favorite shots on the fridge and on the magnetic bulletin board anyway, so why not pin them up with these fun things? Besides, they’ll make you feel right at home when you’re looking at your images away from the computer.
I broke my lightweight tripod last month and haven’t gotten around to replacing it. This would certainly be a great replacement. It extends to 53″, closes down to 16.7″ and weighs less than 3 lbs. Great for backpacking, great for all around photography, and since it’s not made of metal, I won’t freeze my fingers when trying to adjust it during the winter. It’s like carbon fiber handlebars for your camera.
I checked this book out from the library last week and have been poring through it, taking notes and learning a tremendous amount about how to become more proficient with off-camera flashes. It’s an incredible learning resource. After all, Joe McNally is The Man when it comes to creative lighting techniques and I’d love to have my own copy of this awesome book.
I always seem to let my magazine subscriptions run out and forget to renew. This is a great publication and I’ve always learned a lot in the past by having it around. I wonder, though, after reading Chase Jarvis’s call to “Drop The Digital from Photography”, will they eventually just call it “PhotoPro” magazine? Ok, let’s move on.
If you tend to shoot solo, which I often do, this thing is awesome for controlling and diffusing the light from flashes or the sun, or as a quick replacement for a softbox. The ergonomic grip allows you to comfortably hold it with one hand while shooting with the other. You can also attach it to light stand or tripod by using a Bogen Super Clamp – another item that should be on everyone’s wish list. You can never have too many of those things.
I know you’ve seen these things all over the web. It’s probably not something you’d run out and buy for yourself, but wouldn’t it be fun to get as a gift this year?
As I’ve mentioned in previous post, these guys put out the most beautiful, informative and inspiring photography eBooks that I’ve ever seen. Imagine how much you could learn and how much you’d rekindle your passion for photography by reading all 20 of their books?
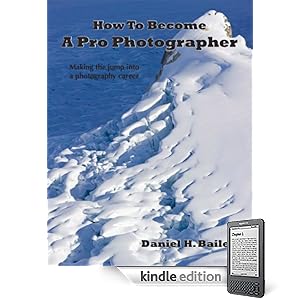
The price is slightly lower, $6.95, with the tradeoff being that the Kindle version contains no photos, so it’s perfect for aspiring and emerging pro photographers who like to read on the go.
This version allows you to delve into the 10,000 words of solid and pertinent information, tips and industry resources that this eBook contains right on your Kindle Reader, or on your iPhone, iPod Touch and iPad if you have the Kindle App.
Of course, you can also read the full, rich PDF version of the eBook on your iPad by purchasing and downloading it right from the device, or by emailing it to yourself if you’ve already purchased the eBook on another computer.
If you’ve already purchased and read this eBook, then please take a minute to leave a customer review on the product page. I’d really appreciate your feedback. Thanks!
I’m excited to welcome my first guest blogger to the site, Anne McKinnell. Anne is a talented photographer from Victoria, British Columbia. Not only does she shoot beautiful images, she’s got some great insight about being an emerging pro, which she shares here in this personal and introspective post. Check out Anne’s website and follow her on Twitter @annemckinnell
Losing Balance, by Anne McKinnell
I am a planner. When I go on a shoot I like to have a clear idea of what kind of shot I want to get and what I need to do to get it. When I go on a road trip I like to plan where I am going, what sights I want to see and what shots I want to get. And I plan enough time to allow for spontaneity.
Now I am planning a career switch. Coming from a business background, I have developed many business plans, communications and marketing plans, project plans, budgets, and the like. But the difference is that those always had a clearly defined target. I knew what I was trying to achieve and who the audience was before I started. Usually because I was contracted to do something specific, so some of those decisions were already made.
But now in the world of photography it all seems so much more wishy washy. I can take it in so many different directions, the decisions seem impossible. I’m not sure whether I should shoot what I love and let the rest fall into place or whether I should be creating a feasible business model.
So I am tackling this on a number of fronts. First I am following some great advice from Chase Jarvis, which is to start building an audience right away. I dived into social networking after resisting it for many years and discovered that I love Twitter! Twitter is helping me greatly with my second goal, learning. I no longer search for information on the internet, the information comes to me with high regard from photographers I admire. It makes it so much easier when three or four of my favorite photographers all tweet about the same excellent learning resource. The third tactic is, of course, planning. I am trying to come up with a variety of ideas to work on and looking at different business models for my future photography business.
Now my goals are starting to get mixed up. In addition to learning photography and planning a business, I am planning how to learn by deciding on some live workshops, some online interactive courses, and some online seminars and podcasts. I am learning how to plan by reading some great information from Dan Bailey’s How to Become a Pro Photographer eBook and Dane Sander’s wonderful book Fast Track Photographer.
There are so many resources is it easy to get buried in all the reading and a couple of days ago I realized I had completely lost my balance. I had a photo assignment to complete for a club I belong to. This month’s assignment was architecture. So I went downtown to the Legislature for some interior shots which is a little different for me. I got myself into the rotunda and set up my camera for a shot with the camera tilted upwards. It was a bit of an awkward position. It was then that I realized to my horror that I forgot how to turn my LCD live preview on! I like to use my LCD for exactly these occasions when the camera is in too awkward of a position to look through the viewfinder. How could this possibly have happened? It didn’t take me long to figure out how to make the live preview come on, but just as quickly I found out I forgot how to change my auto-focus points.
Granted it is a relatively new camera. I bought it for a recent trip, used it for a month solid, and then for the past month I have been in front of my computer processing the shots and reading and social networking.
It was obvious at that point that I have been spending too much time in front of the computer learning and planning, planning how to learn and learning how to plan, tweeting and blogging, downloading and learning new software, and not enough time behind the camera.
Now I have a new plan to create: time management. I need to write down all of the tasks I need to complete in order to accomplish the career switch and assign a priority and time allotment to each of them:
– learning
– planning
– social networking
– writing
– processing
– shooting.
Should I spent a little time each day doing each thing? I don’t think that will give me enough time to focus deeply on any one thing. So maybe I’ll put shooting on the list twice and focus on one thing each day. Or do a little social networking every day and put shooting on the list 3 times a week.
I am still planning the details of that. But for now I am going to stop writing and go figure out how to set my auto-focus points.
With the fresh snow that fell on Thanksgiving, I went ski flying with a pilot friend, Udo Cassee, AKA The Flying Dutchman in his Cessna 170 on Saturday afternoon. We flew up and over the Chugach Mountains to check out the snow conditions, although the winds were a bit too squirrely to land on the glacier that we were scoping out.
After that, we headed west to check out some frozen lakes and rivers near the Susitna River. Udo touched the skis down on one small lake, but being early season, it was pretty rattly. Many of the potential areas are still pretty bare of snow, which makes for much softer landings.
I took quite a few photos during the flight, these are my two favorites. We had sun and blue skies over the mountains, but low overcast over the areas west of Cook Inlet. I used my Nikon SB-800 Speedlight (The SB-900 is the current model) off camera to add some dramatic light to the cockpit in the second photo. If done right, you can get some really great effects with the iTTL capabilities of the Nikon Speedlights.
My fixed Nikkor 14mm f2.8 lens works so well for shooting in confined areas, like inside a Cessna cockpit. It’s considerably smaller and lighter than the Nikkor 14-24mm f2.8, which is also an awesome lens, but when you’re trying to hold the camera with one hand and the flash with the other, that extra half pound savings just makes it that much easier to handle.
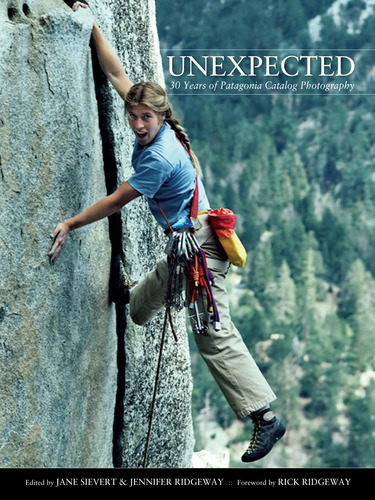 Just out- the gorgeous new book by the photo editors of Patagonia, Unexpected- 30 Years of Patagonia Catalog Photography.


 Yesterday we took a look at a selection of
 It stands up. It wraps around trees and poles. This thing lets you mount your camera just about anywhere, and it fits in or on any camera bag, pocket, purse or glove compartment.