Digital Imaging Tips by Dan Moughamian
For this second HDR tutorial we’ll take a look at the color workflow with Topaz Adjust 4 by Topaz Labs.
If you enjoyed these these tutorials, please head over to Colortrails.com to see more free tips and learn about my Photoshop and Lightroom book. Also feel free to post suggestions below!
And in case you missed it, here’s Working with HDR Efex Pro.
Background
Topaz Labs is the creator of numerous popular Photoshop plugins, ranging from noise reduction software to black and white processing and everything between. For this segment though, we’ll show you how easy it is to create HDR looks using Topaz Adjust 4.
Ease of Use
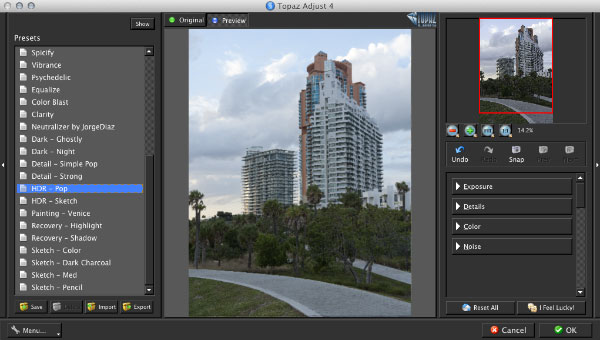
If you’re a Mac user, the Topaz plugin interface may take a little getting used to but it’s easy to use and offers a lot of control over the creative process. Similar to what you find in other plugins from Nik, Topaz plugins use a list of presets (left side), tabs for displaying the original image and preview image (center), and a collection of collapsible control “panels” (right). You can use the menu at bottom left to specify preferences, access online help, check for updates, and more.
Topaz Workflow
For HDR, we already have a couple of presets made for us, and one of them makes it very easy to create an HDR look from a single photograph. My recommendation is to use an exposure that is slightly over-exposed so that you have more data available for the plugin to work with. You shouldn’t have any issue recovering the highlights in most cases. Once you’ve processed the raw file and opened it in Photoshop, choose Filter > Topaz Labs > Topaz Adjust 4. Next choose your preset (HDR – Pop in this case).
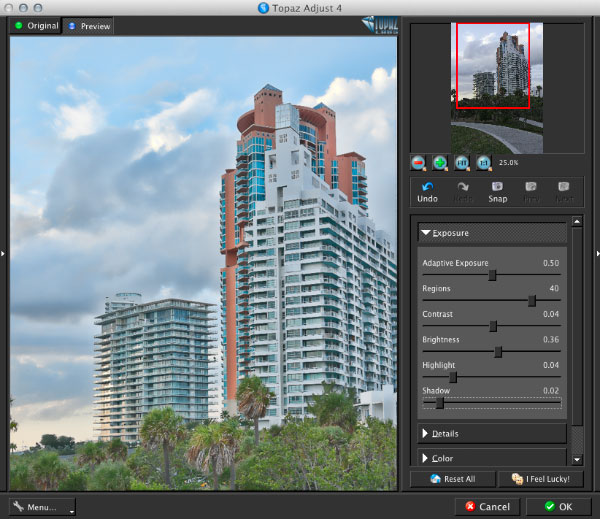
To start the edits, open the panel that says Exposure. Experiment with the Adaptive Exposure and Regions controls, which work together to modify brightness and local contrast. The higher the values, the more illustrative and painterly the look, the lower the values the more natural looking a result you’ll tend to get. Note that will all of the controls in Topaz Adjust, if you mouse over them you will get detailed help text, which is useful since there are only subtle differences between some controls. Below I reduced the default values of both to get closer to the original look of the scene. Here as with the prior example [link to Method 1 article], I paid attention to the highlight details in the clouds to avoid clipping them.
Next, as you boost the Contrast setting, you will notice the stark halos and other characteristics of over-cooked HDR shots will decrease. It will also tend to sharpen the edges of your subjects, which is usually desirable to maintain an element of realism. In the screenshot above, I also increased the Highlight value (which protects the lightest tones from clipping) and decreased the Shadows value (which prevents them from clipping). I did this to make the scene more realistic — the trees were not that bright and the clouds were not pure white. The final steps involve tweaking the details and colors.
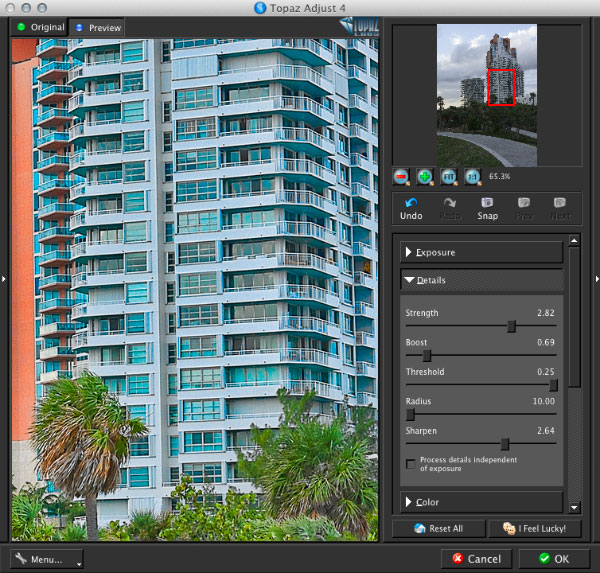
Open the Details panel. Generally, if you took the shots with a tripod and have sharpened the details from of your raw editor, only modest amounts of change are needed to the Strength, Boost and Sharpen sliders IF the objective is to maintain realism, as it was here. The Strength slider and Boost slider work together to enhance both global and localized (or small detail) contrast. Zoom in again and experiment by moving both sliders to extremes (individually) and watch what happens to various areas of detail. For Boost, a very small change will go a very long way! Below I increased the values of each control only slightly.
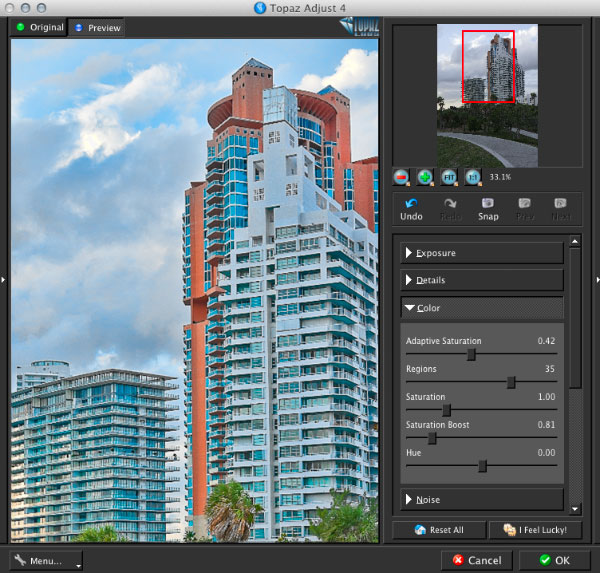
For the color enhancements I like to zoom back out to get a feel for the overall look of the photo. Here again we have an Adaptive control and a Regions control for handling saturation on a localized basis. As with the prior controls you’ll find a small change can make a big difference so don’t over-do it! What I typically find with shots that were taken under relatively darker light, is that a modest adjustment to Adaptive Saturation, Regions and Saturation Boost will achieve the look I want. (Note at lower magnifications, the previews can be a little blurry with this plugin; at least that seems to be the case on recent versions of Mac OS X.)
When finished, click OK and the image will process and open in Photoshop. Within the span of 8 or 10 minutes, you should be able to create realistic and dramatic HDR looks from a single well chosen photograph using Topaz Adjust 4.
————–
Dan Moughamian is an experienced photographer and educator, and has worked
with Adobe Photoshop since the early 1990s. He also has extensive
experience with Photoshop Lightroom, Photoshop Elements, plugins from Nik
software, and many other digital imaging products. As a long-time member
of their testing programs, Dan has collaborated with Adobe Systems to help
enhance many of the core functions in Photoshop, Lightroom, and Elements.
As an educator, Dan’s focus is to help photographers at all levels get the
most from their digital workflows. Tips on raw editing, layer masking,
alpha channels, image adjustments, HDR photography, focus and lighting
effects, and perspective correction, are just a few examples of the topics
he covers. To learn more, you can visit Colortrails.com, and follow Dan on Twitter, and on Google Plus.
He is the Author of Adobe Digital Imaging HOW-TOs- 100 Essential Techniques for Photoshop CS5, Lightroom 3 and Camera RAW 6, and his work has been also been published in Photoshop User Magazine and Photo Techniques Magazine.


[…] Here’s Working with HDR Expose- Part 2. […]
[…] This post was mentioned on Twitter by Dan Moughamian, Daniel H. Bailey. Daniel H. Bailey said: Today on the blog: Working with HDR Expose- Part 2. Video tutorial by @colortrails http://t.co/giwjKc5 @UnifiedColor […]
[…] Continued here: Working with HDR Expose- Part 2, by Dan Moughamian | Dan Bailey's … […]
really helpful. Thanks Dan.
[…] announced Topaz Adjust 5 plug-in for Photoshop, so I thought it would be useful to follow up on the prior Adjust 4 tutorial to show another example of how it can help improve our digital workflows. Aside from some […]