Macphun just released a powerful upgrade to Luminar today. Version “Nepune” adds a host of new features and significant performance enhancements designed to offer additional creative control and streamline your workflow even more. (The update is free to existing Luminar users.)
I’ve been using Luminar extensively for the past seven months and I absolutely love the program. It has an extremely intuitive interface that makes the whole editing process easy, and yes, fun.
With a comprehensive set of over 300 tools and palettes, full RAW support, even for the Fujifilm X Series cameras, plus layers, masking, blend modes, brushes, non-destructive editing, customizable workspaces, object removal and more, Luminar offers a full service, professional quality editing solution for any type of photography. (Right now, Luminar is Mac only, but there will be a Windows version coming later this year.)
Save $10 on Luminar with this link and coupon code DANBAILEY
The best thing about the program is that you can use it however works best for your workflow, style and mood. It runs standalone or as a Lightroom plugin.
If you prefer to edit quickly, say bump up the colors, remove some dust or crop, then you probably don’t need to wade through a multitude of sliders. You can set it up with a workspace that includes only the tools you want, add tools as you need them, or you can make use of the many included presets.
On the other hand, if you want to dive in and perform some serious editing tasks, which might involve things like highlight control, structure, exposure/contrast, layers, texture overlays, or split toning, etc…, you can pull up up any of the almost 40 tool palettes and go to town.
If you’re strictly a RAW shooter and just need an affordable, yet full featured program to make critical adjustments and do your conversions for export to JPEG or TIFF, Luminar is definitely a viable solution.
Useful Tools and Presets
I’ve never been a preset guy, but I love the Luminar presets. They look great, and they’re all unique enough to make it very easy to find one that works. In addition, you can dial them up down from 0-100 percent, which gives a wide range of possible results. (I find that for most of the presets, I like the 20-30% range.)
They’ve got some great tool palettes and filters in there as well. In addition to the essentials, like exposure and tone controls, HSL, dehaze, adjustable gradient, there are a number of creative tools as well, like golden hour, grain, polarizing filter, soft focus, top & bottom lighting and soft glow.
I don’t want processing tasks to be an endless time suck. I want to get in there, make my edits and come out with a great looking image in a reasonable amount of time. In the past few months, I’ve had great success with Luminar, using it to process RAW files and the occasional Fuji JPEGs that needs a slight tweak in order to bring it to its full potential.
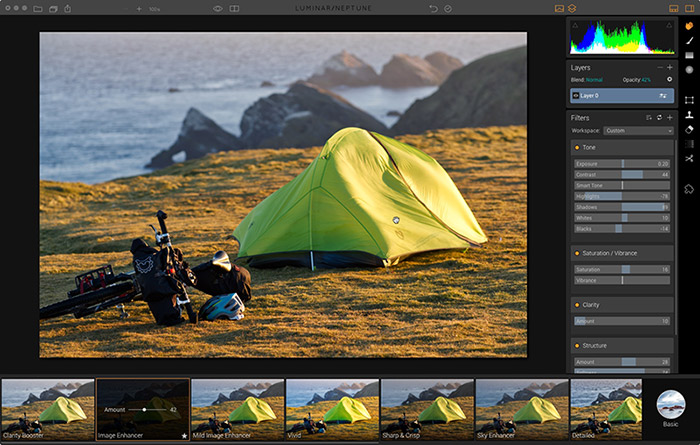
I’ve even had fun exploring the wide array of creative filters and presets, which help me take my images in new directions I might not have thought of, like this photo below.
What’s New in Luminar Version Neptune
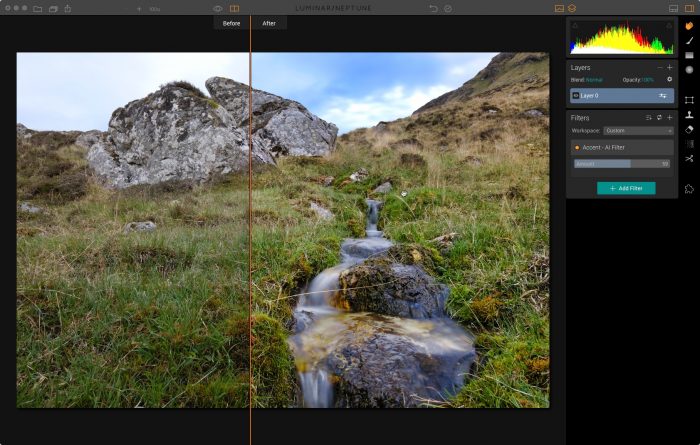
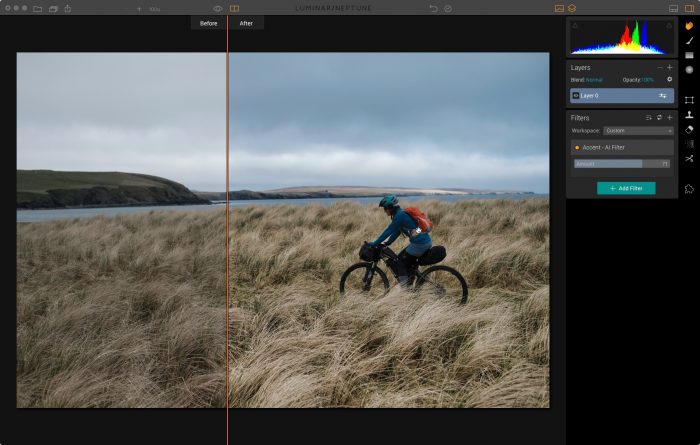
Accent -AI Filter
The new Accent – AI Filter uses special algorithms drawn from multiple filters and combines them into a single, ultra-poweful slider that gives stunning results with a single move.
The beauty of Luminar is that you can dial in gorgeous images and make vital tweaks to your shots with minimal effort and fiddling. This new feature distills it down to sheer simplicity.
Often times, your images need just a few similar adjustments to make them pop. The Accent – AI Filter does a great job identifying what’s needed to bring out the important aspects of the shot.
I’ll admit, I was a little bit skeptical, but once I tried it out on a few images, it was apparent the Accent slider indeed works like a charm.
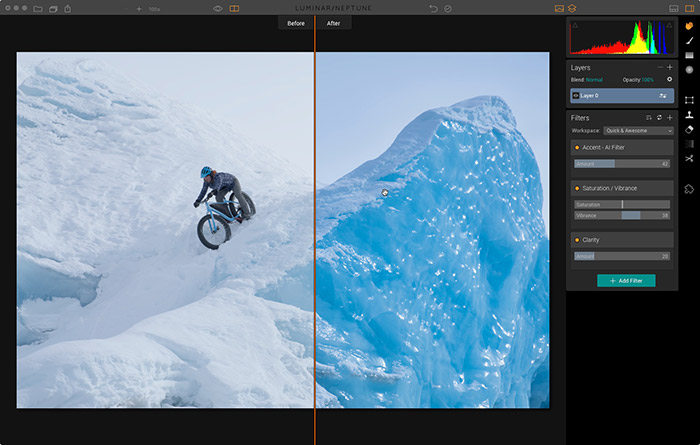
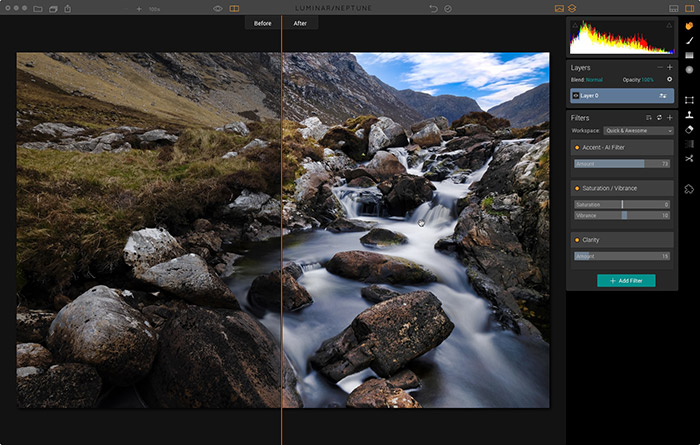
As you can see in the two photos below it seems to bump up the vibrancy and clarity just enough to give you great results without going overboard, even when you dial it all the way up to around 60%.
With some images, it will even do selective exposure and contrast adjustments, as well. Overall, the Accent filter is very useful tool that will dramatically speed up your workflow.
Quick and Awesome Workspace
If you like the quick and dirty approach, but want a little more control, you can use the new aptly named Quick and Awesome Workspace. Workspaces are one of the most usable workflow features in Luminar.
If you’ve got a set of adjustment tools or filters you tend to use on a regular basis, you can save them as a Workspace for quick recall. Luminar comes with a standard set of Workspaces, including Landscape, People, Street and BW, and the new Quick and Awesome Workspace in the Neptune update gives you four sliders: Accent AI, Saturation, Vibrancy and Clarity.
So, as I said, if you like the Accent slider, but you want more detailed control over the colors, contrast and edge sharpness, this is a very easy way to fine tune your images for maximum impact.
Plug-in Integration with Other Macphun Apps
If you also own Aurora HDR or one of Macphun’s other Creative Kit apps, you can now run them as a plug-in right inside Luminar. Previously, you had to do your adjustments separately in each program. This all-in-one approach makes sense, and it will certainly allow for a vastly more streamlined workflow if you own any of the other apps.
Custom Cropping
Luminar’s Crop tool now allows the option for custom crop ratios. In addition to all the standard sizes, the menu now lets you enter whatever dimensions or aspect ratio you want for your image.
Vignette Filter Enhancements
The Neptune update adds a number of new options to the Vignette tool, including new styles, a “Place Center” mode and both Pre- and Post- Crop modes
Memory Management and Performance
This was a big one. Luminar Neptune adds significant performance when editing large files or when you’ve got 5 or more images open at the same time. (Good, because that’s totally me!) You’ll also see faster in-app animations, transitions and other stuff that make for a more pleasing user experience. It’s the little things, right?
Save $10 On Luminar
If you haven’t tried Luminar, I recommend taking a look. Macphun has won multiple awards for their apps, and they did a great job with Luminar. It’s a great processor that keeps getting better, it will do anything you need it to do, and it’s very affordable. Download the free fully functional demo and see what you think.
Right now Luminar has a bundle deal that includes free eBooks by Ian Plant and Andrew Gibson, 2 Preset Packs, over 500 overlays and a photography training video. That’s a total value of $309, but you can get it all for only $69.
Use my special discount code, DANBAILEY and you’ll save an additional $10 on the program. (Existing Macphun users will save an additional $10 on top of that.)
So, the previous Luminar update was Pluto, this one is Neptune. What happens when they get to Mercury and run out of planets? Will they start going with moons? Luminar IO. Galaxies? Luminar Andromeda. Constellations? Luminar Orion.
What about Pulsars? Look for Luminar version PSR B1937+21, coming in 2020 to a computer near you!