If you’re a regular reader, then you probably know that I have camera bag issues. I keep searching for a bag that fits my fast and light style. Or my fast with light style. Whatever… I can’t even remember which one it is anymore.

You see, for me it’s all about accessibility.

I’ll say it again. Accessibility. As photographers, we all know that moments are fleeting. The best ones fleet the fastest. Expressions. Action. Glimpses. If you can’t move camera from bag to hand in mere seconds, or even faster than that sometimes, you’ll miss the shot.

Recently, I got my hands on the new Lowepro Photo Sport 200 AW camera backpack (that’s the one I mentioned in my 10 Things You Want on Your Photography Wish List), and after trying it out for a few weeks, I’ve decided that it’s the pack I’ve been waiting for.

I don’t mean to sound all romantic and mushy, but that’s really how I feel. Let me explain.

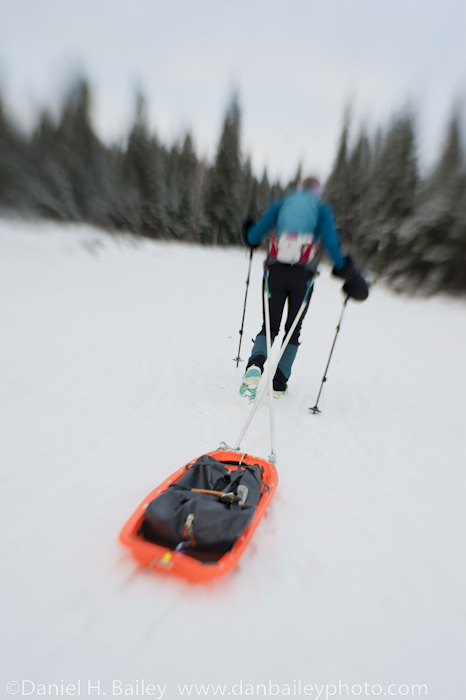
For nearly every single activity that I do, hiking, biking, skiing, climbing, trekking, tromping, trapsing, I’m always wearing a backpack. In fact, I’ll be honest here, I’ve actually discovered that if I’m just walking around without a pack for any length of time, my lower back get sore. Go figure.

Anyway, when I’m adventuring out in the world, in addition to my camera gear, I’m carrying snacks, water, bike pump, hand warmers and technical gear; the stuff I need to stay warm, survive or just plod along in the outdoors for hours on end.

Unfortunately, with most packs, if I’m carrying camera gear, I need to bring along the chest pouch, which can be cumbersome on the bike, and also stuff extra lens/flash cases into the pack, which I’ll have to fish out if I want to shoot any photos. And, since it’s heavier, this stuff usually goes on the bottom, below the lightweight clothing and jackets.

That’s NOT accessible.

The Lowepro Photo Sport 200 AW is a hydration ready, top loading backpack that fits a decent amount of outdoor gear. It also has a side zipper camera compartment on the bottom where you can fit a DSLR body with lens, and, depending on how you pack it, a second lens, or a flash and another small lens.

The side zipper allows access very quick access to your camera, which as we agreed above is often the key to getting the shot, right? As you can see in my video above, you don’t even have to take the pack off to reach your camera, although, slinging it off and on is pretty simple.

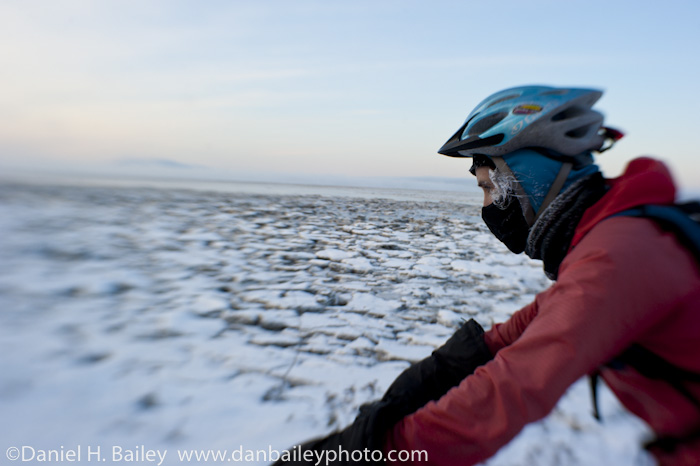
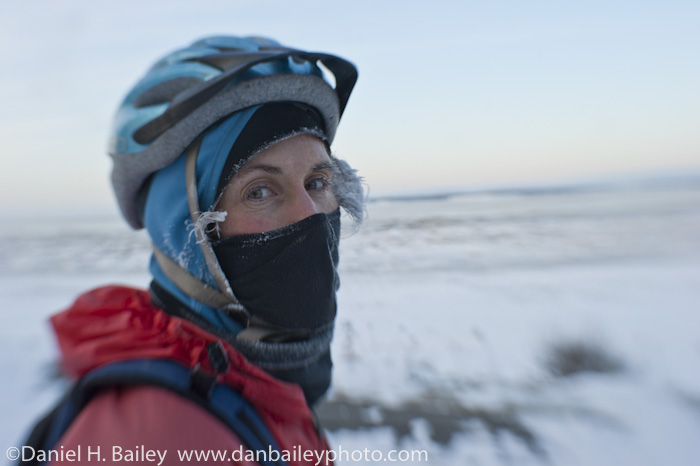
Of course, there’s often a difference in design and usability. You want to know, does this system really work? Absolutely. I can tell you that it works quite well. So far, I’ve used the pack downhill skiing, snow biking and skate skiing, and I’ve found that it’s not only usable, it’s comfortable. In recent weeks, I’ve worn it up to seven hours at a time on long bike and ski days.

In fact, this pack is pretty much where my camera lives full time right now. When I’m not outside, it’s permanently parked on the floor of my office right next to the door. It holds a surprising amount of gear. (See the list below to see what I typically cram into it.)

I love Lowepro stuff. I think it’s built really well and it fills a niche with the adventure and outdoor photography crowd, but I’ll be honest, not all of their stuff works form me. Their chest pouches and many of their waist packs are either too big or too small to comfortably fit me, and their bigger packs are designed more as photo gear packs than outdoor gear packs. Like I said, I’m picky. I have issues.

However, the Photo Sport 200 AW is just the ticket. The bomb. The cat’s meow or pajamas, or whatever. Like I said, it’s the pack I’ve been waiting for. In my mind, it’s the ideal pack for all day adventuring with your camera. Period.

Is there anything I don’t like about this pack? Well, I’m used to slinging backpacks off of my right shoulder, so it’s taking me awhile to get used to this system. However, if it slung the other way, I wouldn’t be able to grab my camera with my right hand, so that’s my own design flaw, not theirs.

Also, I wish it were just a tiny bit bigger some of the time. Not all the time, but there are times when I’d like to pack a little bit more camera gear. Maybe they’ll make a Photo Sport 300.

Finally, I wish the top lid had more room, it gets pretty full with snacks and sync cord, which makes it hard to get into. I wish it had at top lid the size of my Osprey Talon 33, which is my favorite non-camera technical outdoor pack. In fact, maybe if they make a Photo Sport 300, the whole pack will be that size,

Minor things. Overall, it’s an awesome pack, and as much fun as I’ve been having with it this winter, I can’t wait for summer!!

If you’re an outdoor shooter who wants versatility and accessibility, then I’d highly recommend that you take a serious look at the Photo Sport 200.

Photo ©Jim Kohl

I hope you enjoyed my video review. Thanks for watching, and special thanks to Jim Kohl for his most excellent video work and for laughing at my face plant. (Don’t miss the blooper reel at the end!) Check out his website at www.jimkohlphoto.com.

What I usually carry in my Photo Sport 200:

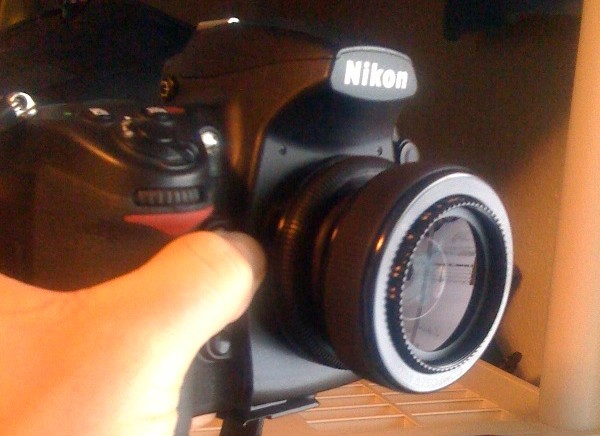
  • Nikon D700 w/ either 24mm, 50mm or 85mm lens or Lensbaby
  • SB-800 Speedlight
  • A second small lens
  • Sync cord
  • Lumiquest Softbox III or LTp (shoved in the outside pocket)
  • 80-200mm lens, SB-900 or thermos of Bailey’s
  • Extra puffy jacket, hat & gloves
  • Hand warmers
  • Clif bars, cookies or sandwich. Or all three (top lid)
  • Memory card case (waist belt zipper pocket)
  • Gu packet (waist belt zipper pocket)
  • Gorillapod (shoved in side strap)
  • 100oz Camelbak bladder (inside hydration compartment)
December 20, 2011
See this post
Video Review- Lowepro Photo Sport 200 Camera Pack

On Friday afternoon, I found myself with a couple of hours to kill before our neighborhood pizza party. Ok, I’ll admit. I didn’t have any any extra time to spare, especially since I was the one bringing the dough, and I still hadn’t made it yet.

However, in classic Dan Bailey fashion, I tried to cram and make it all happen. With precise thought to the absolute latest time I could start the dough, I texted my model, threw on my camera pack, clicked into my skate skis and raced over to the park.

When Keri showed up a few minutes later, we shot for exactly a half hour. I tried grabbing some skate skiing action shots at first, but those weren’t really working, so we quickly got down to shooting portraits.

I started with the top photo here, and then after a couple of frames, I pulled out an SB-800 flash, a Lumiquest Softbox LTP, which I had shoved into the outer pocket of my backpack since it folds flat.

Shooting with one hand, while holding the sync-corded flash in my left hand, I shot a few frames, standing very still, since I was shooting all manual focus with the Lensbaby Composer Pro.

Despite the fact that I had the entire state of Alaska acting as an enormous bounce card, the no-flash shots just don’t have the same life as those photos below, which were shot with the flash.

You can also see that the Lumiuqest LTP, which has a diffusion surface that’s 40 times the size of the flash head, throws some very nice light onto the entire right side of Keri’s body, instead of just her face and shoulders, which a smaller softbox like the Softbox III would do. I wanted to highlight all that brilliant red in her jacket, which is why I reached for theSoftbox LTP instead of SBIII.

Although I think both photos work nicely, the second, vertical shot is my favorite. Tell me what you think and why?

This is literally Going Fast With Light in action. It’s what my entire 83-page eBook is about, moving and shooting quickly with lighting gear that doesn’t slow you down, either with weight or method.

Our entire photo shoot lasted a half hour, and the portrait part of the shoot lasted for less than half of that.

Time: 12 minutes to take the flash out of my pack, attach the LTP and sync cord, do a couple of test photos for exposure, and then shoot 44 frames, a couple of which I REALLY like.

Of course, when 4:30 hit, I knew I had to race home. I threw all my gear back in the pack like a total spaz, forgetting to zip the camera compartment shut. I skied all the way back with the flap hanging wide open, and made it home just in time to get the pizza dough started. I can’t believe that my D700 didn’t fall out along the way. Maybe someone is looking out for me!

Read Oh What a Difference a Flash Makes! (Part1).


December 19, 2011
See this post
Oh, What A Difference a Flash Makes! (Part 2)

Even though my adventurous style of photography demands that I go light and fast with my camera gear, I still try to carry a flash whenever possible. Why? Because the light from just a single flash can make a dramatic difference in the quality of images I’m able to create, even in the outdoors.

My standard “light and fast” lighting rig consists of a Nikon SB-800 Speedlight (an SB-700 would be a possible alternative), an SC-28 sync cord and a Lumiquest Softbox III.

Inside my Lowepro Photo Runner 200 pack, the flash goes in the camera compartment, the cord in the top lid, and the softbox folds flat and gets shoved into the outside pocket. While the flash adds some weight to the pack, the cord and softbox take up a nearly imperceptible amount of space, and together, they greatly increase my shooting options in bad light.

Here’s an example: December in Alaska. The ambient light is dim, cloudy and white. If I shoot a portrait of my friend Jim straight with no flash, I get a photo like the one above. Ok, but it’s certainly nothing to write home about. Good enough for a status update, but that’s about it.

If I spend a couple extra minutes and bring out the flash, I can greatly increase the quality of light on my subject. All I did here in the second shot was hold the flash/softbox combo in my left hand, place it just out of frame to the left of the subject and shoot TTL.

Way more appealing light, wouldn’t you say? That extra light from the flash gives the subject much more life, and the Softbox III adds a pleasing quality and dimension, without going too soft. I set up, framed and snapped this second photo in no time at all. It actually took longer to dig out the lighting gear and turn on the flash than it did to shoot the five or so frames that I took in this series, and that took barely any time at all.

Looking back, I probably could have set the background exposure a little darker. With all the blown out white light from the snow, that would have made the shot even more dramatic. Oh well, you shoot, you learn. That’s how it goes, right?

Like I say in my latest eBook, Going Fast With Light, “Good light doesn’t have to slow you down.”

I mean it. Get yourself a lightweight lighting rig and go have some fun with it. I guarantee, you’ll be excited about the shots you get.

Read Part 2 of this article here.

December 15, 2011
See this post
Oh, What a Difference a Flash Makes!

I’m excited to announce that Going Fast With Light is now available in a Kindle Version at the Amazon Store.

Although the PDF format of this eBook is already optimized and viewable on mobile devices such as the iPad and the new Kindle Fire, you can now get the entire book in the standard Kindle format.

All the photos are there, as is every bit of the text and product links to the gear that I recommend in the book.

And, just in time for the holidays, I’m offering the Kindle Version of Going Fast With Light to you at a special price. Pick up a copy for yourself, or buy it for your strobist friend or family member who is interested more about how to use lighting and off-camera flash in their photography. Trust me, it makes a great gift. If I didn’t write it, I’d want someone to buy it for me!

And if you’ve already purchased the PDF copy of Going Fast With Light, then please consider writing a review about the book at the Amazon Store. I’d really appreciate it! Think of it as your holiday gift to me.

Going Fast With Light– Because good light doesn’t have to slow you down.

Click here to get it at the Amazon Store.

December 14, 2011
See this post
Going Fast With Light – Kindle Version Now Available

Having been a long time fan of selective focus techniques in my photography, it would only make sense that I have a tilt shift lens. Only I don’t. Mostly because they’re quite expensive. As much as I’d love to get my hands on the Nikon 45mm PC-E Tilt Shift Lens, It seems that every time I find an extra $1,800 to spend, I end up blowing it on something else.

So, when I was given a chance to try out a Lensbaby Composer Pro with the Sweet 35 Optic, I jumped at the chance. Who wouldn’t?

Initial Impressions

I knew I’d like the thing, since I love using small, compact prime lenses, but I also knew that I’d face some challenges trying to incorporate the Lensbaby into my style of outdoor photography. For one thing, the Lensbaby doesn’t talk to my camera, so in use, it’s all manual focus, manual exposure lens. As an action photographer, I’m not used to that.

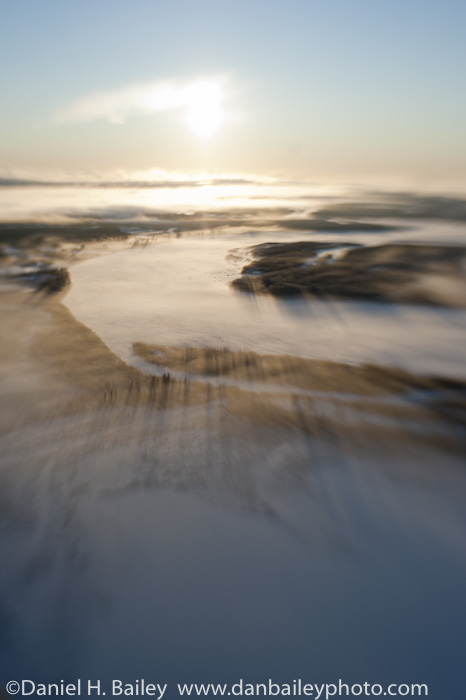
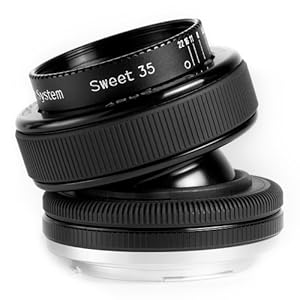
There’s also that tilt-shift thing. I’ve never actually used a tilt lens, so although I had ideas of how I wanted to use it, I really didn’t know how easy or hard it would be to get the hang of the tilting and shifting.

When the box arrived, I did what I always do when I get new gear. I immediately unpacked it and tossed aside the instruction manual. On second thought, I picked them back up, just to make sure I wasn’t missing something really crucial to the operation of the Lensbaby.

Turns out I wasn’t. It’s pretty self explanatory. You slap it on the camera, toss the lens cap on my desk, where it will sit completely unused, and start tilting and shifting your way towards some fun new imagery!

It’s about the same size and weight as a standard 50mm lens, and instead of those three funky knobs that the Lensbaby Control Freak has, it just has a single focus ring and adjustable optic aperture ring. More on that later.

The Lensbaby In Action!

Being winter here in Alaska, I tried out the Lensbaby for the first time in conditions that were not quite the easiest for any kind of photography; in sub-zero temperatures with blowing wind, and little sunlight.

That’s when I had a little reality check. Where I have extensive experience in the methods of one-handed shooting while riding bikes, I now had no automatic control of either focus or exposure.

Ok, I can deal. Getting the right exposure is simple, you simply meter through the lens, adjust shutter speed on the camera and aperture on the Lensbaby Sweet 35 Optic. Done.

Now for the focus. Shooting action takes a little more thought with the Lensbaby. Not only is it manual focus glass, it’s actually kind of hard to judge your focus points in the lens, especially when you start tilting. Especially in the heavy overcast and reduced ambient light of short Alaska days at the end of November. Especially when your glasses are fogging up from the cold.

Again, I can deal. After all, I’m an adventure photographer. I do “challenging” for a living. It took me some time to get the feel of judging distances and physically changing focus settings, but I got the hang of it. Often times I’m following moving subjects, so if my relative distance remains the same, focus should stay on track.

Notice I said “should.” I didn’t always get my subject in focus, but when I did, the image was quite sharp. The Sweet 35 Optic is actually a nice piece of glass. More on that in a bit.

Tilt Shift

This is where things get really fun. After you’ve figured out all the focus and exposure stuff, you get to start tilting and shifting. Basically, the Lensbaby Composer works like this. If you want the right side of the frame to be in focus, you tilt the lens to the right. If you want the left side in focus, you tilt to the left. Same goes for top and bottom of the frame, and yes, you can combine tilting to the side and up/down at the same time. It’s actually a really cool effect.

However, you can go too far. Tilt too much and you’ll get vignetting. You’ll also have a hard time getting anything in focus. As with the focus, though, you’ll get the hang of it.

Image Quality

I’ll just say right now that the Sweet 35 Optic is not a Carl Zeiss lens. That said, it’s actually a solid lens that give you perfectly acceptable, and professional quality results. I wouldn’t have any hesitation sending my to Lensbaby shots to a client. Pros use them all the time.

It also captures and reproduces color nicely. Again, I had no qualms with how it rendered my subject matter. During a few outings, I shot a variety of action photos, nature and portraits with it and has very satisfied with the results.

That said, I had plenty of out of focus frames, bad exposures and missed shots, mostly because I set out to try and blend it into my fast breaking adventurous style of photography. Of course, it’s not like I don’t screw up and shoot bad frames with any other lens in this style. When it came down to it, once I got comfortable with how the Lensbaby Composer Pro works, my success rate went up and I got shots that I’m happy with. And as long as I kept the condensation off, it performed flawlessly in the cold.

I still have lots of things I want to try with the Lensbaby, and I’ll keep posting shots here and on my Facebook Page, so keep checking back. Overall, for the price, quality and creative options that the Lensbaby Composer Pro offers, it’s a great lens. If you’re into tilt shift photography, have played around with it on your iPhone, or even if you’re just curious, I’d highly recommend checking one out; it really opens the door for adding some great new creativity to your photography.

Of course, like anything, you wouldn’t want to use it ALL the time, because it will get old. Yes, Lensbaby shots are sometimes WAY overdone, but if you learn how to use it and vary the types of subtle and drastic selective focus effects that you create with it, the Lensbaby composer Pro can be a handy addition to your camera bag, especially when compared to the price of a real tilt shift lens.

Here is a wide selection of biking, aerial, nature and portrait imagery that I shot during my first few times out with the LCP. Let me know what you think.

Support this site: By visiting and purchasing through the following links, you’re helping keep the content flowing on this site.

[iframe][/iframe]

December 13, 2011
See this post
Full Review: Lensbaby Composer Pro with Sweet 35 Optic

Here are 10 photography related items that you probably wouldn’t mind having. Let me rephrase that- 10 items that you’d totally covet if your neighbor had one.

1. Sketching Light, by Joe McNally

The latest book by legendary Life Magazine photographer, workshop teacher and Speedlight master Joe McNally. Schedule for release just in time for this year’s holiday season, Sketching Light is a masterful collection of off-camera lighting tips, techniques, methods, and of course, photographs, all described with the experience, wisdom and wit that Joe is known for. This one is definitely on my list!

2. Fijufilm X10 Digital Camera 

Fujifilm’s latest high resolution, full featured compact camera. Essentially the little brother to the beautiful X100, the X10 is a modern day classic. With a  stylish looking die-cast magnesium alloy body, a 12MP digital sensor, 1080p HD video, RAW capability, manual shooting mode and a very ergonomic design, this thing actually feels like a camera.

3. Peak Designs “Capture” Camera Clip System

I picked up one of these thing at this year’s PND PhotoPlus Expo and I have to say, it’s one of my favorite gadgets of the year. This is an Arca-Swiss compatible QR plate that attaches to your belt or backpack instead of to your tripod by way of a small, sturdy clamp that quickly attaches to your pack strap.

Great for hiking, biking, cross country skiing or other low impact, low bounce activities, the Peak Capture keeps your DSLR secure and very accessible. Makes a great stocking stuffer. Check it out here, watch an 8 second video demo that I shot at PPE, or buy the Capture Clip here at B&H Photo.

4. Manfrotto Pocket Tripod

Another stocking stuffer. The new Manfrotto Pocket Series ultra mini tripod screws onto the base of your DSLR, where it sits there unnoticed. Then, when you need to brace your camera for a shot, you simply unfold the legs, adjust as necessary and BAM!, instant camera support.

They’ve also got one for point and shoots, which will work great on the Fujifilm X10. *hint hint*

5. Kessler Philip Bloom Pocket Dolly

Let’s face it, as cool as time lapse photography is, it’s even cooler when you move the camera. Enter the Dolly. If you do time lapse photography, then you want something like the Kessler Pocket Dolly so that you can start experimenting with motion control effects in your T/L videos.

Better yet, why not just ask for $50 so that you can build your own skateboard wheel, PVC track dolly. Then, save the extra thousand bucks and spend it on gas to get to all those beautiful locations that you’re going to photograph with your new homemade dolly.

6. Apple iPad

Don’t have an iPad yet? Dude… get with the program. If you’re a photographer, you definitely want an iPad so that you can read iPad photography Magazines like Photographers i and Scott Kelby’s Light It, show clients your portfolio, read photography eBooks, and spend hours each week reading articles on Flipboard and browsing 500px photos.

7. Any eBook by Craft and Vision

Beautiful travel collections, concise instruction titles like Ten, Ten More, David duChemin’s creativity driving The Inspired Eye series and a host of other inspiring titles that will light a fire under your photography, Craft and Vision eBooks rock. And every single one of them only costs $5.

8. Any eBook by Ian Plant

Compositional techniques, masterful photography and image processing tutorials, and creative insight from one of the best landscape photographers in the business today, Ian Plant. If you’re a landscape shooter, make sure you get these on your list!

9. Lowepro Photo Sport 200 Camera Backpack

If you’re an active photographer who wants to carry more than just a waist pack and still have fast access to your gear, then trust me- you want this pack.

I got one a few months ago and it has become my number one go-to camera pack. Fits an array of gear, both in the camera compartment and then upper top-loading backpack part, the Photo Sport 200 is the pack I’ve been waiting for. Wish hard enough and maybe you’ll get on too. (Check out my full review of this pack here.)

10. USB Film Roll

Bring back the good old days with these USB film roll drives from the Photojojo store. Each roll holds 4GB of data, which is way more photos than you could have packed inside these little metal cans when you used them the first time around.

December 12, 2011
See this post
10 Things You Want on Your Photography Wish List

Read my featured travel article and photo essay about Barrow, Alaska published today on Matador Network.

Matador Network is a media company based around travel culture worldwide. With 1.4 million unique monthly readers, it’s the most read independent online travel magazine.

With their mission of empowering, connecting and promoting culture, conservation and sustainability around the world, Matador has won Lowell Thomas awards for recognition of excellence in travel writing and journalism for two years in a row.

I’m very excited to be working with Matador and look forward to collaborating with them on future projects.


December 8, 2011
See this post
Read My Barrow, Alaska Photo Essay on Matador Network

custom backdropsWith the sheer volume of iPhone and iPad apps out there, I’ve almost given up trying to review them; there are simply too many to keep track of. However, every once in awhile, I find one that I feel is worth sharing.

Shot List Assist is a very useful app that helps you keep track of potential image ideas and plan shots for future assignment, stock shoots or personal projects.

The app’s simple interface allows you to create categories, subcategories and detailed shot info, which you use organize and store your creative ideas for future reference.

You can add your own presets for just about any type of data that might be associated with a shoot, like cameras, lenses, lighting setups, models and locations. You can also shoot reference shots or store images from your photo library and use the built in lighting/shot diagram to visually map out the details of your shots.

If you’re one of those photographers who shoots cool photos that you see in magazines just to have for future reference, study or inspiration, this is a great place to store them. Simply create a category called “Magazine Cutouts” and save them all there, where you can easily call them up later. It’s a much more efficient system than just shooting and scrolling through endless images stored on your iPhone.

The app also has a GPS feature which you can use to physically map out the location of your proposed ideas. If you ever find yourself in a particularly photogenic setting, you can just save your “current location,” or, you can go into the map and drag the pin around to whatever location you desire.

While I’ve seen a couple of other apps like fall into this category, such as Second Shootr, which is specifically designed to plan wedding photography, I was always waiting for one that’s built to for more general photography use . Shot List Assist definitely fits the bill. The app is well designed, very easy to use and definitely helps you store and organize your creative ideas all in one place.

Stock, assignment, portrait and commercial photographers, as well as 365 project shooters will all find this app useful. It’s been out for iPhone and iPod Touch for awhile, and it was recently released for iPad. The designer has created PDF and video help files that you can access right from within the app. It’s quite easy to use, though, you’ll get the hang of it pretty quickly by just playing around with it.

Shot List Assist costs $3.99, which is extremely reasonable, when you consider how well it can help keep your ideas organized. I’m glad I found this app, and I definitely recommend it, no matter what kind of photography you do. Get it at the iTunes Store.

20111207-085029.jpg20111207-084849.jpg20111207-084906.jpg

December 7, 2011
See this post
Organize Your Creative Ideas with Shot List Assist App

I’m excited to announce that Going Fast With Light has been updated with brand new content!

I’ve added some new and updated items in the gear section, a few extra links, as well as one or two new photos. Plus, I’ve fixed a few small errors that were discovered after initial publication.

If you’ve already purchased Going Fast With Light, then you should have already received an email with a link to the updated version. Let me know if you didn’t get that email and I’ll make sure you get the update.

If you haven’t checked out this 83-page manual on off camera flash and lightweight lighting techniques yet, what are you waiting for?

With current lighting technology and the wide array of light modifying tools that are available today, there’s no reason that you can’t take some of this gear with you for those times when you’re dealing with challenging light. There’s no reason that you can’t walk away with photos that look more professional, instead of walking away with excuses about how the light just didn’t cooperate.

Essentially, Going Fast With Light is a detailed instruction manual on flash that’s been distilled down from my own fast breaking, highly adaptive, first person style of photography. I wrote it to make using flash easy to understand. Using a very simple, yet effective workflow, and numerous examples of how to apply it so that you can bring your subjects to life, I show you how to take control of the light so that it doesn’t take control of you.

And since it’s a PDF file that’s viewable on mobile devices like the iPad, the iPhone and the new color Kindle Fire, there’s no reason that you can’t take it with you for reference on location.

I don’t use flash all the time, and neither should you. However, during those times when even just one extra light might make a remarkable and creative difference in the strength of the image, don’t you want to be able to shoot with confidence?

Then check out Going Fast With Light and see what it can do for your photography today.

Going Fast With Light, Because good light doesn’t have to slow you down.

$12.95

Add to Cart

View Cart

December 6, 2011
See this post
Going Fast With Light Has Been Updated!
Holland America's Mariner Magazine, Fall/Winter 2011 Issue

This past summer, I traveled to Skagway, Alaska on assignment to photography the White Pass & Yukon Historic Railway for Holland America’s Mariner Magazine. Here’s the two page story opener and the article. Click here to read the entire issue online.

This is my second travel photography article for Mariner Magazine. My first assignment for them was the Denali cover story that I shot last summer. That issue won a Pearl Award for “Excellence in Content,” specifically the Bronze Award “Best use of photography.”

December 5, 2011
See this post
Recent Publication: Holland America’s Mariner Magazine, Fall 2011 Issue