 Digital Imaging Tips by Dan Moughamian
Introduction
Topaz Labs recently announced Topaz Adjust 5 plug-in for Photoshop, so I thought it would be useful to follow up on the prior Adjust 4 tutorial to show another example of how it can help improve our digital workflows. Aside from some performance tweaks, and the updated user interface, there are also new filters and controls for creating precise results.
For this tip we’ll take a look at working around a common problem: taking an image that was shot under overcast or partially overcast light (because there was no other alternative), and using what the scene gives us to enhance or re-create the emotion of the place. Sometimes just photographing an interesting place isn’t quite enough to convey the meaning of the place. Seen below, the original shot was taken this fall at Niagara Falls under less than ideal lighting conditions.
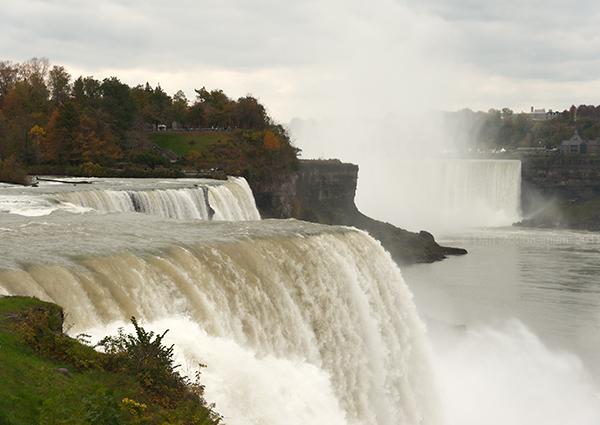
There are things that I like about this shot, even though it’s been taken a million times before. Sometimes we take pictures not to floor people with something brand new but to remember the unique places that we pass through during this short life. Maybe the shot is for others, maybe it’s just for the photographer; the “who” is not really important. What is important is that we can use selective techniques with apps like Topaz Adjust to add some emotional impact back into the shot.
The Goal
To me, this moment was about the blustery weather, being surrounded by water in many forms (and famous Buffalo Wings and Duff’s!). Summer was gone and there was a sort of surreal moment, trying to understand “big nature” in the context of a mob of people and a row of cheesy looking hotels and casinos on the Canadian side of the falls. I chose only to capture a bit of the man-made here, just to give a hint that it is there. So, how could I help the photo “define” some of the thoughts that I experienced at the time? For one thing I think this is a perfect example of a shot where the small details don’t matter. By that I mean how sharp the trees in the distance are, how sharp the eddies are, etc. We have a tendency to always sharpen, even when it doesn’t suit the scene. For another thing, there was more color here visible to my eye than the camera captured. We can get some of that back in spots.
The Workflow
First, in Photoshop choose Filter > Topaz Labs > Topaz Adjust 5. The user interface is similar to the one I described in the earlier Adjust 4 tutorial; the main difference is that the presets are now broken into categories, making it easier to find the type of preset you need. Use the Effects category list to choose the type of workflow you want. As you mouse over each preset, the preview at top left will give you an accurate idea of how your image will look with the preset applied. Down the right side there are three primary groupings of controls; we’ll focus on the Global Adjustments.
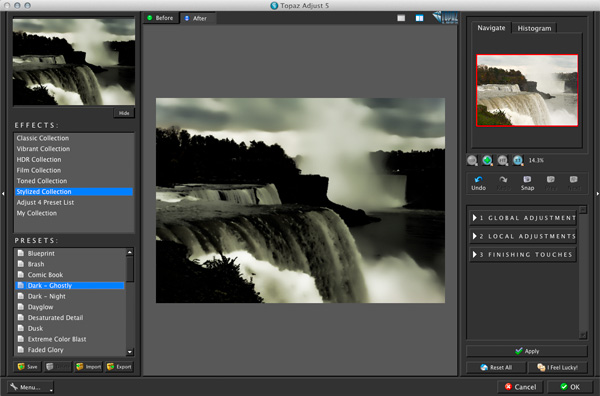
To follow along for this tutorial, you can scroll down the list of Stylized presets and click the “Simplify” option for your photo. Note: to speed up performance, turn off the Enable Auto Update feature in Preferences (accessible via menu at bottom left). This will ensure that the main preview area is not constantly updated (which takes a second or two each time), as you mouse over different effects. Once this preset is applied you can see right away what its purpose is: all of the image details get heavily smoothed over. This is a good starting point to make a few simple corrections and achieve the objective of accenting the water details as well as the contrast.
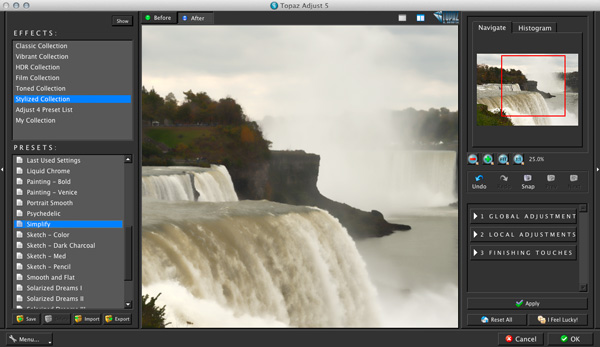
Next, open the Global Adjustments, then open the “Adaptive Exposure” subgroup. What I needed to do first was make the entire image slightly brighter and then make the darker areas on and below the falls contrast with the surrounding areas more, because the water tones were not so uniform as they are here. To make a uniform change in brightness, increase the Brightness slider by a modest amount. Next I increased both the Adaptive Exposure and Regions settings slightly to create localized pockets of contrast (they work in tandem). Note that some experimentation is needed because their effect is not perfectly linear; the bright and dark spots can fluctuate a bit depending on the photo. Specifically these two sliders helped bring back some of the darker streaks in the falling water and on the river.
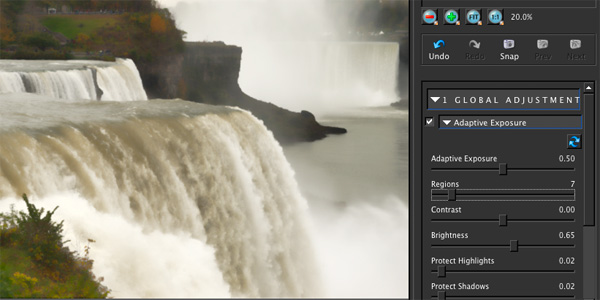
The final step was to reintroduce some detail on the water’s surface to ensure it still looked like a photograph and not a painting or illustration. To do that you can zoom in a bit and then open the Details subgroup. For this shot there was only one control I needed to tweak: the Detail Boost slider can turn an image from pure glass into the grungiest looking shot you’ve ever seen and vice-versa. You don’t need to move it very far; a little nudge goes a long way. Here I bumped up the value until I could see the turbulent details on the water (just above the falls) and then decreased it again until those eddies became small white streaks – rather than having them disappear which is basically what happens with the default setting. The shot below shows the final filter settings applied.
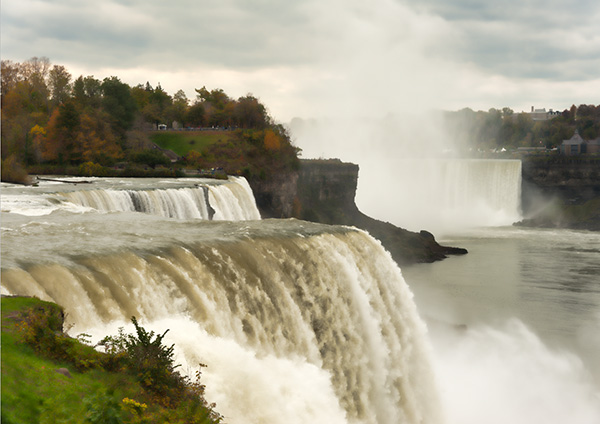
The filter having been applied, the obvious issue was that certain parts of the waterfall and the foreground (i.e. the grass in the corner) didn’t fit with the rest of the shot. They were too saturated for one thing. If you’ve already applied the filter and find “trouble spots”, you can easily handle this by using the History Brush to “paint back” some or all of the original tone, color or texture in specific spots. This technique will be covered along with another “texture recovery tips” in a future tutorial. The final shot is shown below.
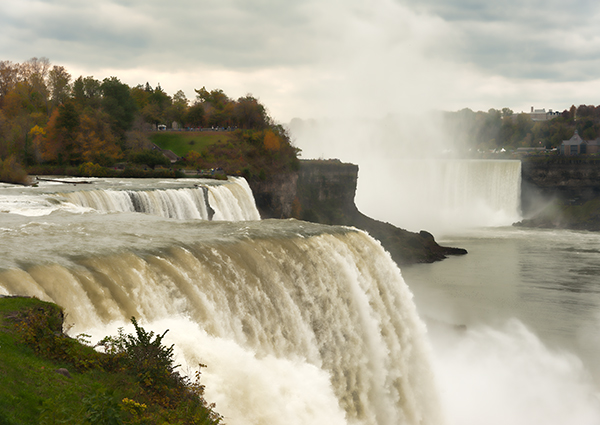
Hopefully you can see from just a few settings how powerful this plugin can be; I encourage you to download the Topaz Adjust 5 Demo if you haven’t already. If you’d like to discuss this other Photoshop techniques, I hope you’ll join me over on Google +. -Dan
————–
Dan Moughamian is an experienced photographer and educator, and has worked
with Adobe Photoshop since the early 1990s. He also has extensive
experience with Photoshop Lightroom, Photoshop Elements, plugins from Nik
software, and many other digital imaging products. As a long-time member
of their testing programs, Dan has collaborated with Adobe Systems to help
enhance many of the core functions in Photoshop, Lightroom, and Elements.
He is the Author of Adobe Digital Imaging HOW-TOs- 100 Essential Techniques for Photoshop CS5, Lightroom 3 and Camera RAW 6, and his work has been also been published in Photoshop User Magazine and Photo Techniques Magazine.
As an educator, Dan’s focus is to help photographers at all levels get the
most from their digital workflows. Tips on raw editing, layer masking,
alpha channels, image adjustments, HDR photography, focus and lighting
effects, and perspective correction, are just a few examples of the topics
he covers. To learn more, you can visit Colortrails.com, and follow Dan on Twitter, and on Google Plus.

I agree – Topaz Adjust 5 rocks, and so do the rest of their plugins. I used to have bunches of adjustment layers and masks in Photoshop on most of my images. Those days are mostly gone with Lightroom and Topaz. The other cool thing about Topaz is that upgrades are always free.