 During the past few weeks, I’ve shot quit a few RAW photos with my new Fuji X-T1. However, since Lightroom is not yet able to read the RAW files, I’ve just been sticking them all in a separate folder for safekeeping until I can make use of them.
As good as the straight JPEGs from this camera are, I’m eager to see what the RAW files look like. A few months ago, I did a test of how much more color information, latitude and sharpness could be wrangled out of the little X20 when shooting RAW, and I was pretty impressed. Seeing how that camera only has a 2/3″ sensor, I’m hoping to be even more impressed by what the APS-C size 16MP X-Trans II sensor in the X-T1 can do.
Remember, when you’re shooting JPEG, you’re basically taking the 4,056 levels of color and brightness information that are captured by the sensor and letting the camera’s image processor compress it into an 8-bit file that only contains 256 levels of color and brightness information.
No matter how good the image processor is, invariably, you’re going to lose some info. When shooting in difficult lighting, you could lose a lot of info. Wouldn’t you rather make the decision about what’s lost and what’s preserved? That’s why we shoot RAW
Adobe finally updated Camera RAW to v.8.4 RC, which means that it’s a stable release candidate. This new version includes support for the X-T1, as well as many other new cameras, so I’m finally able to open and process my X-T1 RAW files in Photoshop.
In addition, Adobe not supports the Fuji Film Simulations, which means that you can easily apply the X camera color profiles like Velvia and Astia to your RAW images. No more having to tweak them and hope you can get close. To find these profiles, click on the Camera icon in the ACR panel and click on the Camera Profile selection dropdown menu. You’ll find them all there.
Here are a couple of quick examples to see how much information is actually captured in the X-T1 sensor vs. what the camera distilled down into the straight JPEG.
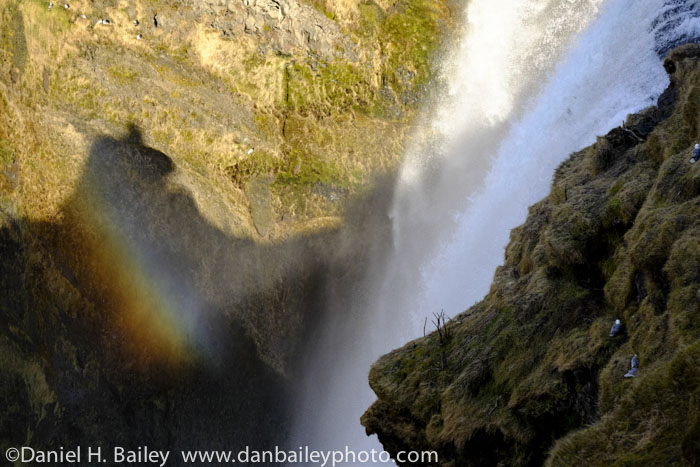
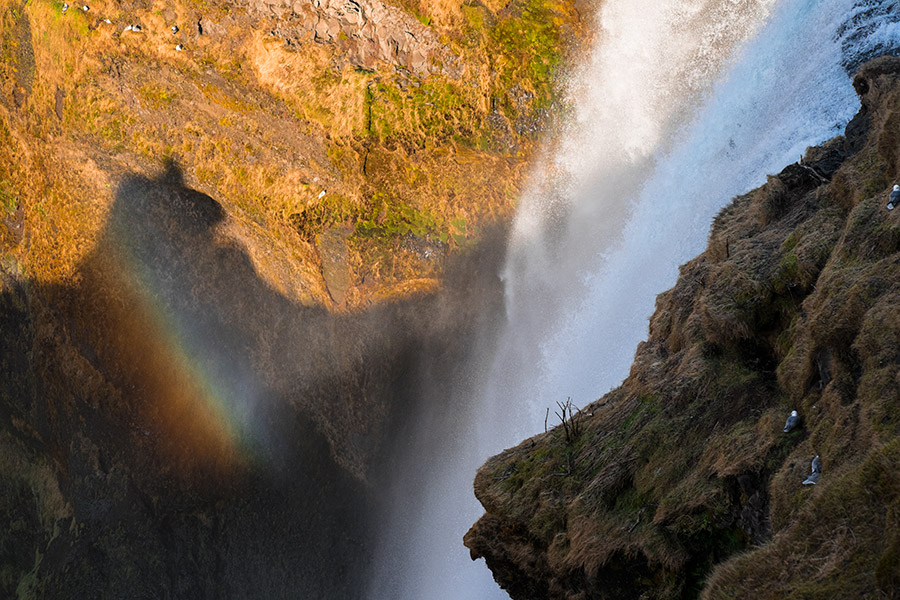
Example 1: Skógafoss Falls, Iceland
First the JPEG, then the RAW. When I was shooting this scene, I knew that the camera would have a hard time with the extremely bright sunlit waterfall detail at top right when it distilled the file down to an 8-bit JPEG. In the JPEG, that detail is blow out, whereas in the RAW file, I was able to preserve it and keep it with tolerance.
Also, I have much more latitude to tweak the colors without running into oversaturation problems.
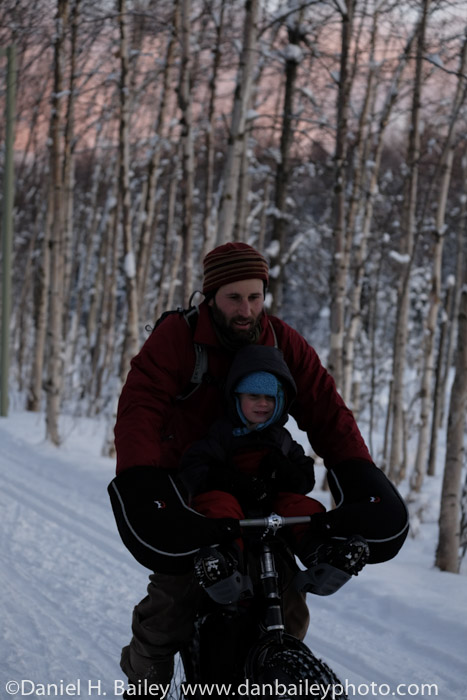
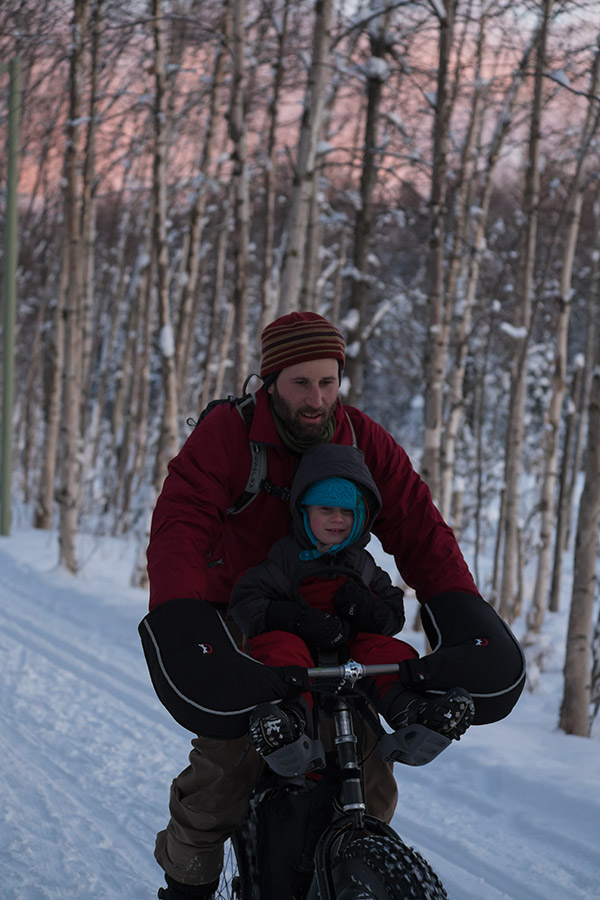
 Example 2: Snow Bike Commuting, Anchorage, Alaska
Last week, I shot some photos of my friend Eric riding with his son Finn in the clamp-on handlebar seat. We missed the direct sunlight by about 20 min, but since the ambient light was still good, I shot anyway. Since they’re in shade, though, they’re really dark. You can see that I’m able to lighten up the RAW file quite a bit and bring lots of color detail back.
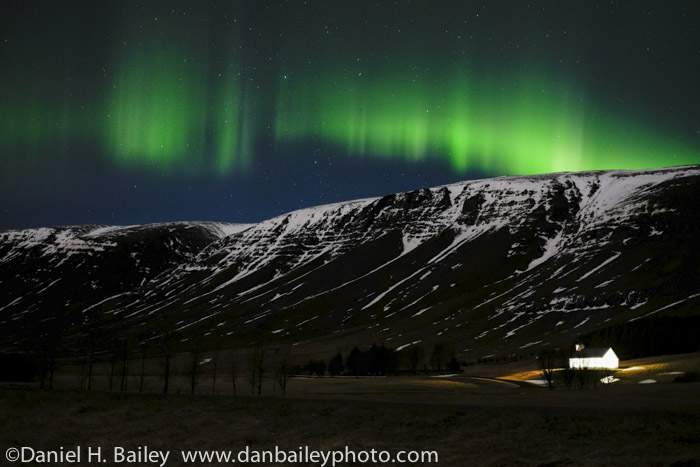
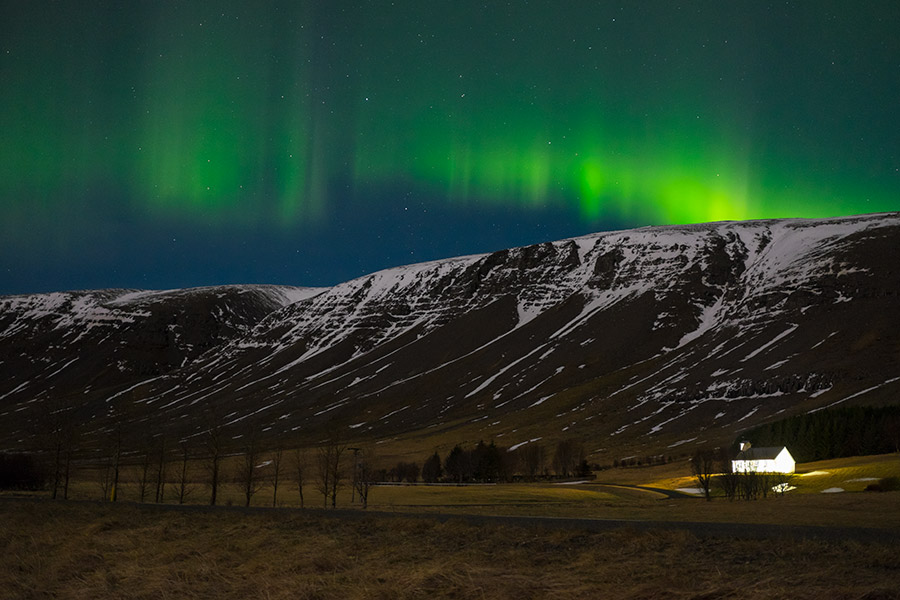
Example 3: Northern Lights, Iceland
I shot all my northern lights photos from Iceland in RAW, knowing that I’d be eventually be able to bring out more detail and reduce noise over what the JPEG could do. As much as Fuji X shooters love the X-Trans JPEGs, they do have limitations. As you can see, the RAW file lets me bring out so much more information that’s not present in the JPEG and drop down the brightness in that brightly lit building just a bit to that it’s not quite so blown out. You can also see that the building is sharper in the RAW version.
As much confidence as I have in the Fuji JPEGs, sometimes RAW is necessary if you want to preserve the maximum level of sharpness, exposure and color info in your image, especially in tricky light. Seeing how well the 16MP X-Trans sensor handles RAW gives me even more confidence to use the X-T1 in any kind of situation. Let me know what you think after seeing these image examples.
Read my extensive review and field test of the Fujifilm X-T1 here. It’s due to hit shelves any day now, so if you think this camera is a good match for your style, you can preorder it here. Thanks for reading and thanks for your support! EDIT: B&H Photo and Adorama both have X-T1 bodies in stock and are shipping right now! Body/lens kits should start shipping any day, so you can preorder and get it as soon as they become available.
Also, right now, you can save up to $250 on the Fuji XF lenses. This special deal ends March 22.
Order the Fujifilm X-T1 for only $1,299 (body only) at B&H Photo or Amazon
Preorder the Fujifilm X-T1 with 18-55mm lens for only $1,699 at B&H Photo – Amazon – Adorama
<iframe src=”http://adn.impactradius.com/gen-ad-code/79340/78389/1036/” scrolling=”yes” frameborder=”0″ marginheight=”0″ marginwidth=”0″></iframe>[/iframe]
[…] Check out my full X-T1 review and field test. It’s a very detailed post with tons of real world information and more full size image samples. Also, I posted a few examples to show you how much information is preserved in X-T1 sensor when you shoot in RAW. […]
[…] During the past few weeks, I’ve shot quit a few RAW photos with my new Fuji X-T1. However, since Lightroom is not yet able to read the RAW files, I’ve just been sticking them all in a separate folder for safekeeping until I can make use of them.As good as the straight JPEGs from this camera are, I’m eager to see what the RAW files look like. A few months ago, I did a test of how much more color information, latitude and sharpness could be wrangled out of the little X20 when shooting RAW, and I was pretty impressed. Seeing how that camera only has a 2/3″ sensor, I’m hoping to be even more impressed by what the APS-C size 16MP X-Trans II sensor in the X-T1 can do. […]
[…] “Dan Bailey's Adventure Photography Blog – Exploring the World of Outdoor Photography with Tips, News, Imagery and Insight (Shooting RAW vs JPEG with the Fuji X-T1 http://t.co/NiBhNaHEEa A look at…” […]
[…] During the past few weeks, I’ve shot quit a few RAW photos with my new Fuji X-T1. However, since Lightroom is not yet able to read the RAW files, I’ve just been sticking them all in a separate folder for safekeeping until I can make use of them.As good as the straight JPEGs from this camera are, I’m eager to see what the RAW files look like. A few months ago, I did a test of how much more color information, latitude and sharpness could be wrangled out of the little X20 when shooting RAW, and I was pretty impressed. Seeing how that camera only has a 2/3″ sensor, I’m hoping to be even more impressed by what the APS-C size 16MP X-Trans II sensor in the X-T1 can do. […]
Dan,
I live in an area with lots of harsh sunlight, and Fuji’s film simulations and default settings are too contrasty to preserve shadow detail, even in post processing. I also found their default sharpening and noise reduction is smoothing out too much fine details, especially for skin and hair.
As in your findings, i found the raw to be much better to gather more details and dynamic range.
I did, however, found the best jpeg settings (for me) for post processing are as follows:
Pro Negative Standard
color +2 (boosting the flat look of Pro.st)
noise reduction -2
sharpness – 2
The resulting jpegs are soft, but allow for much greater degree of tone reproduction and detail sharpening without the over processed look.
Thanx for sharing your experiences so far.
Chen
Just a clarification on the jpeg settings in the post above:
simulation: Pro Negative Standard
colour: +2 (boosting the flat look of Pro.st)
noise reduction: -2
sharpness: –2
Chen