If you’re a regular reader, you know that I’m a huge fan of short telephoto lenses, specifically the 85mm f/1.8 lens. I’ve had my Nikon 85 1.8 for about a decade and it’s gone with me on every single photo assignment, vacation and expedition. I’ve used it with great results on both FX and DX bodies. Most recently, I carried it with me on my midnight sun bike tour through Denali National Park.

I love the this lens because it’s light, fast and sharp. (Read my full review of this lens and how I use it.) Because it has a medium working range and a very shallow depth of field, it’s an ideal portrait and travel lens. It’s also great for nature and landscapes, because it lets you isolate parts of the subject and create images that let your viewer’s mind fill in the blanks. The huge front element and 1.8 aperture make it very usable for shooting sports, as long as you’re not too far away.

And if bokeh is your thing, you simply can’t beat the creaminess and wonderfully soft backgrounds that the 85mm f1.8 lens produces.

For years, I’ve carried the Nikon 85mm f/1.8D lens, but this year, Nikon released the updated version, the AF-S 85mm f/1.8G lens.

What’s the difference? Although the new 1.8G version is a tiny bit bigger and heavier, it’s equipped with the Silent Wave, internal motor autofocus system, which provides ultra fast, whisper quiet focus tracking and lock-on. I imagine that over time, Nikon will incorporate AF-S into all of their lenses. If you haven’t used an AF-S lens, they’re quite impressive.

Also, the new 1.8G lens has Nikon’s Super Integrated Coating, which reduces ghosting and lens flare and improves for exceptional light transmission and superior color accuracy. Effectivley this technology and allows for the crispest, sharpest of imagery.

It’s a little more expensive than the older 1.8D model, but not by much. It’s still under $500, which is an extremely reasonable price for such a usable and verastile lens.

If you already have the older 1.8D lens, I wouldn’t necessarily rush out and switch unless you’ve got money burning a hole in your pocket. I’ve still got my D version and I probably won’t upgrade anytime soon. However, if you’re in the market for a short telephoto and are thinking about picking up the 85mm f1.8, then I’d absolutely recommend getting the newer AF-S 85mm f/1.8G version. It’s is an outstanding piece of glass that I think you’ll get a ton of use out in your outdoor photography over the years. If I had to buy a new 85 from scratch, I’d definitely get the new AF-S model.

Support this site: If you’re in the market for new gear, please consider visiting and purchasing gear through these links. This help cover the costs, effort and time that it takes to run this site and produce these reviews and articles. As always, thanks for reading!

[iframe]<iframe width=”120″ scrolling=”no” height=”240″ frameborder=”0″ style=”border:none;” border=”0″ src=”http://mer54715.datafeedfile.com/widget/aff_widget_prdt_generate-2.0.php?aff_num=6746&aff_net=1&widget_num=1351″ marginheight=”0″ marginwidth=”0″></iframe><iframe src=”http:///e/cm?lt1=_blank&bc1=000000&IS2=1&bg1=FFFFFF&fc1=000000&lc1=0000FF&t=danhbaisadvph-20&o=1&p=8&l=as4&m=amazon&f=ifr&ref=ss_til&asins=B006TAP096″ style=”width:120px;height:240px;” scrolling=”no” marginwidth=”0″ marginheight=”0″ frameborder=”0″></iframe>[/iframe]

July 25, 2012
See this post
Nikon AF-S 85mm f/1.8G Lens

Last week, while hanging around Facebook, I saw this photo by a young Australian photographer who I follow named Tim Arch. I was immediately wowed by the shot and therefore inspired to step away from the computer and go outside to make some photographs of my own. The biking shot above was the result. It’s one of my favorite photos of late, and since it garnered a great deal of positive response, so as promised, here’s the how-to.

Step 1: Decide What Kind of Photo to Make

Having been motivated by Tim’s photo, I decided to make a biking shot of my own, and since it was short notice, I figured I’d just go shoot a self portrait. Since I’m not exactly “model material,” I did what I usually do in these situations and shoot close up and focus on the bike.

Grabbing my Nikon D700, a couple of lenses, a Nikon SB-900 Speedlight and a pair of Pocket Wizards, I shoved all the gear into my Lowepro Flipside Sport AW camera pack, strapped my Gorillapod to the outside and jumped on my bike.

Step 2: Finding a Location

This didn’t take long, as there are numerous trails within a couple miles from my house here in Anchorage. I simply pedaled around for a few minutes until I found a suitable looking section that had good greenery, relatively few roots and a gentle curve.

I didn’t want too many roots, because since I’d be riding slowly and triggering the camera with a Pocket Wizard in one hand, I needed as few obstacles as possible, lest I wipeout and ruin the photo opportunity, or possibly hurt myself.

Step 3: The Setup

I wanted a shot from the front, so I fixed the camera on the Gorillapod and placed it right on the trail looking towards the curve. For a lens, I chose the Lensbaby Composer Pro with Edge 80 Optic. Once I had the framing set the way I liked it, I cabled up one Pocket Wizard and slid it onto the hot shoe.

For the flash, I set my Lowepro pack on the ground just off trail at camera right and stuck the SB-900 into the Tripod strap. It took quite a bit of fiddling to get the pack/flash combo balanced so that it wouldn’t fall over. I also needed to make sure that the optical eye on the flash was in line with the camera, since I’d be using the pop-up flash on the D700 to trigger.

Step 4: Framing and Exposure

Since the Lensbaby is manual focus, I needed to set an identifiable focus point that I’d be able to hit while I rode towards the camera. I chose the small root that lay across the trail and framed accordingly.

Then I set manual exposure on the camera with a shutter of 1/250 and set the flash to straight TTL mode. Coming in from the side, I was just looking for a mix of fill and key, or accent light. Although you often have one light for each, sometimes you can do both with a single flash.

Step 5: Start Shooting

Pedaling down the rooty trail right towards the camera while trying to steer and hit the button on the Pocket Wizard requires more coordination that I usually have on any given day. I rarely got the timing right, and I almost wiped out more than once. I needed to catch the bike wheel right in line with that root, but it didn’t always work out and many of my shots were out of focus. I kept at it for a few minutes, though, hoping that I’d get something good before the mosquitos drove me away. At least I never actually ran into the camera.

Step 6: Happy Accident. Or Divine Intervention, if you prefer. 

While the light was ok, it wasn’t anything to write home about. However, I had a little help. More than once, my Lowepro pack ILS (Improvised Light Stand) fell over and I had to keep setting it back up. It was far from precise, and one time, I inadvertently placed it so that the flash head was angling down and pointing slightly towards the camera. The result was a really cool looking God-beam style flare.

This happy little accident added an unbelievable dimension to the shot, and I instantly knew that I had something special. However, in order to make it really shine, or as Frank Zappa used to say, to “put the eyebrows on it,” I slapped the CTO warming gel onto the flash head and went for gold.

Of course, every time I touched the flash, I moved it slightly and it took a couple of tries to get that cool looking beam back. Eventually, I dialed it all in and managed to nail one pass where the tire was in perfect focus an alignment in the shot.

By then, the mosquitos were really bearing down on me, and since I had neglected to douse myself in Deet, I could only take so much before being driven completely mad. As soon as I knew I had the shot, I threw all the gear back into my pack, and pedaled off at full speed so as to outrun the incessant little buggers.

Total elapsed time for this shoot from setup to fleeing from bugs: Under 30 minutes. This is a perfect example of what I call Going Fast With Light, which is the subject of my off camera flash eBook of the same name about using flash in outdoor photography.

Thanks again for the inspiration, Tim!

July 24, 2012
See this post
Breaking Down The Shot: Mountain Biking Self Portrait

Craft and Vision is stepping things up. They just released a brand new eBook called Dodge and Burn: Leading The Eye With Lightroom and Photoshop. Written by Piet van Den Eynde, this is a comprehensive manual on how to refine the tonal relationships in your digital imagery by using Lightroom and/or Photoshop.

Although we don’t often refer to it as such these days, especially if we didn’t start out in the days of film and enlargers, dodging and burning is a craft that has as much relevance today as it ever did. In fact, Ansel Adams is quoted as saying “Dodging and burning are steps to take care of mistakes God made in establishing tonal relationships.

Lighting conditions, contrast and the limitations of digital sensors rarely produce a perfect image when we snap the shutter. However, by processing our images with modern digital imaging software, we can soften highlights, bring out shadows and accentuate color and contrast in order to effectively communicate the message of our subject matter in the optimum way that we intended during initial capture.

Post processing can be daunting and sometimes overwhelming task. Even with the simplicity of virtual sliders that give immediate results, the craft of effectively dodging and burning requires that we have full understanding of how we intend to refine our image, but also why.

The why is what matters, because in photography, it’s not the technique that carries the image, it’s the message. Photography is all about communicating your own interpretation about the subject, and through careful tonal management, you can help lead your viewer’s eye through your image. Human vision responds differently to light and dark, areas of relative brightness and to differing levels of sharpness, contrast and color. Solid post processing skills allow you to take control of your photographs. In today’s world, you need to take control of your imagery in order for it to stand out.

The how involves establishing a smooth and efficient workflow, and then choosing the right technique that best lends itself to the task and to your particular image. Even with Lightroom and Photoshop, there are a number of options that allow you to manipulate your image: the sliders in Adobe Camera RAW, adjustment brushes, gradient filters, levels, curves, etc. Some people use third party plug-ins, which offer even more options.

In this book, Piet walks you through an entire workflow from the ground up and shows you how to be efficient and effective with the tools mentioned in the previous paragraph. He offers specific case studies where he explores each tool and technique in depth with thorough and straightforward approach.

He starts with Lightroom, and then moves on to Photoshop and a couple of plug-ins by Nik Software, Viveza and Silver Efex Pro. Nik offers 15 day trial version of their software for free, and if you buy this ebook, you actually get a 15% discount code that’s good for any of their plug-ins.

What I really like about Dodge and Burn is that Piet walks you through each example and each area of the practice images with such detail. He might pinpoint seven or eight areas of a photo that need some specific adjustment on a particular photo, and then he’ll show you exactly how to make the adjustments that really bring your image alive.

In order to make the most use of this book and use the exercises, you’ll need either Lighroom 4 or Photoshop CS5/CS6. However, if you don’t have either of those programs, you’ll still benefit greatly from his explanations and techniques, which you should then be able to apply to your own software. Remember, ultimately it’s about the why. The how is just the tools you use to get you to the why.

Dodge and Burn: Leading The Eye With Lightroom and Photoshop is an truly excellent eBook, one of the best that I’ve seen. It’s without a doubt, the most ambitions project that Craft and Vision has released to date, and I’ve read nearly all of their titles. Piet is not only a master of his craft, he’s an excellent teacher and he lays out the information with clarity and technical authority. (Piet is also the author of the C&V Making Light off camera flash eBook series.)

Dodge and Burn is also an unbelievable value. It’s actually not just an eBook, it’s actually a complete package. For only $10, you get a 91 page double spread eBook that’s filled with information. You also get Piet’s Easy Dodge Panel, a custom Photoshop panel and matching action set (normally a $10 value), as well as 10 exercise files that let you follow along in the book and practice the techniques on your own.

Or, you can also get the Dodge & Burn “Lite” version for only $5, which has the Easy Dodge Lite Panel, but doesn’t have the 10 exercise image files.

If you want to increase your technical mastery and learn how to actively create photographs instead of just getting passive digital captures, then I would highly recommend this book, even if it were to cost twice as much.


July 17, 2012
See this post
Dodge & Burn: A New Craft And Vision eBook by Piet van Den Eynde

I’m an adventure photographer who loves to get lost exploring remote rocky mountain terrain, but I’ll admit something. I also have a domestic side. One of the things I love about is summer is gardening. I love flowers.

When I’m home, I spend hours in my yard planting, watering, weeding and cultivating poppies, bachelor buttons, nasturtiums, roses, lavender and many other blooming perennials. As a photographer and visually oriented person, flowers offer very pleasing appeal.

If you’re also a photographer gardener, you might want to check out Photographing Flowers: Exploring Macro Worlds with Harold Davis, which is a beautiful new book published this year by Focal Press.

This 207 page manual explores the intricacies and art of macro flower photography and shows you endless possibilities for capturing your own stunning flower imagery and shooting appeal floral arrangements. Covering both in-studio and outdoor location settings, Davis teaches the basics of macro photography equipment and explores a wide variety of techniques for creating different species and flower types.

He talks, gear, composition, focus, depth of field, creative approach, exposure, histograms, focus stacking, Photoshop post production and how to make use of different backgrounds; everything you need to know in order to create great flower imagery.

The illustrations in the book are simply beautiful. They draw you in with vibrant color and tight compositions and creative arrangements that will make you want to rush out into your own yard or into a nearby field to try out his techniques for yourself. Some of my favorites are the closeups of roses and the translucent photos that he lights from behind. Gorgeous.

As an added plus to the photography aspect of this book, Harold also approaches the material by teaching you about the life and science of flowers. He covers evolution, shape, ecosystems, cultural symbolism and historical significance with a friendly authoritative tone. He’s obviously loves his craft and both is knowledge and artistry come through with dedicated passion and enthusiasm.

Photographing Flowers: Exploring Macro Worlds with Harold Davis is a book that you can simply get lost reading, whether you’re reading it on the couch during a rain afternoon, or preparing to go shoot your own floral imagery. If you love flowers and photography, I promise, you will absolutely love this book. Pick up a copy and start exploring your own macro flower photography. And if you’re even in Anchorage, stop by my house and I’ll give you a tour of my own garden, although I have to give my wife credit for a great deal of the work. She has the greenest thumb on the planet.

July 16, 2012
See this post
“Photographing Flowers” by Harold Davis

A day away from the office. A day away from writing, editing and marketing, and a day away from assignment work. Thats what I needed.

My answer: A day of bush flying and genuine exploring. Where to go, though? Checking the weather, the best option seemed to be north, away from all that occluded front yuck that’s been sitting in Prince William Sound this week and making Anchorage cold and windy. 

After poring over Google Earth and talking with my pilot friend, I decided to head up to the Kahiltna Glacier, which is the massive 36 mile ice sheet that drains the entire west side of Mt. McKinley, as well as many of the other south facing peaks in the park including Foraker and Hunter. It’s the longest glacier in the Alaska Range.

I’d heard about a landing strip on the river bar just south of the Kahiltna. It’s not long, maybe 800 feet, but that’s long enough to go in if I’m light. I figured I’d at least go up and have a look, so I I loaded up the little Cessna with some extra clothes, food, emergency gear and my Fujifilm X10, which has become my defacto airplane camera. It’s good enough to capture high quality imagery and it hardly takes up any room. In fact, often times, I just wear it around the neck in the cockpit.

An hour and a half later, I found the strip, did a couple of low passes, dragged my wheels once to test the surface, then set up for landing. Coming in over the short trees on the south end, I dropped it onto the sand about 150 feet down the strip, bounced once or twice on the bushwheels and then rolled to a stop. Adding some power, I taxied to the end of the strip and shut down.

Landing a short strip gives me the same excited feeling as climbing a hard pitch. I’m always a little jittery right afterwards as my adrenaline gradually recedes. In many ways, flying gives me similar feelings of risk, reward, adventure and pushing my limits.

Once down, I loaded up my daypack, slung the X10 around my shoulder and set out to explore. My plan was to hike up to the glacier, which lay about a mile and a half away from the strip. I could see it off in the distance,  but terrain that you see from the air looks a lot different from the ground.

Brown Bear Print

After a mile up the gravel bar, I ran into brush and forest. I plodded through trees and thick willows up over the first rise, but quickly became dismayed when I saw just how far the trees went on. It was going to take about a thousand yards of serious bushwhacking to get to the toe of the glacier. I wasn’t really up for that, so I bailed and looked for another way.

I though about trying to follow the river on the west side of the gravel bar, but I couldn’t see around the first corner. I didn’t know if that would even go; you never know with water, so I started walking east across the bar, looking for another way.

Eventually, I stumbled across a narrow rock gully that appeared to follow a low contour through the trees. I had no idea how far it might go before tree-ing out, but I headed up to have a look. What I found was a solid corridor of boulders that cut almost the entire way through to the toe of the glacier. You can actually see this little “rivulet of rock” on the Google Map. Again, though this stuff is hard to see from the ground.

Most of it was walking and boulder hopping, although I did have a few stretches of full on willow bashing. I made noise the entire time, my bear bell ringing from my belt, but I didn’t see any animals besides birds and mosquitos. I did see about two million moose pellets and figured that the moose must use this as their main corridor through the trees.

Finally, I popped out on the other side, in front of an enormous, undulating bed of rock, dirt, mud and old glacial ice. My prize. I gave myself a time limit and hiked as far as I could, shooting photos along the way. I’d hoped to make it all the way out to where the exposed ice begins, but as I said, distances can be deceiving. I’d have to go about 2.5 miles out to reach that point, which, on this terrain, would take more time than I had to spare.

Since the light was gray and overcast, I decided to shoot black and white photos with my Fuji X10. Putting it in auto-EXR mode, I captured a few images that I feel really portray the massive mountain landscape of this area. As usual, I was completely impressed with my X10 and was actually happy not to be lugging a heavier pack of DSLR gear through all that brush. Overall, I’m really happy with how it performed yesterday during my little backcountry aviation photo adventure.

I lost my bear bell on my way back through the brush, but that was the worst event of the day; fortunately, I hadn’t needed it. My departure from the sandy gravel bar strip went without a hitch, and confirmed that on a soft runway with no wind and no trees on the takeoff end, 750 feet is about the shortest that I can go if it’s just me in the plane. I’d take you up there to show you, but I wouldn’t be able to make off the strip with both of us in the plane.


July 12, 2012
See this post
Bush Flying Photo Adventure on The Kahiltna Glacier

Adobe Photoshop Lightroom 4 has been out for a few months now, and like all previous versions, it’s built with some powerful new features. In addition to revamping the Develop module. Adobe also included Map and Book modules, which allow you to map and sort your images based on location information, and create photo books through Blurb.

If you’re a new user, or even if you’re upgrading from Lightroom 3, you may not know everything that’s included in this latest edition. If you consider yourself computer savvy, you could always find out by just spending some time navigating the various menus.

However, that’s not always very efficient. If you’re a Lightroom user, then chances are, you’re either a pro shooter, or a part time photographer who already has a busy workload and life schedule and probably don’t have much time to waste. You want to learn how to make the most of all the new features without killing unnecessary hours.

Having a book is a great way to learn any software. With that in mind, here are the three best Lightroom 4 books that will help you get a solid handle on things. They’re all filled with solid information and when compared to the potential amount of time wasted fiddling around, they’re very good investments.

1. The Adobe Photoshop Lightroom 4 Book for Digital Photographers by Scott Kelby.

The Adobe Photoshop Lightroom 4 Book for Digital Photographers by Scott Kelby

Scott Kelby’s books are the bestselling Lightroom books in the world. He is considered the foremost digital imaging teacher and  probably writes the best books on the subject. Much like his companion book, The Adobe Photoshop CS5 Book for Digital Photographers, this is a must have update to the previous edition.

The Kelby book relays very practical information, and it’s easy to read. He writes in a down to earth style and shows you how to get the most out of the program. He walks through a complete workflow, all the way through to archive and output. He explains the exact methods and techniques that the pros use to import, edit and organize their image library and he even shows you how and when Photoshop fits into a Lightroom workflow.

Also included are his patented “Killer Lightroom Tips” as well as his famous “7-Point System for Lightroom,” which will teach you how master the most often used editing techniques.

The book is clearly illustrated with glossy, full color screenshots that outline each step and make it quite easy to follow along.

If you’re coming from Lightroom 3, there will be some overlap and revisiting of techniques that haven’t changed since earlier versions, but there is still lots of new and worthwhile material here. If you’re new to Lightroom and want to get yourself up to speed, then this book is highly recommended; it’s the one I use to get me through.

2. Lightroom 4: Streaming Your Digital Photography Proces by Nat Coalson

Nat Coalson’s books get great reviews and this one is on par with the Kelby book in terms of it’s usefulness and good layout.

Nat is an excellent teacher and explains everything in very clear, professional terms. The goal of this book is to teach you how to use Lightroom as quickly as possible. His approach is to write as if he’s teaching you one-on-one, and the result is a very concise and usable manual.

Like the title says, this book is all about streamlining your digital imaging workflow and through a concise arrangement of step-by-step tutorials, Nat shows you how to save time by using shortcuts and presets, how to make your images look their very best and how to share your photography in the best and most practical way, depending on your needs.

Nat’s writing style is well organized, logical and intelligent. He doesn’t try to be funny, which is one reason why some readers might find prefer this one over the Kelby book. Some people have commented that the screenshots are a bit small in this one. They’re certainly smaller than the pictures in Scott Kebly’s book, but I find them to be adequate.

Overall, this is an great book and one that I would also highly recommend to any new Lightroom user. As with the Kelby book, longtime users may find some redundant material, but this reference can still help you get your Lightroom workflow under control with speed and efficiency.

3. The Adobe Photoshop Lightroom 4 Book, The Complete Guide for Photographers, written by Martin Evening.

A recognized digital imaging and Photoshop expert and a professional commercial photographer, Martin Evening has been working on Lightroom with the design team at Adobe since the beginning and he knows the program inside and out.

In his book, he describes all the new features of Lightroom 4 in detail from a photographer’s perspective, covering all areas of image management, editing and organization.

An accomplished instructor, he’s very good at teaching you how to make the necessary critical adjustments to your images. He shows you how to do tonal correction, sharpening, lens correction, noise reduction and more. Every step is outlined with step-by-step tutorials, many of which you can follow along by viewing the video lessons on the companion website.

Finally, Evening lays out the steps for an efficient workflow that ultimately lets you focus your concentration on actually making photographs, not tinkering around with the computer.

This 704 pages book is the most comprehensive manual to Lightroom 4. Consider by many to be the Lightroom 4 Bible, it’s filled with a huge collection of tricks, tips and pro methods. Overall, it’s probably the best single complete book on Lightroom. It’s not a simple how-to book, though, and you’re looking for the “show me which slider to move” guide book, then I’d recommend one of the two books mentioned above.

However, if you want a complete, in-depth reference that will teach you everything you would want to know about Lightroom 4 so that you can unlock the true power of the software, then this is your book.

[iframe]<iframe src=”http:///e/cm?lt1=_blank&bc1=000000&IS2=1&bg1=FFFFFF&fc1=000000&lc1=0000FF&t=danhbaisadvph-20&o=1&p=8&l=as4&m=amazon&f=ifr&ref=ss_til&asins=0321819586″ style=”width:120px;height:240px;” scrolling=”no” marginwidth=”0″ marginheight=”0″ frameborder=”0″></iframe><iframe src=”http:///e/cm?lt1=_blank&bc1=000000&IS2=1&bg1=FFFFFF&fc1=000000&lc1=0000FF&t=danhbaisadvph-20&o=1&p=8&l=as4&m=amazon&f=ifr&ref=ss_til&asins=1118206177″ style=”width:120px;height:240px;” scrolling=”no” marginwidth=”0″ marginheight=”0″ frameborder=”0″></iframe><iframe src=”http:///e/cm?lt1=_blank&bc1=000000&IS2=1&bg1=FFFFFF&fc1=000000&lc1=0000FF&t=danhbaisadvph-20&o=1&p=8&l=as4&m=amazon&f=ifr&ref=ss_til&asins=0321819594″ style=”width:120px;height:240px;” scrolling=”no” marginwidth=”0″ marginheight=”0″ frameborder=”0″></iframe>[/iframe]

July 11, 2012
See this post
The 3 Best Books for Learning Adobe Lightroom 4

Last fall, I got my hands on the Lowepro Photo Sport 200 AW adventure camera pack. (Check out my video review of this pack.) I quickly fell in love with the Photo Sport  and carried it everywhere.

I used it exclusively throughout the fall and winter and determined it to be the best all around photo pack for active outdoor adventures that I’d ever used in my 15 years as a pro photographer. In fact, for months, it lived on the floor next to my desk, fully loaded and ready for action at any moment’s notice.


What I loved about the Photo Sport, and still do, is the fact that it has a dedicated camera compartment at the bottom of the pack that let’s you separate your photo gear from your outdoor gear. Camera and lenses in one place, jackets, water, and sandwiches in another. The zipper flap gives you quick access to your photo gear, while the pack itself is big enough for a day’s worth of adventure clothing and equipment. In my mind, it meets some perfect requirements and offers an excellent solution to the problem that photographers have been facing for years.

Then, this spring, I got the brand new Flipside Sport AW. I moved my camera over, stuck my beloved Photo Sport on the shelf, and proceeded to run the new one through the rigors. (Check out my full review here.)

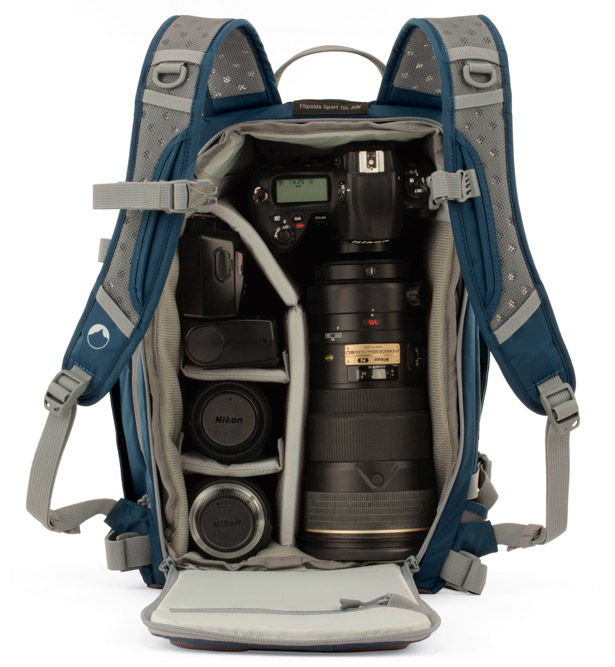
As opposed to the Photo Sport, which is a top loading pack, the Flipside Sport AW is a panel access pack that gives you fast, uninhibited access to your camera gear. In fact, it’s all gear, with almost the entire pack space being dedicated to cameras and lenses.

To get in and out, you simply undo the chest strap and shoulder straps, spin the pack around on its waistbelt, zip open the back flap and bang- there’s your gear. All of it. Ready to go again? Zip shut, spin back around and throw your arms through the shoulder straps. You’re ready.

Now it’s time to make my final recommendation. Between these two, which one is the best photo pack for active outdoor and adventure photography?

The designers at Lowepro did an awesome job coming up with two very versatile, durable and functional backpacks. Both rock, but since they’re built with very different designs, the better way to determine this is by looking at what you do and how you’ll use it.

Carrying Capacity

Whereas the Flipside Sport AW will hold more camera gear in it’s camera compartment, including a battery-grip DLSR body and a long lens, such as a 70-200mm f/2.8, the Photo Sport 200 AW is designed to hold more non-camera gear. However, it’s not quite that simple, because you can cram an awful lot of stuff into the main compartment. It also has belt pockets and shoulder strap pouches where you can stash things like memory card cases and gu packets. It also has a top lid, where you can stash extra batteries, cables, phone, bars or other small accessories.


I can easily fit a battery powered strobe, a couple of flashes and lenses, including my 80-200mm f/2.8, as well a flash modifier and clothing into the top compartment of my Photo Sport, and that doesn’t count the camera, plus two more lenses/flash in the dedicated camera pouch at the bottom. Add to that, a light stand or tripod and a medium sized Photoflex softbox strapped to the side, and I’m ready for just about any kind of photo shoot. It will even hold an iPad.

Or, I could just carry a modest selection of camera gear and an entire day, maybe two day’s worth of outdoor gear, food, water and clothing for a long hike, trek or bike ride if you pack light.

For sheer carrying capacity, the Photo Sport 200 AW is bigger and it will hold more stuff.

Accessability

Oftne my number one determining factor as to the usability of a photo pack for shooting adventure, accessibility is how quickly you can go from standing there empty handed to camera in hand, ready to take the shot.

Both packs do a good job in this category. With it’s side zipper compartment, you can grab your camera pretty quickly. However, I’d have to say that the Flipside Sport AW has a slight edge here, because, even though the Photo Sport will hold more stuff, the Flipside Sport gives you faster access to a bigger selection of camera gear. With it’s back panel zip design, you can have your camera and big 80-200mm lens out in a real hurry, as well as 2-3 other lenses and/or flash, plus accessories. With the Flipside Sport, it’s all right there.

So, in the accessibility category, the Flipside Sport AW wins.

Hydration

Both packs offer hydration ready pockets, which make either pack a great outdoor pack. However, the Photo Sport easily wins out here. It will hold a standard 100 oz Camelbak bladder, whereas the side pocket on the Flipside Sport will only take a full 25 oz bladder. If you’re going on a short hike or trail run, this is probably find, but if you’re out for the whole day and you need lots of water, then the Photo Sport 200 is your pack.

Comfort

Both packs are extremely comfortable and are designed with high tech breathable suspension systems and back padding that make wearing them a real joy in just about any outdoor situation. The Photo Sport has softer and more comfortable shoulder straps and a wider more comfortable belt, but the Flipside Sport shoulder straps are a little more breathable for high energy activity.

I’ve run, hiked and biked with both packs and love the way that they fit, but my pick for winner in this category is the Photo Sport.

Overall Score

The best way for me to give an overall recommendation on which pack to get is to look at it in terms of activity and what type of sports you like to do and photograph, rather than just go by pack design. Here’s how I break it down:

Fast Hiking, Peak Bagging or Trail running

The Flipside Sport offers the fastest accessibility and it lets you carry your big lens in the main compartment, as well as a battery-grip DSLR. I love the Photo Sport for hiking, because it holds more all day gear, and it’s certainly comfortable enough for trail running, but if you want to run and shoot without stopping to ever put the pack down, the go Flipside Sport. It won’t hold tons of outdoor gear, but it will certainly fit a jacket, extra shirt and Clif Bar or two. (I usually stash my jacket in the built-in side tripod flap.)

Longer Day/Multi Day Hiking or Trekking

If you don’t mind stopping to smell flowers and are willing to take the pack off to get inside the top loading main compartment, or if you simply need to carry more gear, clothing, food and water, the I’d recommend the Photo Sport 200. If you have a REALLY small summer sleeping bag, you might even be able to backpack with it.

Mountain Biking

Again, if fast accessability is your need, then the Flipside Sport is the better choice. I recently did an all night, 85 mile bike tour through Denali National Park with the Flipside Sport 10L and found it to be extremely adequate. It’s currently my mountain bike pack of choice. That said, I rode my snow bike all winter long with the Photo Sport and was never unhappy with it.

I guess it depends on how far your riding, how long you’ll be out, how much gear you’re carrying, if you have bike bags or not and if you prefer a top loading pack or a zipper pack. I can see doing a long ride with either.

Both packs offer fast access, but again, if you’re brining that big lens and want it right there at your fingertips, then the Flipside Sport is your pack.

Going Fast With Light

If you’re just carrying one flash and something really small like a Lumiquest Softbox III, you can get by with the Flipside Sport. However, if you’re taking more than one light and a couple of slightly bigger light modifiers, then the Photo Sport 200 will be a much better choice, simply because it holds more, and has the top lid pocket.

Skiing

Photo Sport, hands down. It will fit your thermos, puffy jacket, and even a small shovel & avalanche probe. The Photo Sport is an awesome ski camera pack.

If I HAD to choose just one…

I’d go for the Photo Sport 200 because I think it’s just a bit more versatile. Review the parameters above and then decide which pack you think will be the best choice for your photography adventures!


July 9, 2012
See this post
Comparing Adventure Camera Packs: The Lowepro Flipside Sport AW vs. The Photo Sport 200 AW

Neat and clean. Perfect. Balanced. Evenly distributed.

Whatever. That’s boring.

If your mission with photography is to create dynamic photos that shout, sing and yell, then you’ve got to break out of your box and go for bang, not whisper. Forget subtle, make it pop by pushing your histograms all the way to one side or the other.

In digital photography, we strive to create images with balanced histograms where everything is evenly placed left to right, and all zones of exposure and tone are represented with a pleasant looking curve. So nice and safe. So ho and hum.However, that’s not always how the world looks. The world is full of extremes of light and dark, of brightness and shadow, of left and right. Make use of these wildly unbalanced themes in your photography by accentuating this contrast and creating images that have completely unbalanced histograms. Don’t be gentle about it, run right to the edge with your tonal range and then shove hard.

Although you won’t always want to go too far outside of the box, sometimes it’s ok to have a histogram that’s blown out a bit on either side with the highlights or the blacks, or at least one that’s bunched up all the way up to the edge on one side or the other. In these two images above, you won’t find an even distribution of tones across the entire range. You’ve got tons of light, tons of dark and a small spattering of middle thrown just to define the main subject.

Sometimes that’s the way it should be. So, have fun with your compositions. Experiment. Be bold. Be daring. Be creative.

July 6, 2012
See this post
Don’t Be Afraid To Push Your Histograms To The Edge

July ebook Sale

For the entire month of July, you can save 25% on ANY or ALL of my 3 eBooks. Just click the order button on whichever title(s) you want and enter discount code: JULY25 in your shopping cart and you’ll automatically get the discounted download.

Going Fast With Light

Going Fast With Light is an 83-page manual that will show you how to use off-camera flash and apply speedlight-style lighting techniques in your active outdoor photography styles.


$12.95

Add to Cart

View Cart

Making The Image- A Conceptual Guide for Creating Stronger Photographs

“Making The Image” is a 50 page eBook that will guide you towards making more powerful photographs. By exploring how the human visual system responds to the world, it breaks down imagery into individual concepts, such as light, color, balance and viewpoint.

$10.95

Add to Cart

View Cart

How to Become a Pro Photographer

This in-depth eBook is for anyone who is considering a full or part time career in photography. Illustrated with stunning imagery and packed with industry resources, links and valuable information that I’ve gained during my experience working as a full time pro for a decade and a half, it will tell you what you need to know in order to get started making money as a photographer.

$8.95

Get the Complete Dan Bailey Photo eBook Collection.

  • Going Fast With Light
  • Making The Image
  • How to Become a Pro Photographer

$32.95

Add to Cart

View Cart

Use Discount Code: JULY25 to Save 25% – Order Now!

July 3, 2012
See this post
July Sale – Save 25% on All Dan Bailey Photo eBooks

No matter how long you’ve been shooting or how accomplished you are as a photographer, you need to continually keep up with your education and training. This is vitally important, because the last thing you want to do is fall behind the curve. In this business, if you’re not constantly improving and pushing your creative and technical boundaries, then you’re falling behind.

You should build the time and cost of educating yourself into your yearly photography budget. Training is just important as any piece of gear that you’ll buy, and amortized over the course of a year, these costs are actually less than coffee every day.

Without a doubt, one of the best ways to learn photography is to attend a workshop or take an online photography course. There’s a big difference between reading what someone does and actually watching them do it. Seeing firsthand how to apply a certain technique or creative style from an effective instructor or experienced pro is like a shot of adrenaline to your own photography.

Plus, with an online workshop, you can run it on your own schedule, no matter where you live and you can start and stop at your convenience. Most courses and seminars can be viewed on just about any device, including the iPad, which means that you don’t have to be stuck in front of your computer to learn.

Here are a few of the best online photography courses that I’ve found. I’d recommend giving them a look and seeing if they match your learning style and budget. It’s easy to get complacent about this, so take it upon yourself to stay on track with continuous training throughout your photography life and/or career.

1. Kelby Training

Kelby Training is probably the best site for professional photo instruction. All the top names are there- Joe McNally, Dave Black, Tom Bol, Moose Peterson, Syl Arena, Jay Maisel, Scott Kelby and many more. There are hundreds of courses offered that vary in length between one and three hours. (Check out the entire course listing.)

On average, 1-2 new training classes are added to the site each week. Also, a few times each year, Kelby Training offers a few live seminars in select cities. This summer, Kelby Live Seminars include Joe McNally’s One Light Two Light seminar tour across Canada and a few US cities, and Scott Kelby’s Photoshop CS6 for Photographers workshop tour, which hits five cities in July and August.

Kelby Training works on a subscription system. For $199 a year, or $24.95 a month, you get unlimited access to all the online photography and Photoshop classes. The Live Seminars are $99 each.

I’ve watched a few of the videos on the site and they’re generally very well done. Obviously each photographer has his or her own teaching style and you may prefer one person’s courses to another, but the beauty of having a subscription is that you get to watch any and all of the videos that you want 24-7, whenever you want.

Overall, Kelby Training is an incredibly valuable training resource that I’d highly recommend checking out. It costs less than a buck a day, and whether you’re a novice or a pro, you’re sure to get alot out of the program.

Get $10 off an annual subscription by clicking through this link and entring code KTCJQ12

Learn Photography Online with the Pros Save $10 Now #KTCJQ12

2. The Compelling Image

The Compelling Image offers online interactive photography courses, as well as classes in multimedia storytelling. This is where I teach my online workshops. (See my course listing.)

Here’s how it works: Sign up for a course, and you’ll receive a new lesson each week via email, which includes an accompanying assignment. You then have 10 days to complete and upload your assignment, where it will be personally critiqued and commented on by your instructor. During the length of the course, (most are 4-6 weeks), you’ll have the opportunity for open message board discussion with your teacher, as well as with other students who are also signed up for the class.

This social-interactive aspect is what makes The Compelling Image unique, and it’s what makes it a very effective teaching environment. If you value one-on-one training, personal commentary on your imagery and the ability to ask direct questions about any aspect of the class, then this may an ideal format for you. Course offerings at TCI cover just about every type of photography. Read a student review of one of my courses.

3. creativeLIVE

creativeLIVE, has a unique approach to teaching. Each course is a full one to three day workshop that’s offered in a live setting, and filmed on location in the company’s studio in Seattle. At anytime during the live workshop, you can visit site and watch for free. Then, when a course is complete, it gets added to the course catalog and is available as a paid download.

Essentially, you have three options. One, tune in and see what course is currently being offered LIVE right now. Yes, I said ‘now.’ Tune in and see what’s running at this very moment. Two, check the course calendar, find a course you’d like to watch, and then schedule yourself to watch it. Or, three, check the course catalog for archived workshops, and find courses that you’d like to buy.

It’s true, an all day workshop on your computer may not work for everyone. If you don’t have time to sit down and watch the whole thing, you can always keep it running in the background, or in another browser window. I’ve watched part of a few of the creativeLIVE courses, and while they can drag on a bit over the course of many hours, they generally get great instructors and present relevant material. Hence the beauty of the paid download; watch what you want, when you want.

4. Steele Training

Steele Training offers just a few courses that are aimed at the novice and intermediate photographer and those who are somewhat new to the world of digital imaging. His Lightroom Made Easy and Photoshop Basics For Photographers are great tutorials that get you up to speed with your computer skills, quickly help you build an effective photography workflow and teach you how to manage and edit your images with speed and efficiency.

Phil also has a couple of flash courses- one that that teaches you how to shoot headshots, and one that’s geared towards event photography. These are good workshops, but less geared around outdoor photography.

Phil’s courses run from 2-5 hours, and are presented as a number of short tutorials that each cover a specific topic. Once you purchase a course, you log on and watch right in your browser.

Click these links to save 15% off the Lightroom Made Easy Course, or the Photoshop Basics course. Check out his free tutorials and see if his teaching style is right for you.

July 2, 2012
See this post
Recommended Online Photography Courses