oct16-01271aThe other night, I flew out to the Knik Glacier in my little Cessna and spent the night among a scattering of beached icebergs. It was a spectacular adventure, one that I desperately needed, after weeks of not doing enough of this kind of stuff.

The aurora forecast was calling for strong displays on Saturday night, so I was hoping to shoot some photos of the northern lights over the icebergs, similar to what I had done when I did during a fatbiking camping trip out here a couple years ago with my friends Glenn and Josh.

It was the night of the full moon, so I was pretty excited about that as well- I’d seen it come up the previous evening while shooting aerials over the Chugach, (see below) and I was excited to try and photograph it with a long lens as it came up over the glacier.

oct16-01093

After shooting a few sunset aerials in the area, I landed on the gravel bar around 7:30PM, just as the last light was fading from the sky. I hiked about a half-mile with my gear down to the shores of the Knik Glacier Lagoon and set up my Megamid right in front of a nice big iceberg. (The lagoon is the lake right in front of the glacier that’s full of floating icebergs that have calved off.)

As it got darker, I saw the light from the moon start to grow below the horizon. I was really excited to capture some long lens moon shots similar to the night before, but when it finally crested above the mountains, the sky was already much too dark. There was no way I was going to be able to show any detail in the full moon and still preserve the icy landscape.

In a very cool twist of fate, though there was a bit of haze at the horizon, and when the moon rose above the distant peak, it looked just like the sun. Huge ball of bright yellow orange, just like at sunrise, except the rest of the sky was quite dim, as was the light on the ground.

oct16-01289a

Switching gears, I opened up my exposure for the ambient light and spent the next hour and a half shooting surreal glacier landscapes under the light of the warm, October Hunter’s Moon. I was all by myself out there, and I remember the solitary excitement I felt as I ran around with my tripod, looking for different vantage points and not saying a word.

The air was cool, but not cold- in the high 30s. Chilly enough for gloves, hat and puffy jacket, but not at all uncomfortable. With the scene in front of me, I probably wouldn’t noticed even it was.

I shot in RAW+JPEG with my Fuji X-T2, mostly in Velvia mode, but almost all of these shots are straight JPEGs. Only the leadage at the top was a RAW processed image. Below is the straight JPEG version, which shows you just how much information can be drawn out of the Fuji RAW files. It’s pretty amazing!

oct16-01271b

At about 9:15 PM, I put the camera down for a few minutes to gather wood and make a pleasant little campfire between a couple of ice chunks near my tent. The rocky shore is littered with driftwood- the remnants of trees that were brutally ripped from the surrounding hillside by the moving ice and deposited here many decades later.

It was the perfect company for my rice and chicken backpacking dinner, which I enjoyed while gazing around at the still, blue world around me, and watching out for any sign of the aurora. Then, after dinner, more pictures, in between forays to gather more wood and keep the fire going. I think I finally slid into the sleeping bag at around 11:45 PM.

I set an alarm to wake me up every couple hours to check for aurora, but there was nothing. I think I can see an ever-so-faint band of green in one of my photos, but that’s about all. There seemed to be no activity that night, but I didn’t really care; I was already quite excited about my moonscape photos, and besides, once I’m tucked away in my bag, it’s kind of fun to stay there through the night.oct16-01324

As you can see, I was camped really close to the shore. I wouldn’t camp this close in the summer, when many big icebergs break free from the face of the glacier. Combined with higher water levels from the incoming creeks, this can occasionally displace the water in the lagoon.

During short and very unexpected periods of “high tide,” when the lagoon surges, the water can come up quite a few feet- that’s when many of these smaller icebergs get beached. Since the glacier has slowed down for the season, they’ll spend winter on the shore- dead ice at the end of a very long journey that started as snowfall on the surrounding peaks about two hundred years ago, or more. In the spring, they’ll start to melt, and by early summer, they’ll be gone.

Given the limited glacier activity and the fact that the lagoon is started to freeze up, I wasn’t too worried about the water surging during the night. However, I did hear plenty of creaks, cracks and distant tumbles from the glacier, and I saw the water making small surges under the ice from time to time.

oct16-01329

I did have a dream that night where (in my dream) I had woken up to a surge and all of my gear, including my tripod, X-T2 and all of my lenses were gone, having been swallowed up by the advancing waves of murky glacier water. It was one of those dreams that goes two deep (a-la Inception), and at one point, I had woken up in my dream only to find that it wasn’t a dream- all my gear was really gone, even though I was still dreaming.

Eventually, I topped out from my two-layer dream, probably from the wind flapping the fabric of the Megamid. Much to my relief, all of my gear was still there, safely beside me. Later on that night, two of my rock tie-downs came loose and the Megamid blew over, leaving me exposed for the rest of the night. Wasn’t too bad, though; actually quite enjoyable. I had a much better view from my sleeping bag, and the sky was clear, so no big deal. Still no aurora though.

I shot even more photos the next morning, but that’s a blog post for another time…

What adventures have you had lately?

oct16-01311a

[iframe]<iframe src=”https://player.vimeo.com/video/188221607″ width=”338″ height=”600″ frameborder=”0″ webkitallowfullscreen mozallowfullscreen allowfullscreen></iframe>
<p><a href=”https://vimeo.com/188221607″>(Camp)fire and Ice.</a> from <a href=”https://vimeo.com/user12765218″>Dan Bailey Photo</a> on <a href=”https://vimeo.com”>Vimeo</a>.</p>[/iframe]

October 20, 2016
See this post
Photographing Icebergs by the Light of the Moon

xf100-400mm_hadgrip_flat

In all my years as a photography, I’ve never owned a lens longer than 200mm. Until now. I rented a 300 f/2.8 for an assignment once and borrowed a 300 f/4 a couple of times, but for my fast and light style of outdoor photography, I just didn’t relish the idea of carrying really big glass.

Earlier this year, Fujifilm released their new XF100-400 f/4.5-5.6 OIS WR lens, and I have to admit, I was wasn’t super warm to the idea of getting it. I make it a point to not own any camera gear I can’t run with, and I didn’t think this would fit that criteria. And, I wasn’t sure I’d really get much use out of it.

How wrong I was.

Turns out, I love the Fuji 100-400. I can’t get enough of it! This lens is serious fun, and during the past few months it’s seen more use than many of my XF lenses, including the 50-140, which is THE go-to long lens in my bag.

I plan on writing up a full review of this lens, but for now, here are five reasons why I think it’s awesome.

1. It’s Razor Sharp!!

The XF100-400 has excellent optics. Built with 21 elements in 14 groups, 5 extra-low dispersion elements and one Super extra-low dispersion element, this lens is ridiculously sharp. Fuji has a reputation for producing great glass, and this is no exception.

I’m really impressed at well it’s able to render crips, fine details, even at relative distance. One thing I learned when using long lenses is that when shooting subjects that are very far away, you’re looking through a lot of air. You can lose a lot of sharpness from heat shimmers, but if the air is cool and you’re not shooting at extreme distances, the 100-400 can hold an incredible level of detail.

taurus-03914taurus-03914ataurus-09943taurus-09943a

2. It Has an Extremely Fast Autofocus Motor

Before I got this lens, someone told me that the 100-400 actually has a faster AF motor than the XF50-140. I didn’t believe it, because the 50-140 is pretty darn fast, but when I got it in hand, I was blown away.

This thing locks and tracks like a champ. With AF technology that’s a year ahead of what went into the 50-140, and twin linear motors, it’s probably the fastest Fuji Zoom lens in terms of AF performance. Paired with the X-T2, it’s a highly capable, incredible quick sports and wildlife lens, hands down.

Having shot bike racing, flying birds, airplanes, moose, bears and a variety of other outdoor subjects with the 100-400, I’ve been impressed every singe time.

taurus-06171ataurus-06459taurus-05538a

3. It has 5 Stops of OIS Image Stabilization

This is perhaps one of the most impressive features of the XF100-400 lens. The image stabilization allows for hand holding this lens down to ridiculously low shutters speeds- speeds that you wouldn’t even think of thing to shoot with this focal length.

I’ve managed to hold it down to 1/80 sec when zoomed to 300mm, 1/100 sec at 400mm and 1/30 sec at 100mm. Seriously, I rarely use a tripod with this lens. How bad am I?

taurus-5188
Hand held 1/80 sec @ 300mm, 100% crop

taurus-5188ataurus-5176a

Hand held 1/100 sec @ 400mm, 100% crop

4. It’s a Reasonable Size and Weight, and Weather Sealed

Yes, for the record, I can run with this lens. It fits in my regular lightweight hiking and trail running pack, the Lowepro Flipside Sport 10L AW. Sure, I have to turn the hood around (I usually like to keep all my lens hood on all the time for quick access), but that’s a small tradeoff for being able to hike with a lens that, in full frame size, would be a 150-600.

Add the Fuji 1.4X Teleconverter and you’ve got an 800mm lens. Actually, with the current Fujifilm rebates, if you buy the 100-400 and the 1.4X TC together, you save $350.

Anyway, the very first thing I did with the 100-400 this past spring was stuff it into my Flipside pack and take it hiking. Not flat trail hiking, this was lots of steep uphill and big screefields on the way down. I didn’t feel like I was carrying a huge lens, in fact, it didn’t feel much heavier than if I were carrying the 50-140. The weight difference on my back was almost imperceptible. It’s even lighter when you remove the tripod collar.

Plus it’s weather sealed, so there’s that. Nice when you’re shooting in bad conditions. Like when the animals are out, or when the landscape has that… you know… special charm. Weather sealing is not a deal breaker for me, but for a wide range of outdoor photography, having it is nice.

100-400pack

fujinon-xf-100-400mm-f45-56-lensmar16-01356

5. It’s Serious Fun!!!!!

I said this above, and I mean it. The Fujifilm XF100-400 lens is a blast. Really fun to use for shooting just about everything. The long focal length applies an extreme level of compression to your scenes, which makes your backgrounds loom large, with tons of separation.

You can really bring in the details and show things super close, whether it’s a nature detail, a portrait, oh… I don’t know… The Moon. How fun is it to shoot the moon, zoom in and see all the craters. Pretty amazing, considering that the moon is 238,800 miles away. I can’t wait to photograph the moon the winter so that I totally minimize heat shimmers. I’ll use a tripod then.

Anyway, if you’re looking for a really fun, relatively compact, highly versatile long lens to add to your X Series tool bag, you can feel good about the XF100-400. It’s a solid performer and like I said, it’s super fun!

KNIK-01405KNIK-01405Ataurus-09954ataurus-09187ataurus-09662

As I mentioned above, with the current Fujifilm Rebates, you can get the XF100-400 with either the 1.4X or 2X Teleconverter and save $350, and you can also save $350 if you buy the 100-400 and 50-140 f/2.8 lens together.

[iframe]<iframe width=”120″ scrolling=”no” height=”240″ frameborder=”0″ style=”border:none;” border=”0″ src=”http://mer54715.datafeedfile.com/widget/aff_widget_prdt_generate-2.0.php?aff_num=6746&aff_net=1&widget_num=7470&sid=” marginheight=”0″ marginwidth=”0″></iframe><iframe width=”120″ scrolling=”no” height=”240″ frameborder=”0″ style=”border:none;” border=”0″ src=”http://mer54715.datafeedfile.com/widget/aff_widget_prdt_generate-2.0.php?aff_num=6746&aff_net=1&widget_num=7471&sid=” marginheight=”0″ marginwidth=”0″></iframe><iframe width=”120″ scrolling=”no” height=”240″ frameborder=”0″ style=”border:none;” border=”0″ src=”http://mer54715.datafeedfile.com/widget/aff_widget_prdt_generate-2.0.php?aff_num=6746&aff_net=1&widget_num=7472&sid=” marginheight=”0″ marginwidth=”0″></iframe><iframe width=”120″ scrolling=”no” height=”240″ frameborder=”0″ style=”border:none;” border=”0″ src=”http://mer54715.datafeedfile.com/widget/aff_widget_prdt_generate-2.0.php?aff_num=6746&aff_net=1&widget_num=7473&sid=” marginheight=”0″ marginwidth=”0″></iframe>[/iframe]


September 23, 2016
See this post
5 Reasons Why I Love the Fujifilm XF100-400mm Lens

bik-cycx-ak16-01481Every fall, a very special thing happens: At the tail end of summer, before the snow starts to appear and the chill of winter sets in, there’s an in-between season that’s absolutely wonderful to photograph, and it’s called Cyclocross.

This is the time when cyclists who are in no way deterred by the onset of cool, wet weather, grab their knobby-tire road bikes and race short, fast circuits over dirt singletrack, spongy, rain-soaked grass, puddles, sand and mud.

And when I say mud, I mean lots of mud. Deep pits and trenches of sloppy muck that suck down both feet and tires, steal huge amounts of momentum and energy, and pretty much negate all hopes of pedaling through it, unless you’re one of the few, strongest superheroes of cross.

Oh yea, and then there are the barriers and hill climbs. This is when you have to get off your bike and carry it up and over double, 2-high wooden blockades, up stairs and ridiculously steep hills. And for what? For extra lung and leg busting punishment and pain. And for the further enjoyment and heckling of spectators.

Originating in Europe in the early 1900s, it is said that the sport began when off-season road bikers would race each other from town to town, with the added challenge of cutting through forests and farmers’ fields, and taking shortcuts over fences and through terrain that road bikes are clearly not designed for.

Running/carrying sections and hill climbs were incorporated for their cross training benefits, and also to help warm up hands and feet in cold temps. With the first official cyclocross race occurring in 1902, the sport has taken on great popularity throughout Europe during the past century, and since the 1990s, through the US. Today, most riders use dedicated cyclocross bikes that have wider tier clearance, sturdier frames and lower gearing.

taurus-12391


I LOVE cyclocross. I love everything about it. I love to race it and I love to photograph it. Even fall, I look so forward to this amazingly fun time when I get to enjoy the camaraderie of my fellow bikers and challenge myself on the bike, and practice my action photography skills.

For me and the style of photography I love to shoot, it has everything: fast action, quick moments, awesome expressions of physical exertion, elation and pain. It’s also an excellent opportunity to practice a wide variety of compositional and creative skills and hone your camera skills.

Since courses are usually one to two mile circuits over that run from about 45-60 minutes, shooting a cyclers race allows you to set up in one spot and capture any number of racers, before moving to a new spot and trying out a completely different set of creative and technical ideas.

taurus-11597


Since I typically shoot numerous races through the season, I often try to vary the look of each race by using different lenses, vantage points or even processing techniques after the fact. With the Fujifilm X Series cameras, I often like to play around with different film simulations and even shoot in black and white.

I might shoot one race in Velvia mode to saturate colors, and another in Classic Chrome for more muted colors. I’ll often switch to Monochrome or ACROS mode throughout each race, and sometimes crank the ISO way up to get more grain and grit.

Sometimes I shoot close, other times far away. I like to capture multiple elements of these races, which may include details, expressions, cool lines and overview shots. One lens I’ll shoot a zoom, maybe another week I’ll bring a couple of primes. Like I said, it’s an awesome opportunity to practice and hone my skills.

taurus-13041


I’ve shot cyclocross with numerous cameras over the years. I started with my Nikon DSLRs, then shot with the Fuji X10 and even the X-E1, before getting the X-T1. This year, I’m using the new Fujifilm X-T2, which hit store shelves right before cyclocross season started. Coincidence? I think not. ;D

In fact, the second I got my hands on the X-T2 back in May of this year, I couldn’t wait for cyclocross season. With its new ultra-fast AF system and increased frame rate of up to 11 fps, it’s truly an amazing action camera; by far the best I’ve ever owned. (You can read my full review of the X-T2 here.)

Paring it with the XF50-140 f/2.8 lens is an incredibly capable combo for shooting action and capturing all the variety that sports like this have to offer. If you’re a Nikon or Canon shooter, it would be equivalent to the classic 70-200mm f/2.8 or those 70-200 f/4 VR from Nikon, or the 70-200mm f/4 IS USM from Canon.

Also, with it’s new updated image processor, the JPEGs and film simulations look even better, especially the black and white and high ISO images. I often crank the dial up to ISO 3200 and 12800, just to go something different.

Of course, any camera will work. If you’re not a Fuji shooter, just use whatever gear you have. Like I pointed out above, the key here is practicing and trying out different techniques, creative ideas and equipment.

taurus-13542


dan-cx
Here’s a shot of me racing before my big crash on Sunday!
dan-cx-blood
Post Crash!
dan-cx-blood2
Mommy… I fell down and now I’m bleeding!

Shooting, bike riding… like I said, it’s a blast. And the other thing I love? I’m hanging out with a great group of friends and making them all look like badasses! It’s so much fun to share my photos with everyone on Monday morning after the race.

If you like shooting action and sports, or if you’re into biking, I would highly encourage you to look for cyclocross events in your town and go try and photograph a race or two. Bring a cowbell, or a loud voice for cheering on the racers- that’s sometimes the funnest part of the whole day! Better yet, bring you bike and try it out for yourself! Be careful, though, you might get hooked.

Do you already shoot cyclocross? Post a link to your photos in the comment section, I’d love to see your images!

Here are just a few of my favorite CX photos from the past weekend. To see more, check out my Saturday race gallery and Sunday race gallery. (I think I like the Sunday photos better. The really close up one immediately below is probably my favorite shot of the entire weekend. I can’t believe I nailed that one!)

Enjoy, and stay tuned, I’ll be posting more CX images during the next few weeks.

taurus-13710imagetaurus-12104taurus-12503taurus-12178

September 21, 2016
See this post
Photographing The Amazing Action of Cyclocross

I’m excited to share that my blog has been selected as one of The Best 100 Photography Blogs on the Planet!

In a list compiled by Feedspot last week of the Top 100 Photography Blogs Every Photography Should Read, I made the cut at number 67, in such company as 500px, PetaPixel, Fstoppers, Light Stalking, Strobist, Chase Jarvis, Scott Kelby, Joe McNally and David duChemin.

This is a huge honor for me, coming in on the heels of my 2 millionth page view, which was reported last month, and the fact that I shared the Keynote Speaker slot with Scott Kelby at the recent Bedford Camera Photo Expo.

According to Feedspot, blogs were ranked based on a combination of Google reputation and raking, influence on social media, quality and consistency of posts and expert review by their editorial team.

The goal was to put together a list of blogs for beginners and experts to follow, that provide photographers with inspiration, tutorials, tips and articles geared to help people capture the best photos possible in all styles of photography.

I’m extremely honored by this award, given that I don’t have anything close to the number of social media followers and monthly traffic as many of the hugely popular blogs, like PetaPixel and Digital Photography School. To me, this fact would imply that my blog was reviewed and ranked more on content than by straight numbers.

Although I strive to create the best possible blog I can in order to provide my readers with what I feel is an original style of content, photography tips and insight, I never would have imagined getting this kind of award and recognition back when I first started.

I wrote my first post back in March of 2007. In fact, my first few posts included a few featured images of a recent ski trip in the Canadian Rockies, a link to a feature article that Outdoor Photographer Magazine had just written about me, and a retrospective about having just past my 10 year mark as a pro adventure photographer.

Early on, I was driven to impart my knowledge in order to help other photographers, and during the past 9 and a half years, it seems that I’ve been doing something right. Of course, none of this would be relevant if it weren’t for the people who actually read my posts.

taurus-09944
Sunset on the Cook Inlet Mud Flats, Anchorage, Alaska.


I know that some of my readers have followed me since around 2009, back when I was writing as Senior Contributor for The Photoletariat. (Show me your hands if you remember my column!) After that site went down, I ramped up my own site here and that’s when things really started taking off for me.

Again, I don’t have giant numbers in traffic or even comments, and I don’t have an editorial staff. It’s just me banging away on the keyboard every week, coming up with ideas, writing articles, reading and answering comments, emails and social media posts. I try to answer everyone who sends me a message, whether they have a question about their camera or if they’re looking for tips on how to shoot a bike race or wanting gear recommendations for their upcoming adventure. Despite the fact that this sometimes takes a lot of time each week, I do it because I enjoy helping and connecting with other shooters.

I think that despite my relatively small size compared to the big blogs, that’s why I have a dedicated following of readers who enjoy my posts and who regularly interacts with me on the web. Whether you’ve been following me for awhile, or if you just recently discovered my blog, I’d like to extend my sincere thanks for your support.

Writing this blog has brought me tremendous rewards on both a personal and professional level. It’s led to all of my eBooks, my two published books, my online video course, recognition and support from a number of photography industry companies and entities, and it’s connected me with a number of friends who I’ve met both online and in person during my travels out in the world.

In addition, for all the knowledge I’ve shared over the years, writing this blog has been a tremendous learning process for me. It’s even led me to explore other styles of photography. It’s been a very exciting journey so far, and I look forward to the future.

I promise to keep doing my part here, because I truly love photography and I love it when other people find personal joy and success in photography as well. As I like to say, just because I’m a pro, doesn’t mean I love it any more than someone who does it as a hobby. We all feel the same excitement and exhilaration when we nail a great moment and capture a killer image.

I try hard to make this blog relevant to everyone. It’s not just about Fuji, or Nikon or shooting mountain landscapes or mountain biking, it’s about outdoor photography, and that encompasses a very wide range of styles and subject matter.

If you’re new here, there’s a lot of great stuff in  my archives. Dig through some of my categories and fritter way some valuable office time checking out some of my older posts, I guarantee, you’ll find something that resonates with you. Also, consider signing up for my newsletter, so you don’t miss any of my future posts.

So, thanks so much to the editors at Feedspot for including me on this list, and thanks again to you guys, my readers. This is a very big milestone for me, but in some ways, I feel like I’m just getting warmed up!

taurus-4679a


September 15, 2016
See this post
My Blog Made the List of Best 100 Photography Blogs on The Planet!

x-t2

Game on!! The Fujifilm X-T2 is now shipping, which means it’s available for purchase today, both online and at your local camera store.

If you’ve been following along during the past few months, you’ve heard the hype and seen the specs. The X-T2 is indeed a game changer, it’s the first mirrorless camera that can truly compete with DSLRs in terms of performance.

With a brand new 325-point AF system, the camera can track and shoot moving subjects at up to 11 frames per second. The updated 24MP X-Trans III sensor and new X-Processor Pro chip produce incredible image quality, with stunning resolution, better color rendition and deeper tonal gradation across the spectrum.

The new image processor, which is four times faster than the processing chip inside the X-T1, also speeds up just about every single function inside the camera, including shutter blackout time, which has been one of the huge limiting differences between DLSRs and mirrorless cameras in the past few years.

TAURUS-02042taurus-02041b

Straight JPEGS out of the X-T2 are simply gorgeous and they hold an incredible amount of detail. The RAW files hold even more detail, and you can shoot both uncompressed and lossless compressed RAW for more manageable storage with no loss of quality.

ISO performance has been improved as well. The X-T2 has a native ISO of 12800, and having shot at this speed quite a bit during the past few months, I’m blown away by how gorgeous and how “film-like” the images look.

fuji-xt2-back

Body size and style is nearly the same as the X-T1, with a few minor tweaks. The new lock/unlock dials are awesome. They’re a big improvement and they allow for lightning quick changes of you settings on the fly. The new focus “joystick” lever adds even more precise control when selecting your focus points.

Finally, the new battery grip gives you the extended shooting power of two extra batteries, and it lets you take full advantage of the new Boost Mode by upping your max frame rate to 11 fps.

You can read my full review of the X-T2 here, or if you’re ready to up your game in a big way, you can grab one of these bad boys and experience the evolution of the X Series.

If you’ve been drawn to the Fujifilm X Series for their JPEGS and gorgeous color reproduction, their smaller, lighter weight over DLSRs or for their classic, traditional styling, but have been waiting for them to bring it with a higher megapixel sensor, faster autofocus, and maximum performance, your wait is over.

The X-T2 is here.

Support this site. If you’re ready to jump into the X-T2, or any piece of gear, (Check out the current Fujifilm Lens Rebates), please consider buying through these links. It doesn’t cost you anything extra, and it helps me out a bit. Think of it like a virtual high-five. 🙂

[iframe]<iframe width=”120″ scrolling=”no” height=”240″ frameborder=”0″ style=”border:none;” border=”0″ src=”http://mer54715.datafeedfile.com/widget/aff_widget_prdt_generate-2.0.php?aff_num=6746&aff_net=1&widget_num=7294&sid=” marginheight=”0″ marginwidth=”0″></iframe><iframe width=”120″ scrolling=”no” height=”240″ frameborder=”0″ style=”border:none;” border=”0″ src=”http://mer54715.datafeedfile.com/widget/aff_widget_prdt_generate-2.0.php?aff_num=6746&aff_net=1&widget_num=7295&sid=” marginheight=”0″ marginwidth=”0″></iframe><iframe style=”width:120px;height:240px;” marginwidth=”0″ marginheight=”0″ scrolling=”no” frameborder=”0″ src=”//ws-na.amazon-adsystem.com/widgets/q?ServiceVersion=20070822&OneJS=1&Operation=GetAdHtml&MarketPlace=US&source=ss&ref=as_ss_li_til&ad_type=product_link&tracking_id=danhbaisadvph-20&marketplace=amazon&region=US&placement=B01I3LNMAM&asins=B01I3LNMAM&linkId=130364033be74e4592e9bd4210b588e5&show_border=true&link_opens_in_new_window=true”></iframe>[/iframe]


x-t2-grip

taurus-09662taurus-07685

Motocross riders on the dune at Kincaid Park, Anchorage, Alaska


September 8, 2016
See this post
The Fujifilm X-T2 is Now Shipping!

Tokina lens

I realize that not everyone has the budget for a full arsenal of dedicated Nikon and Canon lenses. I was there once. That’s why there’s a big market for third party lenses. There’s nothing wrong with using a third party lens on your DSLR, but as with anything, you get what you pay for. Not every lens or lens brand is equal.

I really like Tokina lenses. Always have. I bought a Tokina AT-X 17mm f/3.5 back in the late 90s and proceeded to beat the heck out of it for the next decade or so. I loved my Tokina 17mm, it was built like a tank, it could withstand tons of abuse, and it made great looking images. In fact, many of my favorite adventure photography were made with that lens.

Eric Parsons throwing the rappel ropes into the fog on The Throne, Little Switzerland, Pika Glacier, AlaskaZac Wiebe and Heath Mackay skiing up the McGill Shoulder. Rogers Pass, Selkirk Mountains, CanadaCloseup of a woman's feet and shoes trail running, Glen Alps area, Chugach Mountains, near Anchorage, Alaska

Tokina has a great lineup of lenses for Nikon, Canon, Sony, Micro Four Thirds. They also have a line of lenses designed with PL mounts for Epic Red and Arri motion picture cameras, and they have a selection of Cinema lenses as well. They’re all built in Japan and use SD Super-low Dispersion glass, for maximum optical quality and minimized chromatic aberration.

Currently, they have four series of glass for still/video photography:

  1. AT-X Pro FX: Designed for full frame DSLR cameras
  2. AT-X Pro: Designed for APS-C DSLR cameras
  3. AT-X: Small lightweight fisheye zooms
  4. AT-X V: Built for DSLR videography for use with follow focus gear, but can also be used as an AF still photography lens.

While there are two many to list in this post, here are a few models I would highly recommend to budget minded photographers. If you’re looking for high quality, professional-grade, yet affordable glass, you should give this line of lenses a serious look. With every model, you’re getting a comparable lens to the same brand name equivalent, but for a fraction of the price.

If you read the reviews, you’ll see that Tokina lenses consistently get high marks for build quality, distortion control and their ability to produce high quality, sharp images with good contrast and reduced chromatic aberration.

Also, many of the Tokina lenses have rebates right now. Check out the current savings.

Tokina Full Frame Lenses

AT-X 17-35mm f/4 PRO FX – For Canon and Nikon

The Tokina 17-35 f/4 is a compact wide angle zoom designed for full frame cameras. With Super-Low Dispersion glass and one aspheric element, this is a an excellent and versatile lens for a wide range of styles and shooting situations. It’s ideal for travel, shooting wide expanse landscapes and working in tight spaces.

Rated to be as sharp as Nikon’s 17-35 f/2.8, at a fraction of the price, the Tokina 17-35 has very little distortion compared to other ultra wide zooms in all price categories. It’s also weather resistant, which contribute to it’s versatility and build quality.

AT-X 24-70mm f/2.8 PRO FX – For Nikon and Canon

For many photographers, the 24-70 f/2.8 is a workhorse universal zoom lens for shooting a wide variety of subject matter. While the Tokina 24-70mm f/2.8 is not an inexpensive or small lens, it still costs about $700 less than the comparable Nikon and Canon models, making it a very affordable alternative for shooters on a budget who don’t want to sacrifice quality.

With a fast, fixed f/2.8 aperture, fast Silent Drive-Module autofocus, SD glass three aspherical elements, and high quality construction, this lens has excellent optics that will hold up with even the highest megapixel DSLRs, including the Nikon D810 and Canon’s 50MP 5DSR.

AT-X 70-200mm f/4 FX VCM-S – For Nikon

Another workhorse zoom lens, the Tokina 70-200mm f/4 is comparable to Nikon’s excellent 70-200 f/4 VR lens, although the Tokina version costs about $400 lens.

Designed with solid build quality, 3 stops of VR, a fast ultrasonic AF motor and SD glass elements, this lens produces very sharp, crips images that will hold up on any of Nikon’s DSLR bodies. One reviewer said it produced some of the best bokeh he’s seen from a zoom lens of this style. Pairing this with the Tokina 24-70mm lens above would give you a workhorse professional quality two-lens kit that would get you through just about any photo shoot.

AT-X M100 AF PRO D – For Nikon and Canon Full Frame and APS-C

The Tokina AT-X M100 is a thing of beauty. Not only is it a macro lens that’s capable of shooting 1:1 closeups, it also makes for a incredible short telephoto for shooting portraits and mid-distance subject matter. And, it’s less than half the price of the Nikon 105mm macro lens.

DxOMark tested this on the Nikon D800 and called it a “Solid Performer.” It has good sharpness throughout the range, minimal vignetting and great distortion control. Also, being a true macro, it’s capable of shooting with full 1x “life size” magnification, and it makes a wonderful portrait lens. This is one of the real standouts in the Tokina line and I’d highly recommend it to any photographer.

Tokina APS-C Lenses

AT-X 11-16mm f/2.8 PRO DX – For Nikon, Canon and Sony

With an all new internal silent focusing motor, and updated optics, the Tokina 11-16mm f/2.8 is an award winning and very popular ultra wide angle compact zoom lens for crop sensor cameras.

Featuring a fixed f/2.8 aperture and SD glass, this lens yields excellent contrast and sharpness at a price that’s friendly to budget minded photographers.

AT-X 12-28mm f/4 PRO DX – For Nikon and Canon

Less than half the price as Nikon’s 12-24 lens, the Tokina 12-28mm f/4 is one of the most popular and highly rated lenses in their line. For good reason. It’s very sharp, it does a great job controlling distortion and it has very close focus, which means you can shoot dramatic close ups with lots of background detail.

With a very solid build, internal zoom elements and a fast silent autofocus motor, and their standard focus clutch, which allows for easy manual focus control (this feature is incorporated on many of their lenses), this is a fantastic wide angle zoom for DX and crop sensor cameras.

AT-X 14-20 f/2 PRO DX – For Nikon and Canon

This is Tokina’s fastest lens. With a very fast maximum aperture and the optical performance of a fixed lens, the 14-20mm f/2 is an ultra fast, wide angle zoom that’s great for shooting in low light. It’s almost like having a trio of high performance fast primes (equivalent views of 21mm, 24mm and 28mm) at your disposal in a single lens.

An awesome landscape and travel lens, it achieves excellent image quality, contrast and distortion control. With four SD elements, great built quality and a relatively compact design, the Tokina 14-20 f/2 is an outstanding lens that costs about half the price of the Nikon 14-24 f/2.8, and it’s a stop faster.


September 7, 2016
See this post
A Look at Tokina Lenses for Nikon, Canon and Sony

TAURUS-07253A After months of anticipation, (perhaps years for some people), the new Fujifilm X-T2 has finally hit shelves, and is now shipping.

Given the vastly upgraded specs of the X-T2, I see this being a game changing camera for many photographers who are intrigued by the idea of using smaller, lighter gear, but still want the performance and image quality of a DSLR.

However, instead of talking about how awesome it is under the hood, (you can read that stuff in my full review post) I’d like to highlight another aspect of the X-T2, and all of the X Series cameras. The topic of this post is why the Fujifilm images look so damn good.

Yes, I speak totally subjectively here. Image files from just about every other camera that’s made today look really good too. Nikon images look great. So do Canon, Olympus and Sony images. However, there’s something slightly different about the way the Fuji images, especially their JPEGS, look compared to other cameras, and this appeals to many photographers.

Fuji’s Secret Sauce is their proprietary X-Trans sensor. Let’s look at how it’s different, and more importantly, why it’s different. Digital camera sensors are built around a set number of equally sized and equally spaced photosensors, or as we commonly refer to them, pixels.

A 16MP sensor contains 16 million pixels. In order to reproduce color, each pixel is covered with a single filter, either red, green or blue. Since the cone cells of the human eye are most sensitive to green light, camera sensors use twice as many green pixels as red and blue, in order to best mimic the way that we see.

During capture, each pixel on the sensor records the incoming light as a single color. During the demosaicing stage, which occurs in the camera’s image processor, various algorithms are used to interpolate this information into full color image.

When shooting and processing RAW files, the demosaicing stage happens inside your computer’s imaging software. i.e., inside Lightroom or Photoshop. (Note- previous version of Lightroom and Photoshop had a hard time processing the Fuji RAW files, because their demosaicing algorithms were written for Bayer pattern sensors.

They weren’t able to bring out the maximum level of detail in the files, which led many people to believe that the Fuji files weren’t as sharp as they actually are. The latest versions of LR & PS CC do a vastly better job in this area.)

The most common filter array is the Bayer Pattern arrangement, which is named after Bruce Bayer, a former Kodak employ who developed this technology in 1974. Patented in 1976, the checkerboard pattern Bayer Filter is used in nearly every single digital capture device today.

The Fujifilm X-Trans sensor, however, does not use the 2×2 Bayer filter pattern. Fuji sensors use a proprietary non-regular 6×6 color filter array that creates a much more “random” color gathering process. This gives it two very distinct advantages over Bayer type sensors.


Bayer filter can sometime produce moiré effects with certain subjects. To combat this, most Bayer pattern cameras use an optical low pass filter in front of the sensor. However, the OLPF can cause a slight decrease in sharpness.
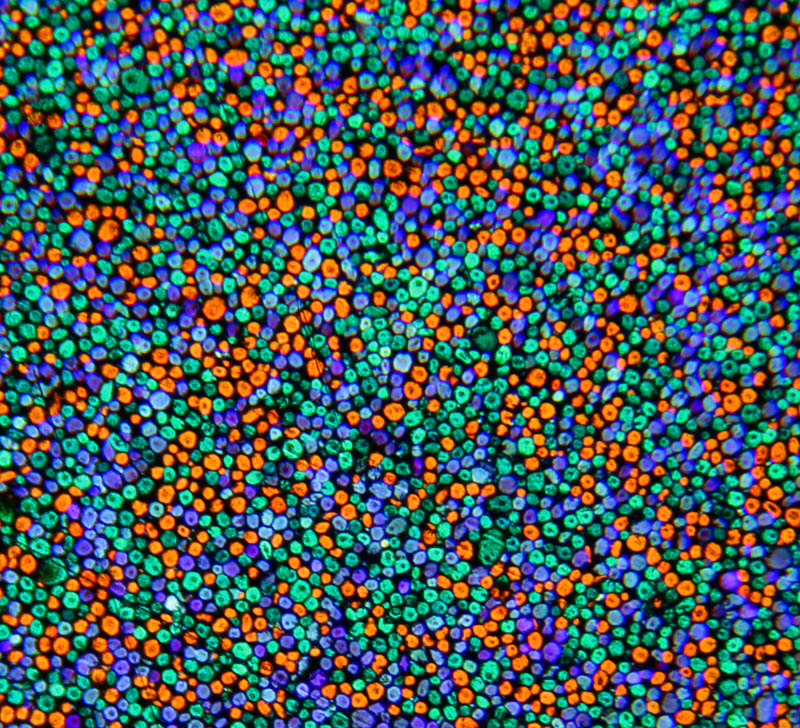
With its non regular array, the X-Trans sensors do not use optical low pass filters, which is why the smaller APS-C size sensors of the X Series cameras are able to compete with full frame sensors with regards to sharpness and detail.

In addition, the irregular pattern of the X-Trans sensor more closely replicates the look of film. This is no accident. With their 80+ year legacy of film photography, the Fujifilm team continues to work very hard to bring their film traditional film heritage into the modern era.

TAURUS-08550 In designing the X-Trans sensor, the Fuji engineers went outside the box and looked back as much as they looked forward. Their goal was to adopt the legacy and artistic heritage of film photography, which is anything but regular.

Anyone who has shot film knows that the medium produced very “representational” and often times very “irregular” images. After all, there is nothing regular about film. It’s just a pile of silver halide crystals mixed up in a liquid emulsion, poured onto an acetate base and cut into strips.

These crystals are the actual “grain” you see when you enlarge a negative or slide, and if you look closely, you can see that film grain is about as random as you can get. It’s in no way uniform with regards to its size, shape or placement in the emulsion.

As much as Kodak, Fuji, Agfa, Ilford and every other film manufacturer tried to create a consistent product, it was simply impossible to arrange these little grainy crystals into any kind of regular rows of red, green and blue.

Below we see two close up views of the grain structure found in Autochrome Lumière film, which was first produced in the early 1900s. It’s striking to note how close the first image looks to the pattern found on Fujifilm’s X-Trans sensor. Again, this is no accident, and it clearly illustrates where Fuji is coming from and what they’re trying to do. Now let’s look at a closeup of Kodak T-MAX 3200, one of their later, modern black and white films, which was sold until late 2012. Below that, two images I shot with the X-T2 at ISO 12,800, which, to my eyes, closely replicates the grain size of T-MAX 3200 film.

You can see just how similar the modern Fujifilm images look when compared to the Kodak film image. Again, this is no coincidence, it’s the result of a very carefully crafted sensor design and the algorithms Fuji has programmed into their on-board image processors.

For comparison: A scan of Kodak T-Max 3200 film. Photo @Tim Dobbs
TAURUS-01653
Fujifilm X-T2 ISO 12800
TAURUS-05628A
Fuijfilm X-T2 ISO 12800

Here are a couple of color examples as well. The first photo of Long’s Peak at sunrise was shot back the late 90s on 35mm Velvia slide film and scanned. In the enlarged version, you can see the pronounced film grain in the sky. And here’s an X-T1 image shot earlier this year. Again, in the enlarged version, you can see the “grain-like” quality of the digital noise in the sky. Another feature the Fuji cameras offer are their carefully crafted film simulations. Where most cameras give you the option to shoot JPEGs in other modes like “Vivid,” “Neutral,” and “Monochrome,”

The X Series cameras have ported the color profiles of some of their classic color slide films into the image processing software in their cameras; films like Velvia, Provia and Astia, as well as some of their professional color and black and white films. Both the X-Pro 2 and X-T2 feature the new ACROS black and white sim.

Having shot many of these films back in the day, I love having these familiar color palettes at my disposal once again.

The rich bold colors of Velvia film simulation
The muted tonality of “Classic Chrome” film simulation

With their sensor design and film simulations, it would appear that Fujifilm is striving for something beyond image quality alone.

Their mission, as stated by Fujifilm Chairman and CEO Shigetaka Komori in his book, Innovating Out of Crisis, has always been to “preserve and sustain the culture of photography. While this statement could certainly be interpreted in any number of ways, their dedication to combine the traditional heritage of photography with modern technology is clearly evident in the X Series.

It would seem that these efforts have paid off, because to my eyes, and to the eyes of other Fuji shooters, their images have a distinct, and very appealing “film-like” quality to them. As I said above, this is all very subjective, as is much of photography.

After all, we’re talking about art and there’s no concrete way to prove that the images from one camera or photographer are “better” than any other. We all perceive images a little different and when it comes down to what’s right, there is no “right.” It’s only what we like and what drives us visually or emotionally, based on our own experiences and desires.

As a photographer who came from film, I’m drawn to this blend of technology, craftsmanship and tradition that Fujifilm has put forward with their cameras. Does it resonate with everyone? Obviously not. People love their Nikons, Canons and Sonys, and that’s ok.

Differing opinions is what makes the world go around. At the end of the day, the most important thing in photography is your own creativity and how much you love what comes out of your camera, no matter which camera it is. You can order both the Fujifilm X-T2 and VPB-XT2 Booster Grip here.

[iframe]<iframe width=”120″ scrolling=”no” height=”240″ frameborder=”0″ style=”border:none;” border=”0″ src=”http://mer54715.datafeedfile.com/widget/aff_widget_prdt_generate-2.0.php?aff_num=6746&aff_net=1&widget_num=7294&sid=” marginheight=”0″ marginwidth=”0″></iframe><iframe width=”120″ scrolling=”no” height=”240″ frameborder=”0″ style=”border:none;” border=”0″ src=”http://mer54715.datafeedfile.com/widget/aff_widget_prdt_generate-2.0.php?aff_num=6746&aff_net=1&widget_num=7295&sid=” marginheight=”0″ marginwidth=”0″></iframe>[/iframe]

Did you enjoy reading this post? If you’d like to stay updated and get exclusive content, sign up for my newsletter over on the sidebar. If you’re an X Series shooter, or are curious about the system, download my free PDF guide, FUJIFILM Tips And Tricks: My 10 Favorite Settings for the X Series Cameras.

September 5, 2016
See this post
Why The Fujifilm X Series Images Are So “Film-Like”

Sunset over Mt. Redoubt and The Cook Inlet, Alaska

There is no secret, really. You know how to shoot more interesting photos? Stand in front of more interesting subject matter. That’s it. At least that’s about 90 percent of it.

No matter how good a photographer you are, no matter how much you may struggle with exposure, technical issues or creative ideas, or no matter how inspired you are by the work of other photographers, the best way to improve your work is to shoot awesome stuff.

TAURUS-07657AForget gear. At that point, what kind of camera you have is almost irrelevant. Lenses? Ok, lenses can make a big difference, but only if what’s in front of them is remarkable when it comes to shape, color, texture and expression.

This holds true no matter what you shoot. Great subjects will always give your imagery a big head start. Heck, some subjects are simply so beautiful, you could drop your camera, accidentally trip the shutter and walk away from a killer shot.

TAURUS-07144

So you want the secret? If you’re a landscape photographer, spend some money on plane tickets or gas and go to some fantastic places. I guarantee, you’ll come away with some of the best photos you’ve ever shot.

Portrait shooter? Seek out beautiful people and great models with lots of character, who are confident in front of the camera. Travel photographer? Again, buy planet tickets and go to amazing places. Start knocking off that ol’ bucket list.

Adventure, sports or action shooter? Shoot bad ass athletes in amazing places. And remember, shoot in great light. That’s a given, no matter what kinds of subjects you’re photographing.

So yes, technique, skills and gear are important aspects of being a great photographer. That’s what’s going to put your work into the next level of awesomeness. However, nothing will beat standing in front of a great subject.

I have to give Scott Kelby partial credit here. While this is certainly not an original idea, or some kind of trade secret kept by pros, this concept was recently thrust into the forefront of my mind again when I saw Scott give a presentation earlier this month. I’m just passing it along with my own twist.

Scott is an outstanding photographer, although he’ll be the first one to admit that much of it is because he travels quite a bit to different parts of the world and he shoots really cool stuff, like pro football and great looking models. Check out his blog here, he share some great insight.

TAURUS-08249

TAURUS-09139

August 29, 2016
See this post
The Secret to Shooting Better Photographs

TAURUS-02781According to my WordPress stats, my blog received its 2 millionth page view this week. Going by Google Analytics, which I didn’t install until 2011- almost four years in, the number is almost 2.5 million, with nearly 1 million unique readers.

Either way, I need to stop and think about that for a minute.

2 million.

2 mill-ion.

2 mill-ee-yun.

I had to say it a few times, because when you’re getting into the millions, you’re talking really big numbers.

Sure, there are plenty of blogs that have millions of readers each week, but to me, a couple million is an astounding figure, considering that it’s just me sitting here, banging on my keyboard every day and every week, just talking about photography. I’m not a department, and I don’t have managers and content curators. It’s just me. Dan Bailey.

The fact that people have clicked and opened up over 2 million pages tells me that I’m doing a few things right with all of this blogging stuff. It shows me that the experience, insight and photographs I share provide real value and help to inspire and readers people from all over the world.

It keeps growing too, because while it took me about 7 years to hit my first million page views, it only took 2 years to hit the second million. That stat blows me away.

And when I say “people,” I mean you, because at least a quarter of those million visitors are people who have come back at least once. If you’re reading this right now, there’s a pretty good chance this isn’t the first post you’ve read here on my blog.

Of course, numbers alone don’t tell the whole story. If I look deeper into the analytics, I can see that a large percentage of visitors have only visited once and stayed for less than 10 seconds. That’s search engine traffic where people land and jump back off in a flurry of frantic mouse clicks and finger taps.

On the other hand, close to one million page views are from people who stuck around and read at least 3 or more of my blog posts in one sitting. Given that a number of my posts are fairly long, I smile when I think about how much valuable “work time” has been spent perusing my site, reading about cameras and stuff.

It makes me very happy to know that my work and words have inspired so many people out there. My blog is truly a labor of love, because every time I sit down to write a post or answer a comment, my primary goal is to help people become better photographers, including myself. In fact, many of my posts originate from my own learning process.

It continues to be that, year after year, and whenever I think about all of the topics and ideas inside my head that I want to write about, I get even more inspired. And that doesn’t even count the times when I sit down and come up with an idea on the spot.

So, I’d like to express my deepest gratitude to my readers for making me WANT to write and share my knowledge with you, and for taking the time to read, share and comment on my blog. Thank you so much for allowing me to be a part of your creative process and your ongoing and endless photography journey in this world.

Also, I love to hear from you guys, so if you’re a regular reader, it would be awesome if you’d leave a comment and let me know how long you’ve been following my blog. Let me know if you remember the first one of my posts that you read, or one that has particularly inspired you or helped you with your photography. Or let me know what you’d like to see more of. What style of posts do you especially like from me?

Thank so much and take care! -Dan

AK-AERIAL-CHU-01646

August 15, 2016
See this post
A Huge Thanks to My Readers for 2 Million Page Views!!
TAURUS-07294
Shot with the Fujifilm X-T2 at native ISO 12800

Having shot with the new Fujifilm X-T2 during the past few months, (read my full review here) I’ve been extremely impressed with how well it performs at high ISO settings. Given that the X-T1 does quite well when shooting in low light, (here’s a pixel-to-pixel comparison of how well the X-T1 stacks up against the Sony A7r), I was curious about how they would improve the noise reduction on the X-T2.

We all know that pixel size plays a huge factor in how well a sensor does in low light. Since the new 24MP APS-C X-Trans III sensor actually has smaller pixels than the 16MP APS-C sensor on the X-T1, there would no doubt have to be some new magic under the hood in order to make up for this.

With the X-T2, Fujifilm has incorporated a few new technologies, including copper wiring instead of aluminum for better conductivity and faster signal transmission, improved signal amplifier and better noise reduction algorithms. The non-Bayer patter X-Trans sensor also helps reduce noise; the irregular pattern RGB pixel array helps the image processor better spot noise artifacts.

However, the biggest factor is the new X-Processor Pro image processing chip. It’s the backbone of nearly all of the X-T2’s performance enhancements. That’s what drives the faster autofocus system, faster EVF refresh rate and shooting frame rate, reduced shutter blackout and sensor readout time, faster image processing, as well as the ability to shoot 4K video and compress RAW files to 14-bit lossless format.

(With the current instant rebates, the X-T2 is $200 off right now. Many of the other X Series bodies and lenses are also on sale.)

Shot at ISO 12800
Shot at ISO 12800

With processing power that’s four times faster than what’s possible in the X-T1’s EXR Processor II, the X-T2 is able to run much more complex and powerful noise reduction algorithms. The result is that high ISO images shot on the X-T2 don’t really have “noise” anymore, at least not the kind we’re used to seeing. Instead, high ISO images now look very grain-like, even at very high settings. In addition, they retain a very high level of sharpness and detail.

Let’s have a look.

Image Examples – X-T1 vs. X-T2 High ISO Comparison

We’ll start with guitars. Here are two examples from both the X-T1 and X-T2 shot at ISO 6400. At “webs size,” both cameras seem to do fine at this setting.

X-T1 ISO 6400
X-T1 ISO 6400
X-T2 ISO 6400
X-T2 ISO 6400

Now lets look at some RAW+JPEG pairs, shot on both the X-T1 and X-T2 at ISO 3200, and 6400. For each setting, I include four versions, the first pair being a straight 100% crop from the RAW file, saved as a JPEG with no processing. The second pair at each setting is a 100% crop of the straight JPEG.

As you can see, the RAW versions have no noise reduction applied, so they appear a little grainer. This is a clear illustration of how well the sensor itself records the scene at high ISO settings. Notice, I said “grainer.” It really does look like grain, even at the higher settings.

The JPEG versions look at little smoother because of the in-camera noise reduction that’s been applied. This is where the X-Processor Pro comes into play. At each of these speeds, the X-T2 shows improved noise reduction, finer grain and a slight increase in detail.

X-T1 ISO 3200
X-T1 ISO 3200 Straight RAW Conversion
X-T2 ISO 3200
X-T2 ISO 3200 Straight RAW Conversion
X-T1 ISO 3200
X-T1 ISO 3200 Straight JPEG
X-T2 ISO 3200
X-T2 ISO 3200 Straight JPEG
X-T1 ISO 6400 Straight RAW Conversion
X-T2 ISO 6400 Straight RAW Conversion
X-T1 ISO 6400 Straight JPEG
X-T2 ISO 6400 Straight JPEG

Now let’s bump up the speed even more. While the max native ISO setting on the X-T1 is only 6400, the X-T2 has a native ISO setting of 12800. Please note, these exposures vary slightly due to the fact that I shot multiple images with slightly different settings during my test, but you can still get at accurate look at the noise reduction and sensor performance.

X-T2 ISO 12800
X-T2 ISO 12800
X-T2 ISO 12800 Straight JPEG
X-T2 ISO 12800 Straight RAW Conversion
X-T2 ISO 12800 Straight RAW Conversion
X-T2 ISO 12800 Straight JPEG


Now that we’ve pixel peeped, let’s look at some real world examples. After all, what matters here is not how pixels compare with the previous model when viewed at full 100% crop, it’s how different scenes hold up under real light out in the world. These are all straight JPEGS.

ISO 800

ISO 800 on the X-T2 is like the new normal. There almost no noise, and if there is, it’s rendered as gorgeous looking grain with minimal intrusion.

KNIK-01405 KNIK-01405ATAURUS-05868 TAURUS-05868A

ISO 1600

At ISO 1600, the X-T2 does amazingly well. It holds a very high level of detail and resolution. I’d use 1600 without even thinking about it and expect excellent results.

TAURUS-03461 TAURUS-03461ATAURUS-01779TAURUS-01779A

ISO 3200

At ISO 3200, you’ll start to see some grain with certain kinds of subjects, but in good light with a good exposure, this setting holds up incredibly well. I can’t believe the level of sharpness and detail that’s preserved in the moose here.

KNIK-01441KNIK-01441A TAURUS-03456TAURUS-03456ATAURUS-05630TAURUS-05630A

ISO 6400

At ISO 6400, you’ll definitely start to see the grain build up, but that’s exactly my point. It’s not noise, it’s grain. It imparts a lot of character, but it doesn’t overwhelm or take anything away from the photograph.

TAURUS-06383 TAURUS-06383A_DSF1128_DSF1129-2

ISO 12800

I’m blown away by how well the X-T2 images look when shot at ISO 12800. At this setting, you have a tremendous amount of grain, but it’s not obtrusive. As with 6400, it imparts a great deal of character and give the image a very real “photo-like” feel, just as if you were using high speed film.

To my eyes, the black and white images hold up better at ISO 12800, but the color isn’t bad, it just has a different look. Honestly, I haven’t shot a lot of color images at 12800 yet, but from what I’ve seen so far, it’s

TAURUS-07288TAURUS-07288ATAURUS-05628TAURUS-05628ATAURUS-07184TAURUS-07184A

ISO 25600 and 51200

I only have one image example shot at 12600 and 51200, and to compare, an X-T1 image shot at 51200. As you can see, the X-T2 images are pretty grainy, but they still holds up surprisingly well considering they were shot in the nosebleed section. I never shoot at this speed, but if you have to grab a shot and you have no other choice, the X-T2 will give you an acceptable file.

_DSF1125
ISO 25600
_DSF1130
ISO 25600
ISO 51200
ISO 51200
ISO 51200
ISO 51200
ISO 51200, shot with the X-T1

Final Thoughts

Having used the X-T2 since early May, I feel I’ve gotten a very good feel at how the camera performs at different ISO settings. From my tests, I feel the combination of the new sensor, internal hardware upgrades and the new image processor make the X-T2 an excellent camera for shooting in all lighting conditions, especially for things like concert photography, indoor sports, nighttime shots and astrophotography and low light portraits.

I have full confidence when shooting in low light with the X-T2 and absolutely no qualms about cranking the ISO dial into higher territory. There is no native speed I’m uncomfortable with. Photographers have always had to make tradeoffs when shooting in low light, but with the X-T2, those tradeoffs just got a whole lot better.

Check out my full review of the X-T2. Also, check out my blog post about the new autofocus system I wrote for the Bedford Camera website. If you think it’s the right camera for you, you can preorder it through these links. It will be available in September. And, stay tuned for more “feature reviews” of the X-T2 in the coming weeks.

Terrific, Dan! I shot some musical friends playing at a club and was really pleased at how well the XT-2 performed at speeds that used to be ridiculous!

profile-pic
Bobbi Lane

[iframe]<iframe width=”120″ scrolling=”no” height=”240″ frameborder=”0″ style=”border:none;” border=”0″ src=”http://mer54715.datafeedfile.com/widget/aff_widget_prdt_generate-2.0.php?aff_num=6746&aff_net=1&widget_num=7411&sid=” marginheight=”0″ marginwidth=”0″></iframe><iframe style=”width:120px;height:240px;” marginwidth=”0″ marginheight=”0″ scrolling=”no” frameborder=”0″ src=”//ws-na.amazon-adsystem.com/widgets/q?ServiceVersion=20070822&OneJS=1&Operation=GetAdHtml&MarketPlace=US&source=ss&ref=as_ss_li_til&ad_type=product_link&tracking_id=danhbaisadvph-20&marketplace=amazon&region=US&placement=B01I3LNMAM&asins=B01I3LNMAM&linkId=61f7d971b8766adc8e5d42e401d1ec38&show_border=true&link_opens_in_new_window=true”></iframe>[/iframe]

August 12, 2016
See this post
Testing High ISO Performance with the Fujifilm X-T2