Photographers who continue to experiment with off camera lighting techniques and expand their shooting styles, quickly discover the limitation of using regular speedlights.

If you’re shooting a big job, you’ll drain your batteries, which severely slows down recycle times. Also, when trying to overpower the sun, sometimes a single flash just doesn’t put out enough light. Your answer is to either carry a handful of flashes, or enter the world of battery powered strobes, which, often times don’t allow you to go fast and light.

The latest battery powered strobe from Photoflex is the surprisingly portable TritonFlash. Now, before I go on, I need to disclose that I’m a featured Photoflex Pro who writes lighting tutorials about how to use gear like the TritonFlash. As an action and adventure shooter, the Photoflex guys wanted me use it and put it through the rigors.

That said, I had to be talked into even trying it out. As a guy who likes to carry all my gear on my back, I was pretty hesitant about entering that world, but as soon as I got my hands on the Triton, I feel like my world opened up. Things changed. In short, I saw the light.

Here are the basic specs and my real world analysis of the TritonFlash:

  • Rated at 300 watt seconds with a Guide Number of 185
  • Fires 750 full power flashes on a full charge
  • Ultra fast recycling that allows firing rates of up to 6 frames per second
  • Built-in optical slave sensor
  • 19 power settings in 1/3 stop increments
  • 10 second modeling light
  • TritonFlash head weighs under 2 lbs.
  • Lithium-ion battery pack only weighs 1 lb
  • Kit comes with 2 batteries, cables, wireless triggers, Octodome NXT softbox and reflector dish.

Size, Weight and Portability

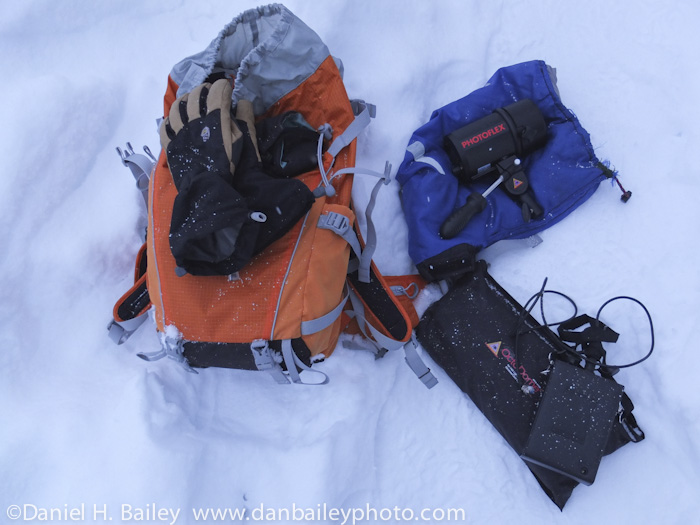
At roughly three pounds, with flash head, battery pack and cables, the TritonFlash is highly portable. It weights about as much as a 70-200mm f/2.8 zoom lens, and when broken down, it packs up small enough to fit inside my backpack, along with a camera, a couple lenses, radio triggers and a jacket.

The flash head itself is smaller than a Nalgene water bottle, and comes with a hard plastic cover which protects it from getting damaged when not in use. The lithium-ion battery pack is about the same size as a box of mac and cheese, and the included Octodome NXT softbox case is small enough to strap to the outside of a pack.

That’s it: flash, battery, OctoDome and a couple of thin cables and you’re good to go. Just the flash head and battery pack take about the same amount of room as two speedlights, but pack way more power. Pound for pound, the TritonFlash delivers big light in a relatively small package.

Ease of Use

The TritonFlash comes with its own heavy duty swivel clamp. Stick that on a light stand or have your assistant hold it, hook up the battery and trigger cables to the head, slide on the softbox (OctoDome or any speedring compatible light shaping tool) or the 7 inch reflector dish, and turn on. You have light.

The back of the flash head only has a few controls: Sync input, modeling light button, optical slave button and the main command knob.

To adjust power, you simply turn the knob to change in 1/3 stops, until you’re desired setting is achieved. Fast. Easy. No menus. No sub command dials. Just turn and set.

You trigger the TritonFlash in one of four ways: Included sync cord, included FlashFire wireless triggers triggers, PocketWizard, optical slave from another flash. I’ve used each of these ways and they all work. The Photoflex FlashFire triggers operate up to 164′ and sync up to 1/160 sec. PocketWizards actually work better, because you can sync up to 1/250 sec. and operate at much great distances.

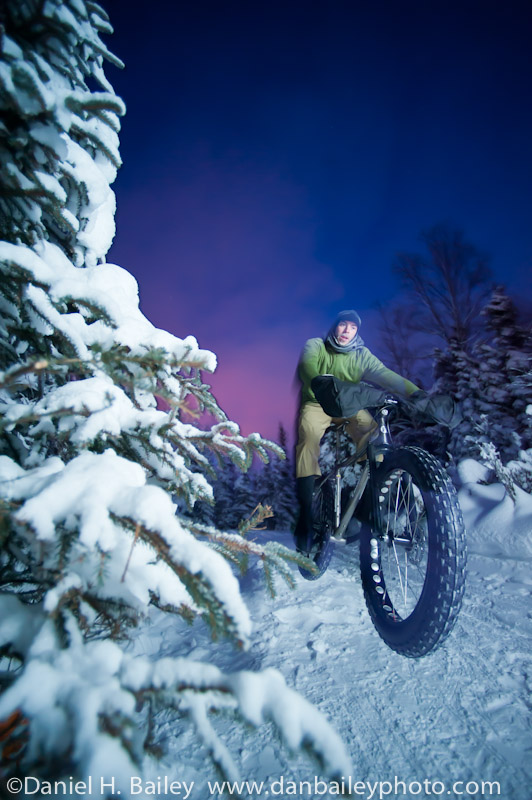
However, sync speed isn’t a huge issue, given that the duration of the flash head is about 1/8000 sec., which will freeze just about any action. Here’s a test shot that I did on my first day with the Triton. (1/250 sec at f/16.) Normally, 1/250 doesn’t always stop action, but the ultra high speed burst of light from the flash does.

Light Quality and Power

Using the double-baffled OcotDome NXT softbox, the TritonFlash put out really nice light. Keep in mind, though, you can use just about any of the Photoflex diffusers with the Triton. I’ve used both the OctoDome NXT and the much bigger WhiteDome to shoot action, sports and portraits, both inside and out. I really like the OctoDome NXT, and had one before I got the Triton. It does an incredible job diffusing the light up close, and even looks good from a distance. (With the exception of the biker jumping, all of the shots below were done with the NXT.)

The hard 7 inch reflector is designed for use with umbrellas, or if you want a harder, less diffused blast of light. I haven’t tried using it yet, but I can see how it could come in handy for direct lighting effects. You could even stick a makeshift snoot on it for a really strong directional light source. Might be something to play around with…

When it comes to power, the TritonFlash recycles fast enough to shoot up to 6 frames per second bursts. Actual speed and firing rate depends on battery charge, temperature and flash power. When it’s really cold, recycle time does slow down quite a bit, but nowhere near as slow as a regular flash would under the same conditions.

At full power, the Triton is rated to 750 shots on a full charge. At minimal power settings, you’ll get a few thousand fires per charge. And with the way that lithium batteries work, recycle times will remain quick right up until it dies. Supposedly. I’ve never actually had one die, not when shooting for 2 hours at 10 below zero. Kept right on working.

Even it if does die, you’ve got a second battery. Depending on your power settings, that gives you somewhere between 1,500 and well over 10,000 frames, which is more than enough to get any job done. Keep charging and swapping out batteries and I guarantee, the TritonFlash will keep working longer than you.

The TritonFlash features a 10 second modeling light, which is perfect for grabbing focus in low light, or for doing a quick check on how your scene will look when it’s lit. Hit it once, do your check and it will turn off by itself. Nice feature. I’ve used it a few times and when you need it, it’s there.

Durability

I can attest that the TritonFlash is indeed durable. I’ve already dropped it and bent the ring on the reflector dish, which I fixed with a pair of pliers. I’ve dragged it outside in the snow and cold numerous times and have had no problems with it at all. As I said, recycle times certainly slow down, but the thing keeps firing. The plastic cover protects the unit adequately to the point where I have no qualms about carting it around into the outdoors.

The fabric on the OctoDome is tough and quite tear resistant. You’d be hard pressed to ruin it. Might get dirty, but that’s about it. You might bend the little metal rods, believe me, but unless you really wrench on them, you can usually straighten them right back out.

Limitations

The TritonFlash does have limitations. For one, it will only sync up to 1/250 sec. under normal operation. As I pointed out above, though, the 1/8000 sec. flash duration is fast enough to freeze action in most uses. There is a way to sync it up to higher speeds, but it requires some separate gear.

By triggering an an off camera flash in non-TTL mode with pair of PocketWizard FlexTT5 or MiniTT1 radios, you can set the TritonFlash to optical slave mode so that it reads the other flash. This way, you can get the Triton to sync all the way up to 1/8000 sec. shutter speed. There may be other ways, as well, and maybe this is something that Photoflex will work out in future models.

Also, I’d like to see a small handle on the casing of the TritonFlash head. This would allow you to take off the swivel clamp and save even more weight and space if you’re hand holding (or having your assistant hand hold) the unit. As is, you can still hand hold it with the swivel clamp, but I’d like to see the option of being able to easily use it without.

Price and Value

The TritonFlash Kit runs around $1,499. (Right now it’s $1,299 at B&H Photo until the end of March.) It’s not cheap, especially if you’re just getting into lighting gear. However, put it into this context. When compared to a top of the line speedlight, it’s still less than three SB-910s or 580EX IIs. (Often times, photographers will double and triple up on flashes to shorten recycle times.)

Plus, you get the OctoDome NXT, which costs around $164 brand new, and a set of wireless triggers. Not PocketWizards, mind you, but the FlashFires do work, and they take up less room than a set of Plus IIs.

When you consider the amount of power and versatility that you get from the TritonFlash, and that it costs less than most fast lenses, it’s actually a pretty good value for a high performance piece of technical photography equipment.

Comparison vs. the Elinchrom Ranger Quadra

The Elinchrom Ranger Quadra is the TritonFlash’s main competition, alternative, or whatever you want to call it. I have not used the Quadra, but I know it’s a very capable strobe unit that’s used by a wide selection of both indoor and outdoor photographers. Both the Triton and the Quadra are excellent, professional quality units, and either will get the job done.

Light Output & Recycle Time: The Quadra is rated to 400 watt seconds, vs. 300 on the TritonFlash. However, the TritonFlash wins out big in recycle time. Whereas the Quadra recycles in 4.0 seconds (full power) and 2.2 seconds (half power), the TritonFlash is rated to recycle at 3.0 seconds (full power) and will recycle at 0.1 seconds under partial power for quick bursts of up to 6 frames per second. From that standpoint, it seems the the TritonFlash is the better choice for shooting fact action and sports.

Battery Performance: The Quadra is rated to produce 150 shots full power charge, compared to 750 full power shots on the TritonFlash. One review on the Quadra listed a practical limit of 200-400 partial power pops. Even when using the TritonFlash in below zero temperatures outside, I’ve easily gotten that many pops with well over half the battery charge remaining. Like I said above, I’ve still never drained my TritonFlash battery, even on longer photo shoots.

Size and Weight: The Quadra flash head is considerably smaller and lighter than the Triton. (1/2 lb vs. 2 lbs.) However, the Quadra’s battery pack  is quite a bit larger and 2 lbs. heavier. (Click here to see a photo of the Quadra battery.) In my experience, the TritonFlash battery is small and light enough to tuck inside your jacket when it’s around your neck. Not sure it would be very comfortable to do that with the Quadra. (Click here to see the size of the TritonFlash battery.)

Overall Value: The TritonFlash kit comes included with the OctoDome NXT, whereas the Quadra does NOT come with a softbox. Also, for roughly the same price, the TritonFlash kit comes with that second extra battery and wireless triggers.

Final Analysis

A battery powered strobe like the Photoflex TritonFlash is certainly not for everyone, but it’s a very powerful, capbale and portable tool that gives you great options for shooting just about any type of subject inside or out: action, studio, location assignments, interiors, portraits etc…

As for me, Mr. fast and light, run around adventure photographer guy, I’m sold. I feel that the TritonFlash has added an entire new dimension to my photography, especially to my style of Going Fast With Light.

See more info on the Photoflex Website, see my TritonFlash in use in my LightingSchool Lessons, and view some of my TritonFlash shots below.

[iframe]<iframe src=”http:///e/cm?lt1=_blank&bc1=000000&IS2=1&bg1=FFFFFF&fc1=000000&lc1=0000FF&t=danhbaisadvph-20&o=1&p=8&l=as4&m=amazon&f=ifr&ref=ss_til&asins=B0050LY0GE” style=”width:120px;height:240px;” scrolling=”no” marginwidth=”0″ marginheight=”0″ frameborder=”0″></iframe><iframe width=”120″ scrolling=”no” height=”150″ frameborder=”0″ style=”border:none;” border=”0″ src=”http://mer54715.datafeedfile.com/widget/aff_widget_prdt_generate-2.0.php?aff_num=6746&aff_net=1&widget_num=916″ marginheight=”0″ marginwidth=”0″></iframe>[/iframe]

March 20, 2012
See this post
Photoflex TritonFlash Battery Powered Strobe Review

.

You can now get the first two chapters of my eBook, Making The Image: A Conceptual Guide to Creating Stronger Photographs as a free download.

This free excerpt contains the Introduction, as well as the two chapters, Light and Color, which which begin the exploration of how the human visual system perceives and responds to the world. See how you can use this information to help create stronger imagery of whatever subjects you like to shoot.

This book contains concepts that I’ve leaned and applied to my own image making for nearly two decades. I consider it the defining guide on my own photographic style, as it accurately represents how I see and compose my imagery.

Of course, if you want to continue with the rest creative concepts in the book, and if you think that it’s worth a few bucks, then by all means, purchase the full version. You don’t have to, though. Just click the button below and get your free sample of Making The Image right now and see what it can do for your own creativity, inspiration and composition.

Get the free download:

Add to Cart

Don’t forget to share this offer and and pass it along to your other photography friends!

March 19, 2012
See this post
Download a Free Excerpt of my eBook, Making The Image

My latest lesson is up on the Photoflex LightingSchool website. It’s called Lighting an Alaskan Ultra Runner Outdoors, and showcases the TritonFlash, the FlashFire Wireless trigger kit and runner Beat Jegerlehner, who remarked that this photo shoot was more strenuous than running 350 miles across the Alaska wilderness in the middle of winter.

The lesson demonstrates the effects that a single flash can make on your outdoor action imagery. Keep in mind, that even though I use the TritonFlash battery powered strobe in the lesson shots, the same effect can be had with just a single off camera flash unit.

Stay tuned for more lessons throughout the year!


March 16, 2012
See this post
New Photoflex Lighting School Lesson – Snowshoe Running

Just released: The Adobe Photoshop Lightroom 4 Book, The Complete Guide for Photographers, written by Martin Evening.

If you’re a Lightroom user and haven’t upgraded to LR4 yet, then you’re missing some big advancements, as the new version offers a number of great new features and a much more powerful image processing engine.

This new manual by digital imaging expert and bestselling author Martin Evening details all the features of Lightroom 4 from a photographer’s perspective. He walks you through each one of Lightroom’s modules, shows you how to build an efficient workflow and guides you through the process of importing, editing and outputting the best quality imagery, whether for the web, a professional portfolio, a Blurb photo book or for final delivery to a client.

As an established commercial photographer who has worked closely with Adobe during the entire Lightroom development phase, Martin knows the software inside and out. As a world renowned instructor, he’s able to guide you through each process in a straightforward and professional manner.

I’ve used and written reviews for Martin’s books for years, and can definitely recommend his detailed, comprehensive teaching style. His books aren’t just quick how-to guides, they’re complete resources that explain every aspect of the software and how to use each tool with thorough efficiency. If you don’t just want to know which slider to adjust or what preset to use, but instead want to learn everything you can about an Adobe imaging program so that you can have every creative tool at your disposal, Martin’s books are definitely the best way to go.

At 704 pages, this complete in-depth reference is coupled with a companion website that contains video tutorials, sample images, articles and updates. Just as his other books have for each of the preceding versions, The Adobe Photoshop Lightroom 4 Book is sure to become the defacto Lightroom 4 bible. It’s available in either print or eBook format.

 Buy at PeachPit Press            Buy at Amazon

March 15, 2012
See this post
The Adobe Photoshop Lightroom 4 Book by Martin Evening

Yesterday I asked some Facebook fans to tell me which books have influenced them the most in their process of learning photography. These are their recommendations.

If you’re looking for a great book or some written inspiration to help you advance your own outdoor photography skills, creativity and vision, listen to my readers and check out the books that they like best.

1. On Photography, by Susan Sontag

One of the most highly regarded books of its kind, On Photography first appeared in 1977 and is described by its author as “a progress of essays about the meaning and career of photographs.” It begins with the famous “In Plato’s Cave”essay, then offers five other prose meditations on this topic, and concludes with a fascinating and far-reaching “Brief Anthology of Quotations.”

2. The Ongoing Moment, by Geoff Dyer 

Great photographs change the way we see the world; The Ongoing Moment changes the way we look at both. Focusing on the ways in which canonical figures like Alfred Stieglitz, Paul Strand, Walker Evans, André Kertész, Edward Weston, Dorothea Lange, Diane Arbus, and William Eggleston have photographed the same things—barber shops, benches, hands, roads, signs–award-winning writer Geoff Dyer seeks to identify their signature styles.

In doing so, he constructs a narrative in which these photographers–many of whom never met–constantly encounter one another. The result is a kaleidoscopic work of extraordinary originality and insight.

3. The Digital Photography Series, by Scott Kelby.

Scott Kelby, the man who changed the “digital darkroom” forever with his groundbreaking, #1 bestselling, award-winning book The Photoshop Book for Digital Photographers, shows which button to push, which setting to use, when to use them, and hundreds of the most closely guarded photographic “tricks of the trade” to get budding photographers shooting dramatically better-looking, sharper, more colorful, more professional-looking photos with their digital camera every time they press the shutter button.

4. Within the Frame and Vision Mongers, by David duChemin

Within the Frame is a book about finding and expressing your photographic vision, specifically where people, places, and cultures are concerned. A personal book full of real-world wisdom and incredible images, author David duChemin (of pixelatedimage.com) shows you both the how and the why of finding, chasing, and expressing your vision with a camera to your eye.

Vision leads to passion, and passion is a cornerstone of great photography. With it, photographs draw the eye in and create an emotional experience. Without it, a photograph is often not worth—and can’t capture—a viewer’s attention.

Vision Mongers: Making a Life and Living in Photography: For those who want to make the transition into the world of vocational photography—staying true to your craft and vision, while fusing that craft with commerce, VisionMongers is a great place to begin your journey. With a voice equally realistic and encouraging, photographer David duChemin discusses the experiences he’s had, the lessons he’s learned, and the practices he’s adopted in his own winding journey to becoming a successful working photographer.

5. Visual Poetry, by Chris Orwig

A great photograph has the potential to transcend verbal and written language. But how do you create these photographs? It’s not the how that’s important, but the who and the what. Who you are as a person has a direct impact on what you capture as a photographer.

Whether you are an amateur or professional, architect or acupuncturist, physician or photographer, this guide provides inspiration, simple techniques, and assignments to boost your creative process and improve your digital images using natural light without additional gear.

I also love Chris’s book, People Pictures: 30 Exercises for Creating Authentic Photographs.

6. Adventure Photography, by Michael Clark

Digital Masters goes extreme! This beautifully produced guide by Michael Clark, Adventure Photography: Capturing the World of Outdoor Sports, is the newest entry in the series, as well as the first book on a fast-growing photographic genre: shooting today’s popular extreme outdoor sports, from mountain biking and ice climbing to surfing, BASE jumping, and more.

Clark is one of the world’s most respected adventure photographers, and he offers sage advice—gained from years of hard-earned experience—on equipment, techniques, and the specific skills required to get in on the action. Learn to capture fast-moving subjects and deal with harsh conditions and horrible weather—even when you’re hanging from ropes and riggings in a squall. Of special interest is the Portraiture and Lifestyle chapter, which covers increasingly in-demand techniques.

Having known Michael since he first began is photography career, (we came through the ranks at the same time), I can attest that he is not only a truly awesome photographer and writer, he’s one of the nicest guys you’ll ever meet.

7. The Moment It Clicks, The Hotshoe Diaries and Sketching Light, by Joe McNally

Joe McNally, one of the world’s top pro digital photographers, whose celebrated work has graced the pages of Sports Illustrated, Time, and National Geographic (to name a few), breaks new ground with The Moment it Clicks by doing something no photography book has ever done—blending the rich, stunning images and elegant layout of a coffee-table book with the invaluable training, no-nonsense insights, and photography secrets usually found only in those rare, best-of-breed educational books.

A truly awesome book, read my full review of The Moment it Clicks.

After spending more than thirty years behind the lens—working for National GeographicTimeLife, and Sports Illustrated—Joe McNally knows about light. He knows how to talk about it, shape it, color it, control it, and direct it. Most importantly, he knows how to create it…using small hot shoe flashes.

In The Hot Shoe Diaries: Big Light From Small Flashes, Joe brings you behind the scenes to candidly share his lighting solutions for a ton of great images. Using Nikon Speedlights, Joe lets you in on his uncensored thought process—often funny, sometimes serious, always fascinating—to demonstrate how he makes his pictures with these small flashes. Whether he’s photographing a gymnast on the Great Wall, an alligator in a swamp, or a fire truck careening through Times Square, Joe uses these flashes to create great light that makes his pictures sing.

Read my full review of The Hot Shoe Diaries.

Following up on the great success of The Moment It Clicks and The Hot Shoe Diaries: Big Light from Small Flashes, legendary magazine photographer Joe McNally takes us on another memorable ride with Sketching Light, another trip into the land of light–but this time running the gamut from small flash to big flash, and everywhere in between.

Of course, Joe includes coverage of Nikon Speedlights, but he also covers big flash, as well as “in-between” lights as the Elinchrom Quadra. The exploration of new technology, as well as the explanation of older technology. No matter what equipment Joe uses and discusses, the most important element of Joe’s instruction is that it is straightforward, complete, and honest. No secrets are held back, and the principles he talks about apply generally to the shaping and quality of light, not just to an individual model or brand of flash.

8. Chased by The Light, by Jim Brandenburg

Award-winning nature photographer Jim Brandenburg gave himself a challenge: for ninety days between the autumnal equinox and the winter solstice, he would take only one photograph each day. This exquisite book, now in softcover, is the result of that bold and immensely personal project. Through the accompanying essay, Brandenburg shares his innermost thoughts and passions as he witnesses the cycle of nature near his home in the northwoods of Minnesota.

Brandenburg also contributes new photos and an Epilogue that illustrates and discusses the devastating summer wind storm that wreaked havoc on the locations photographed for the original project.


March 14, 2012
See this post
Photography Books Recommended by My Readers
Yuck. Flat light. What do you do?

I realize that much of the world is either done with snow or else doesn’t have any yet. However, it’s 5 degrees at the house this morning, so I decided to do another winter related post. Don’t worry, for those of you who live in the non polar regions of the world, I’ll be sure and retweet this article again next year in case you forget this stuff. For you southern hemisphere people, you know what’s coming.

In wintertime, the light is often really flat and downright unappealing. The snow doesn’t help, either, it diffuses everything to the point where you lose all shadow and texture. So what do you do? How do you deal with this kind of light as a photographer?

Here are 4 things to try and bring that POP back into your flat light winter outdoor photography. If you have some other ideas, why not leave a comment and share them at the end of the post.

1. Shoot Up Close

One of the best ways to deal with flat light and overcast skies is to pretend that that the sky is a giant softbox and the snow is your assistant holding the world’s biggest diffuser, because that’s essentially what’s going on. Get up close and shoot stuff that wouldn’t necessarily work under strong, direct sunshine. Shoot portraits, faces, details and macro. Put on the long lens and shoot really tight.

Not having any shadows is sometimes easier to deal with than having strong direct shadows and harsh light. When you actually think about it, what would you rather have, overcast and white or mid day sun straight overhead? Yea, I thought so.

Make the picture much more about your subject instead of how it fits into the big open expanse of white. Focus on the “what” instead of the “where.” Bring your viewer into the frame and show them faces, expressions, details and moments instead of environment.

A little goes a long way here; you can still show the background, just don’t include too much of it. If you do an effective job with this, no one will really care about all that white.

2. Use a Flash

I’ve said this before: Oh what a difference a flash makes. Even just a single speedlight can rescue your shot from the worst lighting conditions. Like this one. It’s about as flat a light as you can possibly get, but add a flash, sync cord and a small portable softbox, like the Lumiquest Softbox III, and you suddenly have definition, texture, angles, interest and a usable image.

You don’t have to use a softbox, though. If you don’t have one, then shoot bare bulb. It’s better than nothing, and in some cases, the higher contrast of a bare flash will counteract the effect of the flat light and actually add more interest.

How you use the flash is entirely up to you and your desire to experiment. Go subtle and just try to add some invisible flavor. Or, go big and strive for strong, bold light that gives your shot some real punch.

Make use of your tools and creativity, that’s what they’re for. What you try may not end up working, but if it does, you’ll have a new technique in your bag of tricks. Likewise, if it doesn’t, you’ll know what NOT to do next time.

3. Let The White Be White

Sometimes there’s really nothing you can do except let the white be white. Take what you got and run with it. Let the scene be what it is. Love the white. Revel in the white. If you’ve got an especially good looking environment, then try to feature that proiminently in your image.

If your foreground isn’t anything spectacular to write home about, then try zooming in a little bit, or putting on a longer lens and try to play your subjects off of something in the background. You might have to make a few adjustments in post to in order to increase contrast and give the shot a little more life.

Another solution is to put your models and friends in bright colored clothing. You probably already do this anyway, but when the light sucks, more color goes a long way.

4. Say “Screw it,” and Just Go Play

Sometimes you just have to put the camera gear away and go play. Go put some miles underneath your big fat snow tires. Make powder turns on your big boards. Launch yourself down the hill. Have fun. Enjoy life. Shoot pictures later. If the photos aren’t working, don’t try to force it. Know when to quit. There’s aways tomorrow…

…Unless, of course, the client is breathing down your neck, in which case, revert back to tips #1, 2, and 3.

Thanks to Anthony DeLorenzo for suggesting this topic.

March 13, 2012
See this post
4 Tips for Photographing in Flat Winter Light

Short post today, just a quick trio of photography bits to start off your week. One educational, one inspirational and one image. Enjoy!

1. Personal Work is What Recharges Us

I found this worthy message today on A Photo Editor. If you haven’t visited this site, it’s definitely worth stopping by for awhile- Lots of great pro insight, features and photographer interviews.

2. Why Shooting to the Right Gives You Better Final Images

Light Stalking is one of the biggest and best photography resource sites out there. I can’t even begin to count the number of hours that a photographer could kill surfing over there. This short lesson explains histograms and how to reduce noise in your digital imagery.

3. Grassy Sunset, by Justin Brown

A really nice winter sunset view of Grassy Mountain in Manning Provincial Park, British Columbia, shot by Canadian photographer Justin Brown. Go ahead, check it out and then spend some time getting lost in some of his other great photographs while you pour that second cup of coffee.

Happy Monday.

March 12, 2012
See this post
3 Bits of Photography Goodness

During the past couple of weeks, I’ve veered away from DLSR land and explored a few compact cameras with my full review of the Fiji X10, my writeup of 4 rugged adventure point and shoots and my look at the new Nikon 1 and it’s lighting fast AF system.

This new generation of compact cameras has indeed captured our fascination; they shoot great imagery, shutter lag is a thing of the past, and they’re packed with creative technology, presets and sometimes even Instagram-type filters. After all, manufacturers know that they have to compete with the most popular point and shoot camera in world, the iPhone.

However, when shopping for any camera, don’t get a case of Sensor Envy.

While its true that larger sensors produce better quality, sharper, higher resolution imagery, sensor size is NOT always the most important thing to consider.

The reality is that in most shooting applications, sensor size is NOT the limiting factor as to whether you’ll get a great shot, or even if you’ll get the shot at all. More important concerns are usability, functionality, and compatibility with your photography style. Here’s a list of things you should consider before you buy a cool new “little camera.”

1. Is it comfortable to hold and carry?

If a camera is just not convenient to carry with you, whether it’s stuffed into your pocket or clipped to your backpack or climbing harness, then it won’t do you much good. Hold the thing in your hands. Get a really good feel for what it’s actually like to use and carry. How does it feel? Will it fit into your pocket? Does it have a viewfinder? Do you have to/want to deal with extra lenses? Are those things even a concern? Think about this stuff before dropping cash.

2. Are the controls easy to navigate?

This a big one; it’s the deal breaker for many cameras. Are the buttons too small or too close together to press without accidentally hitting the wrong one? Is the touch screen interface usable with gloves? Is the LCD viewable in the bright sunshine? All very important factors.

3. How easy is it to change functions?

Another huge concern. No matter what you shoot, life moves pretty damn fast, and if you can’t set the camera controls as you need them, then you’ll miss the shot every time. Are functions easily changeable by dials and buttons, or do you have to dig inside the menus to set the parameters you need. Even just changing exposure settings on some cameras is quite an ordeal. Sensor size don’t mean sh*t if your exposures are all wrong of if they’re blurry because you couldn’t remember how to change the AF mode.

4. How fast is the autofocus and/or FPS rate?

Again, life doesn’t wait. It goes by in the blink of an eye and if you’re waiting for your camera to find and track the subject, then you’ve already lost it. Also, with some cameras rivaling and even surpassing DLSR fps speed, those little cameras are quite capable of capturing action and fast breaking scenes.

5. Will you actually take it with you?

Yea, that new super X Pro E1000S Micro Super HD camera has an APS-C sensor that’s even bigger than Macro Four Thirds and CX format, and it’s got a great lens, but is it too nice? Will you actually take it with you out into the world where it might get dinged and knocked around? Then you’d better get one of those rugged, indestructible models. Sure the sensor is not nearly as big, but again, if you don’t have your camera with you…

Lastly, find out what other people think- Check out reviews on a wide variety of compact camera systems over at Photographyreview.com.

March 8, 2012
See this post
5 Things to Consider when Shopping For a Compact Camera


The Nikon 1 is Nikon’s first offering in this current trend of small, mirrorless, high quality compact cameras. Essentially a bridge between a point and shoot and a DSLR, the Nikon 1 J1 offers the flexibility and quality of an interchangeable lens system in an incredibly small, convenient package that you can stick in your pocket and take anywhere. (The more expensive Nikon 1 V1 camera offers an electronic viewfinder, a higher-resolution screen and a hot shoe flash option, whereas the smaller J1 features built-in flash and a lower price tag.)

The “1” cameras use Nikon’s new 10 MegaPixel CX format digital sensor, which is smaller than the Four Thirds size, and slightly larger than the Fuji X10’s 2/3″ sensor size. It offers a max image size of 3,872 x 2,592, and does Full HD (1,980 x 1,020) stereo movies.

Blah blah blah… tech specs. What you really want to know is, what’s so great about the Nikon 1 camera and why would you want to buy one?

Simple. It rocks for shooting sports and action.

The Nikon 1 has a highly advanced, incredibly fast 73-point Focal Plane Phase-Detect autofocus system that rivals that of a high end DSLR. And it shoots at up to 10 fps with full AF, or 60 fps without AF.

It also boasts two other features that will ensure that you never miss the shot. The new Smart Photo Selector feature, the Nikon 1 can capture motion at 30 fps and then select the best 5 shots from the series. Add to that the fact that the “1” can simultaneous capture HD moves and high resolution still images at the same time without interruption. We haven’t seen anything like this before.

It will also slow things down- WAY down. In Slow Motion Movie mode, the Nikon 1 will shoot at either 400 or 1,200 fps. To contrast, I thought that shooting 200 fps with my Fuji X10 was cool!

So what’s the trade off?

Image quality is the only real tradeoff, but it’s not by very much at all. While photos from the Nikon 1 look great, and are certainly high enough resolution for just about anything other than full-on pro work, you’ll find that they’re not quite as what you’d see from Four Thirds or APS-C sensor cameras.

However, the Nikon 1 blows away all other compact camera in it’s class away when it comes to shooting action, fast breaking scenes and moving subjects. If shooting sports and fast, capturing daily life is what you like to do, even just for fun, then I’d definitely recommend the “1.” It’s an outstanding camera system that offers lots of flexibility for most outdoor photography applications, including full manual modes, RAW, flash, and more.

The Nikon 1 (starting at $599) is available in different camera lens packages, your options being the J1 or the higher end V1 with one of the following lens kits:

Read the PDF Brochure for the Nikon 1 that shows all the features or check out Photo_John’s hands on review of the Nikon 1 J1 at Photographyreview.com.

[iframe]<iframe width=”120″ scrolling=”no” height=”240″ frameborder=”0″ style=”border:none;” border=”0″ src=”http://mer54715.datafeedfile.com/widget/aff_widget_prdt_generate-2.0.php?aff_num=6746&aff_net=1&widget_num=829″ marginheight=”0″ marginwidth=”0″></iframe>[/iframe]

March 7, 2012
See this post
The Nikon 1 Camera System – Great for Shooting Action

When you’re wrecking on your mountain bike, falling down in waist deep powder, bombing through the rapids, or scraping up alpine granite walls, it’s just not always practical to bring along the heavy DSLR. Believe me.

Sometimes you just want to head out on the trail for a few hours, smell the flowers and shoot a few landscapes or fun action photos without burdening yourself with the “big camera” and all those lenses.

Does this mean that you can’t go light and fast AND document your more extreme adventures with high quality, and perhaps even publishable photos? No way. Compact camera technology has gotten a whole lot better in recent years, just as cameras themselves have gotten tougher.

Here’s a review of 4 rugged adventure point and shoot cameras that produce high resolution imagery and that are designed to be knocked around, dropped, submerged, frozen and otherwise abused by risk taking, hard playing, fun loving outdoor photographers. Also, check out my writeup on the Fuji X10 and my look at the new Nikon 1 J1, which are both excellent compact cameras, they’re just not water and shock proof.

1. Nikon 100AW – 16MP

Nikon turned quite a few heads when it introduced the Coolpix AW100 at this year’s PhotoPlus Expo. Designed with a 16MP CMOS sensor, a 3″ LCD screen, Full HD (1920 x 1080p) video, a built in GPS and electronic compass, the AW100 is built on a chassis that can withstand underwater depths of 33-feet, temperatures as low as 14 degrees F and being dropped onto the rocks from at least five feet.

The 5x optical zoom NIKKOR ED glass lens on the AW100 is equivalent to a 28-140mm f/3.9-4.8, and it’s constructed of 12 elements in 10 groups. The camera features VR image stabilization, Nikon’s EXPEED digital image processor, a motion detector for AF tracking of moving subjects, and a frame rate that allows 3 full resolution shots in about a second.

Knowing that it’s really hard to control all the little camera buttons when you’re wearing gloves, Nikon has included an Action Control feature, which lets you perform certain camera functions by hitting the Action button on the side, and then giving the camera a simple shake up/down or forward/backward. I have not tried this function, but it sounds like it could make things a lot easier in the wintertime.

I like what I see in the Nikon AW100 so much that I’ve been very tempted to just rush out and just buy one for fun. I may end up doing that very soon, as it’s a camera that you could certainly clip to your backpack, always keep with you and not have to worry about beating up. In checking out the Nikon AW100 mini-site, both image and movie quality look very good, even in low light.

Right now, the AW100s have an instant $50 rebate that’s good until the end of March, which means that you can pick one up for less than $300.

[iframe]<iframe width=”120″ scrolling=”no” height=”240″ frameborder=”0″ style=”border:none;” border=”0″ src=”http://mer54715.datafeedfile.com/widget/aff_widget_prdt_generate-2.0.php?aff_num=6746&aff_net=1&widget_num=805″ marginheight=”0″ marginwidth=”0″></iframe><iframe src=”http:///e/cm?lt1=_blank&bc1=000000&IS2=1&bg1=FFFFFF&fc1=000000&lc1=0000FF&t=danhbaisadvph-20&o=1&p=8&l=as4&m=amazon&f=ifr&ref=ss_til&asins=B005IGVY6K” style=”width:120px;height:240px;” scrolling=”no” marginwidth=”0″ marginheight=”0″ frameborder=”0″></iframe>[/iframe]

2. Panasonic Lumix DMC-TS3 – 12.1 MP


Much like the Nikon AW100, the Panasonic Lumix DMC-TS3 is built for toughness. It’s waterproof to 40′, shockproof to a supposed 6.6′, and it also has Full HD video capabilities with Dolby sound and a built in GPS and compass, as well as an altimeter and barometer.

With a Leica ED glass 28-128mm equivalent 4.6 optical zoom lens (10 elements in 8 groups) a 2.7″ LCD panel and a 12.1 MP Hi-speed CCD sensor, the DMC-TS3 produces great, low noise images and high quality video. It will fire a burst of 7 full resolution images at a frame rate of about 3.7 fps, and in Hi-speed Burst Mode, it will fire up to 10 fps for a max of 100 shots.

The Panasonic Lumix DMC-TS3 is rated to fire approx. 310 full resolution shots on a single battery charge, which is slightly better than the Nikon AW100, which is rated to around 250 shots. Of course, these numbers are wildly affected by a number of factors, and under normal circumstances, you’re likely to get even more frames on a full charge.

It doesn’t have a special Action Mode feature like the AW100, so no telling how easy it is to use when wearing gloves. Those buttons are pretty small…

I got to see one of these up close last week- my friend has one and he took his on the 350 mile Iditarod Invitational winter ultra endurance race and had it in conditions well below zero for days on end. I’ll talk to him later this week and see how it performed under those temperatures.

That said, I’ve seen shots from his other winter trips and I’m pretty impressed by the Panasonic Lumix DMC-TS3. The Lumix cameras are awesome and they really hold up, as gauged by my other adventure friends who have them. I wouldn’t mind having one. At around $229, the Lumix DMC-TS3 also costs quite a bit less than the Nikon AW100; the main tradeoffs being the slightly lower MP sensor and no “Action Button” feature.

Note: The brand new Lumix DMC-TS4 is now out. Click here for info.

[iframe]<iframe width=”120″ scrolling=”no” height=”240″ frameborder=”0″ style=”border:none;” border=”0″ src=”http://mer54715.datafeedfile.com/widget/aff_widget_prdt_generate-2.0.php?aff_num=6746&aff_net=1&widget_num=806″ marginheight=”0″ marginwidth=”0″></iframe><iframe src=”http:///e/cm?lt1=_blank&bc1=000000&IS2=1&bg1=FFFFFF&fc1=000000&lc1=0000FF&t=danhbaisadvph-20&o=1&p=8&l=as4&m=amazon&f=ifr&ref=ss_til&asins=B004KKZ0J2″ style=”width:120px;height:240px;” scrolling=”no” marginwidth=”0″ marginheight=”0″ frameborder=”0″></iframe>[/iframe]

3. Olympus TG-810 Tough – 14MP


Much like the AW100 and the Lumix, the Olympus TG-810 Tough is waterproof to 33′, shockproof to 6.6′, winterized and freezeproof to 14 degrees. They all call it crushproof, as it’s metal body is built to withstand up to 220 lbs of pressure. And, like the others, the TG-810 Tough also has a built in compass, altimeter and GPS so that you can tag and see where your photos were shot.

Olympus has a long history with durable point and shoot cameras. Remember the old Stylus Epic? That was a huge favorite of outdoor photographers and adventurers everywhere.

Built with a 14 MP sensor and a 5x 28-140mm equivalent lens and a scratch resistant 3″ LCD screen, the TG-810 Tough has a slightly smaller max video size (1280 x 720). However, the camera does features some other fun features, such as AF tracking, a host of creative Magic Filters (Pop Art, Pin Hole, Fisheye, Drawing, Soft Focus, Punk, Sparkle, Watercolor), and a 3D mode that produces photos that can be viewed on 3D televisions. It also has an in-camera Panorama mode that will stitch together 3 photos into an ultra wide pano.

The TG-810 Tough is also compatible with the Eye-Fi SD card, which allows for wireless WI-FI upload of your images.

Overall, the Olympus TG-810 Tough looks like a very rugged camera that’s comparable to the two previous models mentioned above.

[iframe]<iframe width=”120″ scrolling=”no” height=”240″ frameborder=”0″ style=”border:none;” border=”0″ src=”http://mer54715.datafeedfile.com/widget/aff_widget_prdt_generate-2.0.php?aff_num=6746&aff_net=1&widget_num=811″ marginheight=”0″ marginwidth=”0″></iframe><iframe src=”http:///e/cm?lt1=_blank&bc1=000000&IS2=1&bg1=FFFFFF&fc1=000000&lc1=0000FF&t=danhbaisadvph-20&o=1&p=8&l=as4&m=amazon&f=ifr&ref=ss_til&asins=B004YNE0V4″ style=”width:120px;height:240px;” scrolling=”no” marginwidth=”0″ marginheight=”0″ frameborder=”0″></iframe>[/iframe]

4. Sony Cyber-Shot DSC-TX10- 16.2 MP

Last but not least is the Sony Cyber-Shot DSC-TX10, which features a 16.2 MP CMOS sensor and a Carl Zeiss 4x optical zoom 25-100mm equivalent lens, a 3″ touch screen LCD screen and Full HD 1080p video.

Also, waterproof, shockproof, and freezeproof just like the others, the Cyber-Shot DSC-TX10 will fire at 10 fps at full resolution, and it features a number automatic scene modes and creative filters, as well as 3D mode and 3D Sweep Panorama mode.

The main issue for some people with the Cyber-Shot DSC-TX10 could be the touch screen LCD. While this is not usually a problem in the summertime, it’s pretty much useless in the winter unless you take your gloves off. That gets old. Northern latitude photographers may stay away from this camera.

If touch screen doesn’t bother you, it’s does have a Carl Zeiss lens and a great sensor, so image quality should be quite good.

Note: The Cyber-Shot DSC-TX10 has been discontinued. You can still find them around, but the newer Cyber-Shot DSC-TX20 is due to hit shelves in May- Just in time for summer vacation!! However, looking at the specs, there doesn’t seem to be much difference between the TX10 and the TX20 except a 20-dollar jump in price. If you don’t want to wait, you should probably just pick up the TX10.

[iframe]<iframe width=”120″ scrolling=”no” height=”240″ frameborder=”0″ style=”border:none;” border=”0″ src=”http://mer54715.datafeedfile.com/widget/aff_widget_prdt_generate-2.0.php?aff_num=6746&aff_net=1&widget_num=812″ marginheight=”0″ marginwidth=”0″></iframe><iframe src=”http:///e/cm?lt1=_blank&bc1=000000&IS2=1&bg1=FFFFFF&fc1=000000&lc1=0000FF&t=danhbaisadvph-20&o=1&p=8&l=as4&m=amazon&f=ifr&ref=ss_til&asins=B004H8FNGC” style=”width:120px;height:240px;” scrolling=”no” marginwidth=”0″ marginheight=”0″ frameborder=”0″></iframe>[/iframe]

March 6, 2012
See this post
4 Rugged Adventure Point and Shoot Cameras