Cyclocross season began here in Anchorage this weekend, and so Saturday morning I headed out to the course with a camera, a few lenses and some light. My flash of choice was the Photoflex TritonFlash battery powered strobe, because it’s a versatile unit that’s easy to carry, and it packs a powerful punch.

Now hang on a minute. Beautiful fall day, lots of sunshine and blue sky? Couldn’t I have gotten by without extra light? Why use flash at all?

Because I wanted my images to go BANG!! I wanted to show the sharp glint of chainrings, and spokes, the texture of muscle and chromoly and the sweat and pain of exertion. I wanted to bring my viewer in close enough to get trampled and run over by the racers and flash helps me bring out these details and freeze the action.

Also, because I knew I’d be dealing with mixed lighting conditions. The coolest part of the race course ran up a short rooty hill inside the forest, and if you’ve ever tried to shoot inside the forest during a bright sunny day, you know that it can be a photographer’s nightmare. There’s either too much contrast, or else it’s just too dark to make for exciting photos.

Throw in some extra light from a strobe or even a single flash and it’s like night and day. Excitement. Detail. Color. Texture. Wow!! Both of these photos (above and below) were shot at 1/100 sec, at F/8 with my Nikon 24mm f/2.8D lens. However, see what a difference the flash makes?

When using flash, the shade is actually your friend, because it lets you control the main light that’s falling on your subject. Sometimes it’s just no use trying to fight with the sunshine, and if you can find a vantage point that puts your subject in the shadow, you can build your photo from the ground up.

In these shots, I set my camera exposure to preserve the background, whether it be blue sky or the shaded forest, and then added a single off camera light to freeze the motion and highlight the riders.

The flash was set 90 degrees off axis, which gives the shot three dimensionality and depth. I set the TritonFlash to FP mode, (1/8 power) and triggered it with a pair of PocketWizard Plus radios. You can see in this shot above that the no-flash exposure is too dark, and just doesn’t have any life.

The light is placed about as close as I could possibly get it without being in the way, although in my own clumsiness, I managed to kick it downhill into the dirt at least once. Fortunately, it’s built to last and nothing broke. I wouldn’t say that I abuse my gear, but it definitely gets caught in the crossfire, so it needs to be tough.

I could have just as easily used one or two small flashes, but the TritonFlash gives me added power and much faster recycling times. Plus, the included Octodome NXT softbox helps throw a nice even blast of light. Note, I do have the shoe mount bracket that will let you use Photoflex softboxes with regular flashes.

Finally, no matter what kind of setup you have, using flash allows you to experiment that much more with your creativity. As with any technique, practice with your gear, so that when you find yourself in front of the action, you’ll be able to grab it with skill and confidence.

Read more about off camera flash techniques and equipment in the outdoors in my 83-page eBook, Going Fast With Light.


See more race photos from this series, where I try to take a slightly different approach each week.

September 10, 2012
See this post
Fast With Light – Photographing Cyclocross

Another recent publication – This is a page from the 2013 Photoflex catalog that has just gone to press. It features one of my Alaska snow biking photos that was shot with the TritonFlash battery powered strobe.

The TritonFlash is an incredibly capable lighting unit that fits within my “Fast with light” photography style. It’s easy to pack and carry, even in the outdoors, powerful (up to 750 full power shots per battery charge), fast (can keep up to 7 frames per second), and as I’ve tested, it will work in extreme temperatures and conditions.

I use the TritonFlash for indoor portraits, as well as outdoor action and, as my testimonial in the Photoflex catalog states, it’s added an entire new dimension to my photography.

Read my full review of the TritonFlash, and see the detailed, how-to setup behind this snow biking image.

[iframe]<iframe src=”http:///e/cm?lt1=_blank&bc1=000000&IS2=1&bg1=FFFFFF&fc1=000000&lc1=0000FF&t=danhbaisadvph-20&o=1&p=8&l=as4&m=amazon&f=ifr&ref=ss_til&asins=B0050LY0GE” style=”width:120px;height:240px;” scrolling=”no” marginwidth=”0″ marginheight=”0″ frameborder=”0″></iframe><iframe width=”120″ height=”150″ scrolling=”no” frameborder=”0″ src=”http://mer54715.datafeedfile.com/widget/aff_widget_prdt_generate-2.0.php?aff_num=6746&aff_net=1&widget_num=916″><p>Sorry your browser does not support iFrame</p></iframe>[/iframe]

September 7, 2012
See this post
Recent Publication: 2013 Photoflex Catalog

With all the new photography eBooks that keep coming out, including my own release, Creative Photography Techniques – 20 Simple Tips for Stronger Images, it’s easy to miss some. I often try to review my favorites and the ones that I think will make a difference in your photographic process, but the truth is that I just don’t have the time to read and review every book that gets written.

So, here are the most recent titles by some of my favorite publishers. If any of them look promising, check them out for yourself and see what you think.

Finding Focus – This 37 page book by Nicole S. Young is all about helping you develop your visual storytelling through more understanding and advanced use of your lenses. Chapters include Aperture, Depth of Field, Lens Compression, Macro Photography and  Focus Stacking, Nicole walks you through a wide variety of technical and creative methods that will help you use your camera and lenses more effectively.

I actually did read this one, and I think it’s pretty good. It’s a bit shorter than some of the other Craft and Vision books, but it’s filled with lots of technical information.


Up Close – At 88 pages, Andrew Gibson has written a definitive guide for photographers who like to shoot close up. Covering tools, techniques, lighting, lenses, focal length, image stabilization, workarounds that allow you to get the shot without sacrificing quality and more, this book has been rated as an excellent resource on macro photography.

I haven’t had the chance to read this one yet, but judging by the sample pages, this one looks like a real winner!


55 Smart Web Ideas for Photographers – This authoritative guide by photography marketing guru Zach Prez is filled with ideas that will help you improve your visibility on the web and through social media. With 12 Facebook Ideas, 13 blog tips, 11 Google Strategies, 9 email marketing ideas and more, this easy-to-digest reference will show you lots of quick and effective ways to capture traffic and sales.

I’ve read Zach’s other books and can attest that he knows what he’s talking about. These ideas work. Although it’s been out for awhile now, this one is worth a look.

September 4, 2012
See this post
A Look at 3 Brand New Photography eBooks

The other day I heard from a Colorado photographer who needed stock photo pricing advice. An advertising agency had seen one of her wildlife images and wanted to use it in a campaign for a national brand.

They had apparently indicated to her that they would want a “total buyout” of the image, and so before their negotiation phone call, the photographer wanted to get an idea of what kind of price she should be looking at. In truth, she wasn’t so excited about the buyout idea, because as a biologist, she’d planned to use the image in a future book, and didn’t want to give away all rights.

I suggested that she ask a few questions, get specific ideas about how the client might use the image and get back to me when she had the answers. As I usually do, I also advised her not to take the buyout. Buyouts are a lazy and vague way to negotiate, and more often than not, the term usually accompanies insultingly low price offers.

Long story short, the ad agency began the conversation by offering her $300 for a total buyout of the image. This was all before she even said a word. The photographer kept her composure and politely asked the questions that would help her determine what a reasonable price would be from her standpoint.

As of this point, she has not heard back from the agency, which pretty much says that they were hoping to grab all rights to a really cool image for only $300 from someone who they assumed to be a total novice. And here she was thinking she’s start her negotiations at around $3,000.

Whether you’re a novice photographer, if someone want’s your image, it becomes a commodity that has value, and it should be priced as such. Unfortunately, since there are no established “rules” as to how much money we should get for our images, it’s up to us to negotiate our own prices.

As with any photography sale, here’s the basic information that you need to gain in order to establish a price:

  1. How and where the image will be used? Advertising, corporate, or editorial use.
  2. Size of use in the publication?
  3. Circulation
  4. Duration of use

Once you have this info, you can plug it into a photography pricing program and come up with a starting point. You don’t have to hold to that price, an often times you’ll come up or down depending on the situation, the client and the image.

Even if you’re not a full time professional photographer, if you intend to sell your photography, I highly recommend getting FotoQuote software. Not only does it have pricing tables for just about every type of use, it’s full of insight and tips about how to negotiate and price your imagery. It even has a magazine database and an entire section on assignment pricing.

Read my series on pricing photography at The Photoletariat.

Get FotoQuote here.


August 31, 2012
See this post
Pricing Your Photography

I just published a brand new Kindle eBook called Creative Photography Techniques – 20 Tips for Stronger Images.

In this guide, I present 20 simple tips that help you break out of a creative rut and throw some new excitement into your photography. They’re designed to get you thinking actively about your photography, because making powerful images should never be a passive activity.

These 20 tips are all short, concise and easy to remember, and yet they clearly outline a few necessary elements that are needed to produce a great image. They’re not meant to be hard set rules, they’re meant as ideas to help inspire and jump start your own creativity.

FYI, you don’t need a Kindle to read this eBook, in fact, you can read it on just about any device- iPads, iPhones, Android, Macs, PCs, you just the free Kindle app.

Many of the tips I present in this eBook can be found here on the blog, but here you get them all in one place. No need to go digging. It’s like your own personal creative guidebook that you can take with you and reference anytime you wish.

No matter if you’re shooting landscapes, people, action, sports, adventure, cityscapes, street scenes, your kid’s soccer game, or faraway landmarks in exotic locations around the world, these techniques will help you create more dramatic imagery and improve your outdoor and nature photography. Even if you already know all of these techniques, reviewing them again and seeing how they apply with different imagery might give you new insight on how to apply a specific technique to your own subject matter.

Creative Photography Techniques – 20 Tips for Stronger Images is available exclusively on the Amazon Kindle store. The best part- right now, it only costs 99 cents. I’ve priced it as low as the Kindle store will allow, because I want you to have these tips so that you can add them to your own compositional bag of tricks. Please note that this special introductory price won’t last indefinitely, so get your copy before it goes up.

If you’re a regular reader here on my blog, then you know how much effort I put into passing on my knowledge and insight in order to help you become a better photographer. I wrote this simple guide because I believe that knowing these techniques can help you get there.

So pick up a copy of Creative Photography Techniques today. You can read it on any device. Also, do me a favor: Please consider leaving a review on the Amazon product page, “Like” the page, and share the link with your other photographer friends on Facebook, Twitter and Pinterest. If you’ve got an Amazon Associates account, you can even point your readers to the page with your own affiliate link.

Support this site by helping me get these tips out to as many people as possible. Thanks, I really appreciate it. And as always, thanks for reading. -Dan

[iframe]<iframe src=”http:///e/cm?lt1=_blank&bc1=000000&IS2=1&bg1=FFFFFF&fc1=000000&lc1=0000FF&t=danhbaisadvph-20&o=1&p=8&l=as4&m=amazon&f=ifr&ref=ss_til&asins=B0092S4PL6″ style=”width:120px;height:240px;” scrolling=”no” marginwidth=”0″ marginheight=”0″ frameborder=”0″></iframe>[/iframe]

August 29, 2012
See this post
Brand New eBook- Creative Photography Techniques

Summertime in Alaska means the mass appearance of certain animal species that generally lay dormant in the wintertime. They can be extremely dangerous creatures, especially when you get too close, and thus in order to remain safe out in the wild, one should have a good understanding of their behaviors and migration habits.

Wildlife photographers are not necessarily elusive creatures. Although they often travel alone, they are known to travel in large packs, especially in regions where wildlife preserves, national parks and backcountry lodges are known to be close by.

They also are known to possess the very latest of gear, which usually indicates that they are either 1. Professionals who are actually shooting for real publication, or (more commonly) 2. Retired doctors or lawyers with large disposable incomes.

While other types of photographers are not as easy to spot on the run, wildlife photographers carry a typical set of markings that area easily identifiable, even from a distance. Most common is the extraordinarily large telephoto lens and the second set of three legs that are thinner, but longer than their primary pair.

Since they are not creatures that tend to move quickly through the wilds, they tend to pack considerable more weight than others of their species. They often have a pronounced, and usually black hump on their back and smooth brown lower legs that help them navigate wet environments.

Some wildlife photographers encumber themselves with more equipment than they’re normally able to carry without considerable effort. This can utilize valuable bodily resources and energy.

Camouflage colored lens coverings are another common indicator. However, after it should be noted that these markings appears not to be an extremely effective.

In the past, this probably helped them hide better from the animals that they were photographing, but since many of them have evolved to wearing brightly colored jackets, scientists are no longer sure what part the camouflage plays now. Quite possibly it could be some sort of plumage that the males wear to try and attract prospective camera toting females of the species and intimidate the lesser males.

Dangers of the wildlife photographer: The first thing to remember is NEVER to get between a wildlife photographer and the animals that they’re photographing. I can’t even begin to emphasize the importance of this advice.

Try not to stand to close to a wildlife photographer and be careful when interacting verbally with them. Not all wildlife photographers are evolved with highly advanced social and communicative skills. Take great care when asking them about their gear, you may get more information than you bargained for. (See previous sentence.)

Under no circumstances should you try talk with them while they’re photographing. Listen for the fast “click-click-clicking” sound that they make; this will let you know that it’s not a safe time to talk.

Don’t worry about trying to take a picture of the same thing that they’re photographing, in fact, this kind of pack mentality is considered normal with wildlife photographers. Just try and blend in with the crowd if you can and you’ll be ok. This may even afford you the opportunity for more careful study of this strange creature, and if you can carefully slip unnoticed into the group, quite possibly a free meal at the lodge where they’re habitating.

I don’t pretend to be a scientific expert on this matter, so if you have any other knowledge and/or observations about wildlife photographers, please comment below so that we may all benefit from your insight.

August 28, 2012
See this post
Behavior and Migration Habits of the Wildlife Photographer

I weep today. Not for the death of a friend or loved one, but for the passing of an era that marks both the inevitable march of progress and the fond memories of nostalgia.

If you check out the Nikon DSLR product page, you’ll notice that it looks different than it did yesterday. The venerable D700 is missing from the lineup. As of today, it’s gone. It has been discontinued. No more will ever be made.

We knew this day would come. And of course, with the introduction of the D800 and the rumors of a possible D600, we knew that it was likely to come sooner than later. As with any digital product, we knew that it was only a matter of time before this wonderful camera reached the end of its run.

And oh, what a run it had! The D700 was, and is still loved by pro photographers around the world. It was the perfect camera for outdoor, adventure and travel shooters, because for an all out pro DLSR body, it was smaller, lighter and as rugged as you needed it to be.

It wasn’t nearly as bulky as the D3, and yet it still had all the pro features a working photographer would ever need. Full frame. Smart exposure meter. Impressive firing rate of 8 fps at top speed. Fast buffer. Incredible high ISO performance in low light. On board flash that would provide full control for an array of off camera Speedlights and strobes. So many custom functions. All packed into a more affordable chassis that would take punishment and keep on working. Believe me.

The D700 has not only been my number one DLSR body for over three years, it is in my mind, the best camera that I have ever used. Period. Ergonomic design on the D700 was perfect. It fits in my hand like no other body, and as the main tool in my profession, it did everything I ever asked of it. Always. It got the job done every single time. It will still do the job for me until I stop using it. As of right now, I have no plans to stop.

In some ways, I always thought that since the D700 was such a perfect camera, Nikon inadvertently painted themselves into a corner with it. It did so well because it wasn’t the D3, and even now, with the D800’s top speed of only 4 fps, guys like me still find it useful for sports and adventure. It was the totally ideal camera for so many people, how could any other model compete with it?

Currently, there is nothing else in the lineup to replace the perfection and masterpiece of the D700. The rumored D600 is said to be a cross between the D7000 and the D800, but we’ll only know that for sure when Nikon announces their next camera. Edit: The D600 is now out- read more info here.

I have to believe that whatever does come next will be a suitable successor. Maybe it will be even better. Surely Nikon knows how much we all loved the D700, and since they have admitted that the D800 was not its replacement per se, we can only hope that they’ve got something special up their sleeve.

With the big Photokina trade show coming up next month, we’re likely to have our questions answered very soon. Hopefully we won’t be disappointed, although part of me can’t stop thinking that in some ways, I will be. I’m afraid that the D600 won’t be as rugged as the D700. Where then will I turn? D4? Too expensive. Too heavy. D800? Again, only 4 fps. Nikon needs to bring out the true little brother to the D4, just as the D700 was the D3’s little brother. If only the D800 was 6 fps, this would all be solved…

What we need is a true D700 v.2, not a consumer oriented full frame D7000 type. Unfortunately, I fear that for marketing reasons, Nikon will only give us the option of moving up or moving down. This will obvioulsy leave a big hole, but it will likely prevent Nikon from painting themselves into another corner. The truth is that a rugged, pro quality 16-24MP D700 replacement would no doubt siphon off more than a few potential D4 and D800 sales, mine included. Since neither of those cameras are even available on a mass scale yet, I can see Nikon not wanting to risk that right now.

At this point, though, we don’t know what Nikon will do, and until we hear differently, we can only cradle our D700s with love and cherish how much they’ve meant to us over the years. Many of us will keep using them until either they truly die in our hands, or until Nikon follows up with it’s true replacement, if they even do so.

To Nikon, I express my complete and total gratitude for giving us such a fine camera as the D700. I’m sad to see it go, and although I’m not quite ready to upgrade yet, truth be told, I can’t wait to see what’s coming next.

To all the other D700 users out there, know that you’re not alone as you too weep for the end of what has been a marvelous era. Perhaps in the next few days, I’ll share a few D700 battle stories. Feel free to share yours below.

August 24, 2012
See this post
Fond Farewell to the Nikon D700

When I think back to all the books that I feel helped me progress through the beginning stages of my photography, one title always comes to mind: Understanding Exposure by Bryan Peterson.

There’s a reason that this is one of the most popular and best selling photography books ever written. In a style that’s very easy to understand, Bryan clearly explains the basic technical concepts that ever photographer needs to know. I’ll say it again: “Needs to know.”

Starting with the basics of “Exposure” and what it means in the context of photography, he explains the basics of how a camera works. He goes through things like f/stops, shutter speeds, light meters and ISO with incredibly clarity. Even if numbers and technical concepts aren’t your strong suit, Bryan’s writing is so straightforward, you’ll come away knowing this stuff. I promise.

The next two sections cover the relationship between aperture and shutter speed and how to use them in both technical and creative ways. He covers all the essentials: depth of field, how to soften the background and create bokeh style effects, freezing motion and the creative variations of sharpness vs. soft blur.

He also touches on macro photography, panning, implying motion, and how to use the correct aperture to make sure that the “story” of your image comes across.

Then he talks about light and the role it plays in photography. He compares the visual and compositional effects of sidelight, backlight, front light and soft overcast light, and again, touches on how to ensure the proper exposure for any kind of light.

Finally, he touches on filters, flash photography and special techniques, such as multiple exposures and HDR. Even though the original version of Understanding Exposure came out in 1990, which is right when I bought my camera, the 2010 3rd edition has been updated to reflect the modern advancements of digital photography.

Part of what makes Understanding Exposure so good, especially for beginning photographers, is the fact that Bryan’s style of outdoor, travel and people photography is so wonderfully graphic and simple. New photographers often have a hard time narrowing down their subject matter and creating bold images that avoid compositional clutter. Immersing yourself in a style like Bryan’s early on will train your visual eye to see and compose more simple imagery that has a much stronger impact.

Looking through his book 20 years later, I can see that his style definitely gave me a head start and helped fine tune my own compositional eye. Having taught photography workshops for nearly 15 years, I firmly believe that a book like this will do the same for you.

I’ve seen some reviews and criticisms that this book is too basic, but the truth is that if you’re just starting out that’s exactly what you need. I think that such statements are made by people who have forgotten what it’s like to be standing at the dawn of your own photography and being overwhelmed by all the creative and technical aspects that you realize will take years to master. It’s exciting to start exploring the wonders of photography for the very first time, but let’s face it, some of the stuff we have to deal with can be a little hard to understand at first.

There are indeed many great instructional photo books out there, but for it’s straightforward writing style and clear, effective illustrations, I think that Understanding Exposure is the number one best photography book for beginners. Everyone should read it.

Let me know if you’ve read it and if it helped you. Or, tell me if there’s another book that you’d recommend to beginning shooters.

[iframe]<iframe src=”http:///e/cm?lt1=_blank&bc1=000000&IS2=1&bg1=FFFFFF&fc1=000000&lc1=0000FF&t=danhbaisadvph-20&o=1&p=8&l=as4&m=amazon&f=ifr&ref=ss_til&asins=0817439390″ style=”width:120px;height:240px;” scrolling=”no” marginwidth=”0″ marginheight=”0″ frameborder=”0″></iframe>[/iframe]

August 23, 2012
See this post
The Best Beginning Photography Book

No matter if you’re shooting landscapes, people, airplanes, cityscapes, or faraway temples in exotic locations around the world, here are a few solid tips that will help you create more dramatic imagery and improve your outdoor photography. Even if you already know this stuff, review it anyway, because it’s always good to be reminded. And as always, be sure and like, share, plus, pin, tweet and stumble these tips to your own friends and followers.

1. Shoot At Magic Hour

It’s called magic hour for a reason. Shooting at sunrise and sunset is the number one way to improve your imagery. The long, warm rays and rich shadows of morning and evening light will make any subject look more dynamic and pleasing to the eye. Of course, this often means getting well before the crack of dawn, hiking in the dark, or being very late for dinner, but such inconveniences are quickly forgotten about when you get a killer shot.

2. Pay Close Attention To Your Composition

The viewfinder is your canvas. Everything, and I mean EVERYTHING that goes into it should be there for a reason. Each and every element that sits within your frame should help anchor the image down, or else somehow relate with the other subjects in the frame. Also, pay close attention to the subject matter in your scene that DOESN’T need to be in the frame. Exclude any subject matter that detracts from the overall impact of the image. When in doubt, edit on the spot and go for simplicity.

3. Tell A Story

A photograph is very much like a song. You have a very short time to introduce your subject matter with an interesting twist, tell a story that connects with your audience, color it with some appealing and unique flavor, and then wrap it all up and leave them with a fond memory. And, hopefully instill a desire to look at your photo again or share it with a friend. Think relationships, details, human interactions, expressions, action… the list goes ever on.

4. Use a Tripod

Everyone knows that a tripod holds your camera steady and allows you to shoot at lower shutter speeds and smaller apertures without incurring camera shake. However, the simple act of setting up and using a tripod forces you to slow down and contemplate your subject matter more thoroughly and methodically. It forces you to more carefully consider how to compose and capture your subject in the best way. Get a tripod. Use it. Even if it’s a small one. Remember, the best tripod is the one that’s with you.

5. Don’t Be Afraid to Shoot In Bad Weather

Just because the sun goes away, doesn’t mean that you should put your camera away. Dramatic weather makes for dramatic imagery. In fact, some of my favorite adventure photos were made while shooting in storms, fog, snow and otherwise “bad” weather. Remember, though, weather isn’t “bad,” it’s just misbehaving.

6. Don’t Worry About Your Gear

I’ll say it again… It’s not about the gear. It’s about the image. It’s about the story you tell with your gear. It’s about the overall feel of the shot and the visual power that you communicate through your creative techniques and your personal vision. In the end, it really doesn’t matter if a great photo is created with your DSLR, your compact camera or your iPhone.

For more creative tips, check out my eBook, Making The Image- A Conceptual Guide to Creating Stronger Photographs.


August 22, 2012
See this post
6 Tips for More Dramatic Photos in The Outdoors

During the past couple of years, I’ve reviewed and featured a number of great tripods here on the site. But what about the other part? You know, the one that goes on top and actually holds your camera?

There are a number of really high quality tripod heads on the market, but which one should you buy if you’re on a budget? Unless you’re using really heavy pro gear, you don’t need to spend a lot of money to get a decent tripod head. Here are three great ball heads that are durable enough for general outdoor photography, that will hold a modest sized camera and lens steady, and that all cost under $100, or right around there.

Why a ball head and not the kind that have the arm, the pistol grip or the handles? Because ball heads are simple, compact and quick to adjust, which is what you want when the light’s changing quickly in the outdoors.

1. Manfrotto 496RC2 Ball Head


I’ve used the Manfrotto 496RC2 ball head quite a bit, and in fact still have an older model fixed to my venerable Bogen 3001. It’s a solid, simple design with two controls: A locking lever that operates the ball head and a friction knob for helping you make fine tune adjustments.

It also comes with a rubberized quick release plate, which makes for much faster mounting on the tripod when you need to get your camera in to position quickly. No bubble level, though.

This is an extremely popular model, and in fact, while obsessively checking out other people’s gear during my trip to Denali last week, I saw quite a few of these being carried by photographers. The 496RC2 is rated to 13 lbs, so it should even hold a pretty good sized camera/lens combo. If you think you need to go with a slighlty heavier duty model, you might want to check out the Manfrotto 498RC2, which is rated to 17 lbs.

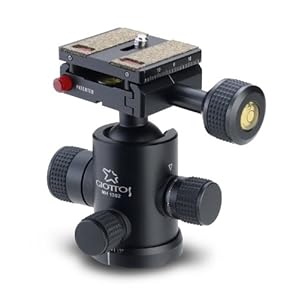
2. Giottos MH-1302 Ball Head

Ok, this one is just over $100, but barely. The Giottos MN-1302 is my current favorite and the one that I use most of the time. It’s an excellent quality, all metal ball head with a number of features that make it a superb choice for landscape and outdoor use.

It’s got a triple knob design for precise adjustments, a degree scale on the base, a bubble level and an Arca-style quick release plate.

Giottos heads are manufactured to high quality standards an they have a very professional feel in your hands. The 1302-MH is rated to 13 lbs; I regularly use it with my D700 and 80-200mm f/2.8 lens.

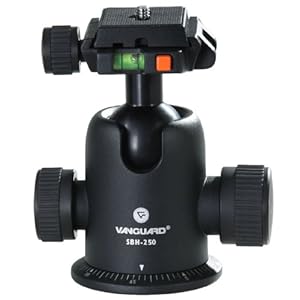
3. Vanguard SBH-250 Magnesium Ball Head

Another great ball head that gets high reviews by the photographers who use it, the Vanguard SBH-250 is crafted with all metal, magnesium design, and it features a dual knob adjustment, a 360 degree scale, quick release plate and bubble level.

Despite its all metal construction, the SBH-250 is relatively lightweight for how rock solid it is when supporting light to medium weight camera gear.

If there’s a downside, it’s that the quick release plate is not quick as quick to manipulate than those found on the other two models mentioned above.

Overall, I’d say you can’t go wrong with any of these heads for landscape work and general outdoor photography. For the price, they’re the best three ball heads that I’ve seen. My pick, though, is the Giottos MN-1302. I really can’t say a bad thing about it.

[iframe]<iframe width=”468″ scrolling=”no” height=”240″ frameborder=”0″ style=”border:none;” border=”0″ src=”http://mer54715.datafeedfile.com/widget/aff_widget_prdt_generate-2.0.php?aff_num=6746&aff_net=1&widget_num=1451″ marginheight=”0″ marginwidth=”0″><p>Your browser does not support iFrame.</p></iframe>

<iframe style=”width:120px;height:240px;” marginwidth=”0″ marginheight=”0″ scrolling=”no” frameborder=”0″ src=”//ws-na.amazon-adsystem.com/widgets/q?ServiceVersion=20070822&OneJS=1&Operation=GetAdHtml&MarketPlace=US&source=ss&ref=ss_til&ad_type=product_link&tracking_id=danhbaisadvph-20&marketplace=amazon&region=US&placement=B002N5NRSC&asins=B002N5NRSC&linkId=DXUMZBDK4H7OUCOI&show_border=true&link_opens_in_new_window=true”>
</iframe><iframe style=”width:120px;height:240px;” marginwidth=”0″ marginheight=”0″ scrolling=”no” frameborder=”0″ src=”//ws-na.amazon-adsystem.com/widgets/q?ServiceVersion=20070822&OneJS=1&Operation=GetAdHtml&MarketPlace=US&source=ss&ref=ss_til&ad_type=product_link&tracking_id=danhbaisadvph-20&marketplace=amazon&region=US&placement=B000OODPTK&asins=B000OODPTK&linkId=VCNKDOIF26HLXQRZ&show_border=true&link_opens_in_new_window=true”>
</iframe><iframe style=”width:120px;height:240px;” marginwidth=”0″ marginheight=”0″ scrolling=”no” frameborder=”0″ src=”//ws-na.amazon-adsystem.com/widgets/q?ServiceVersion=20070822&OneJS=1&Operation=GetAdHtml&MarketPlace=US&source=ss&ref=ss_til&ad_type=product_link&tracking_id=danhbaisadvph-20&marketplace=amazon&region=US&placement=B003BQ71MA&asins=B003BQ71MA&linkId=73HSTDYPLWNTABNI&show_border=true&link_opens_in_new_window=true”>
</iframe>[/iframe]

August 21, 2012
See this post
3 Great Budget Tripod Heads for Outdoor Photography