I don’t care what anyone else says, photography is supposed to be fun. No matter what you’re doing, if you’re having fun, chances are you’ll get better results than if you weren’t having fun. And even if you don’t get “better” results, at least you enjoyed the process, right? You weren’t miserable or stressed out, or worried that you’re not being “creative enough.”

One of the funnest things I like to do with photography is shoot in Miniature Mode. Miniature is one of the ADV mode creative effects on the X Series cameras, and it’s a feature found on every singe Fuji. It isn’t exclusive to Fujifilm cameras, though. I know that both Nikon and Canon have Miniature-style effects, but you can only apply them to images you’ve already shot. (You can also create a miniature effect in Lightroom and Photoshop.)

With the Fuji cameras, you can actually shoot with the Miniature effect, which means you can see exactly what the picture will look like before you take it. This gives you a whole new dimension of creative possibilities when you’re composition your imagery. Each of the X Series cameras has a slightly different way to access and change the ADV Creative Effects, so check the manual. (There are online manuals for all the Fuji cameras here).

I shot these glacier aerials last week using Miniature Mode with my Fuji X-T2 and the XF50mm f/2 lens. The terminal wall of Colony Glacier is massive, and these ice columns are over 100 feet high. The tilt-shift effect, as it’s sometimes called, makes them seem tiny. Those fallen ice blocks, which weigh a few tons each, appear as mere pebbles that have been effortlessly scattered by hand and fingers.

The Miniature effect essentially blurs two thirds of the frame. On the Fuji cameras, you have one third that’s sharp, based on the location of your selected focus zone, and the other two are artificially blurred by the camera.

It works because it fools our eye into thinking we’re seeing the subject with an extremely shallow depth of field. This visual trickery depends on the fact that we usually see the distant world with a high degree of sharpness from front to back.

However, when we’re looking at (and photographing) things up close, we’re used to seeing subjects with a very shallow depth of field. Since we never see distant subjects with a shallow depth of field in real life, this blur effect totally messes with our normal visual perceptions. Our confused brains register the image as if we’re actually looking at a miniature scene.

Also, we’re not used to seeing things that are the same distance from the film plane with different amounts of focus. A tilt-shift lens allows you to shift focus in such a way that two things at the same distance from the camera can have different levels of sharpness and blur.

It can also create an effect whereby two points that are at different distances have the same amount of focus. Miniature mode won’t do that. You can only do that with a tilt shift lens, a view camera.

The CAMBO ACTUS MINI is a view camera mount that works with DSLRs and mirrorless cameras. 

I love using the Miniature effect with my Fuji cameras, but I don’t always used it just to make things look tiny. I love the dreamlike quality the Miniature effect produces, and I often use this mode to create ethereal, intimate images that evoke a mood of wonder.

I also love shooting portraits with Miniature mode, because it allows me to accentuate the shallow depth of field, bokeh effect to the max. These portraits were all shot with the X-T2 and the XF50mm f/2 lens. Depth of field is already quite shallow here, and the special effect makes it even more dramatic.

Even though the people’s eyes and mount are on a very similar plane in relation to the camera, the effect makes it so that only a select portion of the image appears in focus. I use the term “appears” because even though the lens might have rendered more of the subject in focus, the camera does some fancy pixel wrangling and overrides the actual focus with the selective blur effect.

So, if you’re jonesing for some added fun and creativity with your camera, give the Miniature effect a try. Doesn’t matter what you’re shooting, anything can look cool in Miniature, even if it doesn’t actually come across as a miniature. 

Have no fear, even RAW shooters can join in the fun! With the latest firmware for the X-T2 and X-Pro2, you can now capture RAW+JPEG in the ADV modes. You’ll get miniature JPEG and a straight RAW with no effect.

And remember, it’s all about having fun. If you’ve learned nothing else from this post, I’ve at least reminded you that photography and fun both sound like they start with the same letter.

April 23, 2017
See this post
Shooting In Miniature Mode For Added Creativity and Fun

The term ISO Invariance has started to show up more often on the camera blogs and forums lately. It’s one of those hardcore technical buzz word terms that only a very small percentage of shooters fully understand. Or, have even heard about. Or should care about, as you’ll see below.

For the vast majority of photographers who are not super tech nerds, this term causes almost everyone to raise their eyebrows and go “huh?” Go ahead. Ask someone if their camera is ISO Invariant and see how they respond.

I’m pretty much convinced that the term ISO Invariance was made up with the sole purpose of confusing everyone who doesn’t like to photograph camera calibration charts in their spare time, spend at least 78.625% of their waking hours lurking on camera forums or doesn’t live in his mother’s basement.

You know who I’m talking about. The people who know what this term means are certainly nice folks. They’re just a little… no, not a little, they’re just WAY more obsessed with things like sensor size, camera specs and what the letters ISO actually stand for than the other 99.9999972% of people on this planet who has ever shot a photo in their life

What’s that you say? You don’t know what ISO stands for? Really?*

Exactly my point. Another post for another time, my friend.

*If you do, you should probably get outside more often.

So what the heck is ISO Invariance anyway?

I’ll try to explain this in the simplest of terms. If you have a weak stomach, read on at your own risk as we go down the rabbit hole, and don’t say I didn’t warn you.

ISO Invariance is a term first coined by the editors at DPReview.com to explain the fact that today’s digital camera sensors introduce minimal amounts of noise when shooting at higher ISO settings. Some even less than others.

As you know, anytime you shoot photos at high ISO, there will be a certain amount of digital noise in the image, especially in the shadowed areas. That’s because when you crank up the ISO dial, you’re not actually making the sensor “more sensitive,” you’re just turning up the volume.

Just like when you crank up a guitar amp or a radio, you overdrive the signal, which heats up the electrical components. This heat causes distortion, which on a Marshall amp, sounds pretty awesome. On a car stereo, not so much. On a camera, well, it depends. In the past it was pretty bad, but it’s gotten WAY better.

Yes, there are a few other technical factors behind noise that are incomprehensible to anyone who doesn’t have a Ph.D. in Theoretical Physics, like my Swiss friend Beat, who actually does have a Ph.D. in Theoretical Physics from the Max-Planck Institute, where they study things like quarks and black holes, but I promise, you don’t want or need to know what they are. I don’t even know what they are, I just read somewhere that there are some. Probably on DPReview.

All you need to know is that the ISO dial is essentially the gain knob on your camera’s distortion pedal.

(In case you were wondering, the bracketing control is your camera’s analog delay pedal, miniature mode is the chorus pedal and black and white mode is your vintage reverb – almost anything run through this effect sounds awesome.)

Ok. And this is important…why?

If you’re using a camera that’s considered to be “ISO Invariant,” AND you’re shooting RAW, in most conditions, you’ll get the same amount of noise in the shadows, no matter if you shoot at high ISO, or at at low ISO and increase your exposure in post processing.

The benefit with shooting with an ISO Invariant camera is that, theoretically, you could shoot in the dark at ISO 200 and then just slam the sliders in Lightroom, and it won’t look any worse than if you shot it at ISO 6400. According to the “experts,” it means that your ISO dial is now completely irrelevant.

Of course, if you shoot in the dark at ISO 200, you won’t be able to see any detail in your original image when you play it back on your LCD screen or computer monitor. In fact, you won’t be able to see any of your low light images until you download and drag the slider up on every single one of them.

Yea. This sounds like a really fun way to shoot photos, doesn’t it? Imagine your exciting new workflow.

Oh and by the way…and this only applies if you’re shooting uncompressed RAW and using up all your card space. It doesn’t work if you’re shooting compressed RAW. And don’t you dare ask anyone if this apples to JPEG… you’ll get laughed at. Not by me, of course, by the unhappy male people on the forums.

What if your camera is not considered to be ISO Invariant?

Well that’s just too bad. You’re totally SOL. You’ll probably just have to go back to shooting high ISO settings in the dark, because your sensor might produce slightly more noise in the shadows above ISO 1600 or something.

Oh but wait…

How do you know if your camera is ISO Invariant?

Hmmm… that’s where it gets tricky. You won’t find this info in the manual. This isn’t something the camera companies even talk about, only male photographers who own camera calibration charts.

In fact, there’s a pretty good chance that most or all camera company product managers don’t even know (or care) which, if any of the cameras in their lineup are ISO Invariant. I know this, because I know someone who asked one.

For the record, I’m fairly confident that my camera is ISO Variant, but honestly, I’m not entirely sure. The only way to know is to go visit DPReview.com and spend a lot of time on their site.

Hmmmm… this all sounds like a way to get more people to go read DPReview. It’s starting to sound like one big conspiracy. Remember when I mentioned the guys who still live in their moms’ basements? Yea.

OK. Now that you’ve gotten this far, it’s time for the burning question…

Should you care about any of this?

God no.

While the math and science on ISO Invariance is theoretically true, it has ABSOLUTELY nothing whatsoever to do with making great photographs.

I guarantee that in any actual shooting situation you could possibly think of, no matter who you are, where you shoot or what camera you use, this stuff won’t make even the slightest, tiniest bit of difference in the visual and emotional impact of your images.

Photography is about creativity, light, moment, convergence, connections and pure enjoyment of the activity. If you shoot a wonderful scene in great light and come away with a beautiful, stunning photo that you really like, rest assured, the incremental increase in noise or grain won’t affect how well it will be received by you, or anyone else.

And if it just so happens that you somehow discover, or are led to believe that your camera is, sadly, not ISO Invariant, and you end up with a tiny bit more grain in your awesome, killer photo of that super cool thing, because you shot at higher ISO instead of pushing it in post, I promise you this:

NONE of your clients, customers, friends and family, any person who is a woman, and anyone on earth who isn’t a basement-dwelling forum troll, who you will NEVER meet anyway, will EVER say anything about it.

However, they might tell you how much they like your photo.

So, go out into the world and take pictures of things and people you love.

Look for sweet light, magical moments and fleeting expressions. If it’s dark, crank up the dial and forget about it. Shoot whatever shutter, aperture and ISO combinations best fit the scene and your vision for how you want your picture to look and don’t worry about what the forum guys would think.

And if you get some, or a lot of noise, don’t fret it. A little grain never hurt anyone. Remember film? I’ll bet that photo of your favorite grandmother on the mantle is a little grainy. Does that make it any less meaningful to you? If it does, then it must suck to be you.

The whole ISO Invariance thing is just an absurdly technical way of pointing out that modern digital camera sensors are awesome and capable of recording an astounding amount of dynamic range. That much is indeed true.

Except the only people who use that term, instead of just saying stuff like “my camera is awesome!”, “I can’t believe how much detail I can bring out in the shadows,” or “Wow!” are people who are really confused, people who are trying to sound really smart, or people who are just tying to get more traffic to their blog.

Like me. See what I did here? Only I’m not trying to confuse you, I’m trying to help you be a better photographer. Hopefully lots of people will find this article in Google and come read it. I hope this becomes the most popular ISO Invariance post of all time.

So, now that you know what ISO Invariance is, you should purge the term from your mind and never mention it again.

Forget you ever heard it.

(I promise, I won’t use it again in any more posts.)

Then, you should get on with your life as if nothing happened and go take some awesome pictures somewhere. Preferably outside.

If you’re still dying to know more about this stuff and you think you can handle an extreme amount of ridiculous technical jargon, there are plenty of articles about this stuff around the web.

I won’t tell you how to find them, though; I don’t want to be held responsible for anyone’s brain freezing up. Besides, I’d rather you spend your valuable work time reading my blog instead.

Have a nice day and enjoy life.

April 12, 2017
See this post
What the Heck is ISO Invariance and Should You Even Care?

This past week, we ran the inaugural Fujifilm X-Photographers Nature and Travel Summit in the Great Smokies.

Led by Bill Fortney, Jack Graham, Karen Hutton and me, we had a wonderful and enthusiastic group of participants, a diverse mix of weather conditions and some great photography opportunities.

The workshop format featured both in-class workshop presentations, image critiques and daily outdoor shooting sessions in Great Smoky Mountains National Park. (We did three sunrise outings and one afternoon sessions.)

Each of us gave two insightful talks that focused on how we use the X Series cameras and lenses in our photography. We shared some of the specific techniques, compositional ideas and creative methods we use to make our imagery, and how we apply some of the specific features these cameras offer within our styles.

In addition, there were two Fujifilm tech reps on hand to help answer specific gear questions, update firmware for people and explain what every single button, dial and menu does on these cameras.

The reps also had every single X Series body and lens available for demo, and they even had a GFX system for people to try out.

On Thursday, we held a panel discussion that included Yuji Igarashi and Lisa Yang, who joined us from New York. Lisa is the X Series and GFX Product Manager and Yuji is the General Manager of Electronic Imaging for Fujifilm North America.

They made a special trip down to answer questions about the product line, talk with users and get feedback from people about what they like about the system, what could be improved and what features they would like to see added in future firmware updates.

After the panel discussion, they Yuji and Lisa hung around for a full day and made time for anyone who wanted to ask questions or share their thoughts about the system.

This was a real treat, indeed. How often do camera users get to talk directly to the specific brand managers about their gear? Fujifilm is so open to hearing customer feedback and they definitely pass it along to the designers and engineers in Japan.

Although the summit began in the midst of a torrential rain storm, the weather eventually cleared up and we had a handful of fun and engaging field sessions in the park. The relatively small instructor-to-student ratio allowed each person to get some personal one-on-one time with each of us during the four days.

It was an honor for me to be one of the four X-Photographers at the summit. I really enjoyed teaching with Jack, Bill and Karen, and sharing my knowledge and expertise with the participants. Ands, of course, I made a number of new friends during the week.

This is always a highlight for me. I love getting to know other photographers during workshops, especially when they happen to be people who already follow my blog.

To all of you who were down there, it was a real pleasure getting to know you. Thanks so much for making my experience so meaningful, as short as it was. I hope to cross paths with you again.

I’ll be one of the instructors at the fall summit as well, which will be held in Portland, OR, September 6-10. I’m looking forward to that event; I hope you can join us!

It was an honor to work with the amazing and illustrious Bill Fortney.

April 10, 2017
See this post
Recap of the Inaugural Fujifilm X-Photographers Travel & Nature Summit

Today Fujifilm released firmware update version 2.00 for the X-T2 and X-Pro2 cameras. The new upgrade adds 24 new features and performance upgrades to the X-T2 and 17 to the X-Pro2, including the AF-C Custom Settings Menu.

Fuifilm is known for putting out awesome firmware updates that dramatically increase the capabilities of their cameras. In fact, that’s one of the huge benefits of mirrorless cameras in general. Since many of the functions inside the camera are software based, they can be upgraded with new code and algorithms.

In many cases, these advancements make you feel like you’re suddenly using a brand new camera, only you didn’t actually have to go buy another one. Fuji’s mentality is to create cameras that have a relatively long shelf life and they’ve shown dedication to supporting older cameras in the line with continued firmware updates.

In 2016, Fuji released updates to just every camera in their lineup, including a significant autofocus upgrade to the X-E2, and with today’s firmware announcement, they’ve even updated the X-T1 as well.

You can see the entire list of features that have been added to the X-T2 (and X-Pro2) with the v.2.00 update, but I wanted to highlight my favorite performance tweaks and new features that I feel add even more power to an already awesome camera. If you shoot the X-T2 or X-Pro2, you should definitely upgrade ASAP.

1. Shooting RAW in Bracketing and Advanced Filter Modes

I love using some of the ADV modes on the Fuji cameras, like Miniature and Toy Camera. However, up until now, the camera would only record a JPEG of the scene if you were set to ADV or when bracketing film simulations, WB or AE settings.

What if you also wanted to have a RAW image of the scene for more options, or if you also want to recordr a “normal” view of your subject? Now you can. Both the X-T2 and X-Pro2 will now allow you to shoot in RAW+JPEG mode when using these camera settings.

2. Programmable Long Exposure of up to 15 Minutes

When shooting in “T Mode”, the camera previously allowed shutter speeds of up to 30 seconds. With the new update, both the X-T2 and X-Pro2 will now let you shoot even longer shutter speeds, all the way to 15 minutes.

This feature could really come in handy if you like to use super dark neutral density filters or if you like to do extremely long exposure photography. I have a 10 stop ND filter that can easily get me exposure times into the “minutes,” so this could be really fun when shooting things like streams and clouds.

3. Full Range ISO Adjustments with the Command Dial

The X-T2 has an awesome ISO dial that’s so easy to change. (Not everyone loves the ISO dial on the X-Pro2.) Either way, both cameras now have a new option in in the BUTTON/DIAL SETTINGS Menu on that top of Page 2.

If you set the ISO dial to A and switch to COMMAND in the menu, you now have full ISO control with the front command dial. In addition, you can press the dial to toggle between changing Shutter Speed and ISO. This give you incredibly fast and precise fingertip control, which might be a good option when your eye is glued to the EVF. With the Fujis, they name of the game is options.

4. Addition of a Smaller Focus Point Size in Single AF

Both cameras now let you bring your AF box down to a single point when shooting in Single AF mode. This allows for critical pinpoint focusing. This will be great for shooting macro and other critical scenes where exact focusing is required.

5. Addition of Portrait / Landscape AF Mode Switching

This one is totally awesome – probably my favorite new feature, although it’s only been added to the X-T2. What if you’re shooting a fast breaking scene, or even a portrait, and you’re switching back and forth between vertical and horizontal. (I do this a lot!)

Since your subject usually changes their relative position inside the frame when you switch orientations, you often have to move your focus zone to reacquire. This can take time, and even messing with the thumb joystick for a split second can cause you to miss a critical moment.

Well, someone at Fuji is brilliant, because they apparently read my mind and solved this problem. Now, with the new STORE AF MODE BY ORIENTATION option in the AF/MF menu, you can now set a different focus zone, and even a different focus mode for each, and it will change when you rotate the camera back and forth.

When you’re composition your scene, set the focus parameters for each orientation to where you think pro plan to have the subject appear inside the frame. You can even do it on the fly and watch your success/focus percentage go way up. This is so awesome. I’ve already turned this setting on and I know I’ll use it all the time.

6. Change the Focus Frame Position While Enlarging it

Normally, you move your focus point/zone with the thumb joystick and then adjust the size with the front command dial. Or vice versa. Now you can adjust them both at the same time. Thumb and index finger working together to achieve critical autofocus precision.

You may not use this all the time… then again, once you get used to the motion, maybe you will.

7. Display a live histogram during video recording

The new firmware updated added quite a few new video features, and this is one of them. It’s for the X-T2 only.

8. Name Custom Settings

Another one of my favorites. I know a lot of X Series photographers like to tweak the Highlight and Shadow tone, Color, White Balance, Grain Effect, Sharpness and Noise Reduction to suit different subject matter and shooting styles. Combining these settings with different film simulations can give you some very unique and personal looks to your imagery.

You can now name your custom settings and make them even more personal, or at least more identifiable than Custom 1, Custom2, Custom3, Custom 4, etc… Maybe you’ll call them things like GRIT, AIR, DENSE, COOL, CLASSY, VIBRANT, YUMMY, GORILLA, SO LONG, TAKE OUT THE TRASH, SHOW ME THE MONEY, BILL’S GRAIN or WICKED COOL PRESET. Actually, I would hope you’d come up with way better ones than these. You have 25 character spaces to work with, so have fun. 🙂

9. Voice Memo Function

You can now record a 30-second voice memo to any single image. In the PLAYBACK Menu, turn VOICE MEMO RECORDING On, and then press and hold the front command dial when you’re reviewing an image.

This could be useful in any number of situations. Both the X-T2 and X-Pro2 got this feature.

10. Faster Face Detection and Improved In-Focus Indication in AF-C Mode

Ok, so this is really two things, but it’s kind of the same category. Both the X-T2 and X-Pro2 got faster, updated autofocus algorithms and performance upgrades that will make the camera that much better and accurate when tracking moving subjects.

In addition, Face Detection AF now enables the use of Phase Detection sensors for overall faster performance when using this focusing mode.

March 30, 2017
See this post
My 10 Favorite Features in the New X-T2 Firmware Update

After your camera and lens, a good tripod is perhaps the most important piece of photography gear you can own. It’s an critically essential tool for landscape and travel photographers.

A good, sturdy tripod will ensure sharper images and it will allow you to shoot at slower shutter speeds. This is critically important when shooting long exposure subjects, like rushing streams, star trails, the Milky Way, and of course, northern lights.

You probably already know this, but do you know the other huge reason why tripods can make such a big different in your photography?

The “other” reason why tripods are so important

When you place your camera on a tripod, you’re essentially going “hands free.” You suddenly have the freedom to devote all of your energy towards refining your composition and making sure your picture will look exactly like you want it to.

Instead of trying to hold the camera steady, you can take a few (or many) moments to stand back, gauge your scene, study your subject elements, pick and choose, think about your exposure settings and make sure you’ve got everting right before your press the shutter.

In effect, using a tripod allows you to make the most of your most valuable and powerful compositional tool- your brain. Using a tripod gives you the freedom to step away and think about what you’re doing. This will make a bigger difference than any other aspect in your creative process.

And depending on your creative and “thinking’ style, and considering how much time you have, you might want to set it up and walk around for awhile while you engage the creative machinery inside your head.

You might even set it up and leave it for a few minutes while you wait for the “moment” to happen, or stand around and confer with your fellow photographers if you’re shoot with someone else. You might even leave it set up for a few hours while you wait for night, snow, rain, animals, etc…

And what about time lapse photography? Have you ever photographed the same subject under a different light, weather conditions or even different seasons? Using a tripod and marking your spot can lead to some very interesting picture “sets.”

Choosing the right tripod

If you get the “right” tripod, you’ll know. The “right tripod” will become your best friend. It will accompany you on countless adventure, trips and photography outing. It will get beat up, scratched, maybe even dented, and you’ll love it forever. It will be the thing that helped you create some of your favorite imagery. So yea, the pressure is on to get the “right” one!

But what is the “right” tripod? How do you choose the right tripod for outdoor, travel and landscape photography?

When it comes to tripods, you have three main things to consider. Essentially, you’re playing the tradeoff game between these aspects:

  • Stability
  • Size/Weight
  • Price


Stability

This is the important one. If your tripod won’t hold your camera still, then you won’t get sharp pictures. That’s it. That’s the whole point of a tripod, right?

It’s all relative, though. If you use lightweight camera gear, like a compact mirrorless body and small lenses, you obviously don’t need the same level of stability required for pro DSLR bodies and big glass; you could probably get by with a lighter set of legs. Likewise, if you often shoot in windy conditions, you’ll probably want a sturdier model.

Size/Weight

If you drive to your photo locations and hike a half mile to your vantage point, then size and weight may not be an issue. You could get the biggest, most burly one you can find and be happy.

However, if you backpack or travel with your tripod, then you’ll most certainly want one that’s lightweight, compact and folds down to a relatively short size.

Price

If money is no option, if landscape or travel photography is your lifeblood or your livelong passion, then you can likely afford to splurge on the very best model. However, if you only use it occasionally, or if you’re on a budget, then price could be an issue.

As with everything else in life, price dictates everything with tripods. You can usually get sturdy and lightweight, but it will cost more. If you sacrifice some stability or weigh, you can bring the price down.

However, this might not always be a bad thing. Again, if you use lightweight gear, or if you like to travel, maybe you can get by with less by realizing your limitations and working within these boundaries. Less is better than nothing if it means having or not having a tripod with you on your awesome photo trip.

My Recommended Tripods

As a workshop instructor, I’ve seen and used a number of different tripods, and I’ve gotten to know which ones are good, which ones aren’t so good and which ones offer a great compromise in stability, size/weight and price.

With all this in mind, here area few of my favorite tripods I recommend from each category.

The “No Compromises” Category

You’re looking for maximum stability and decreased weight, and you’re willing to pay for it. In other words, you want the best tripod you can get, because you’re going to lug it everywhere and beat the heck out of it.

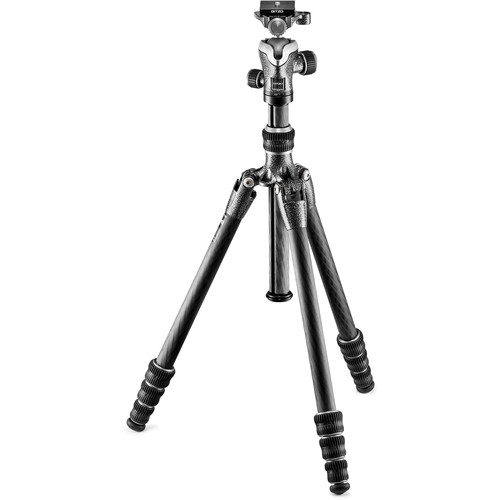
Gitzo GT-0545T Traveler

The Gitzo Traveler series offers rock-solid stability and incredible strength to weight ratio. They’re very sturdy and lightweight, and the carbon fiber legs fold back on themselves, which makes the Travelers pack up very small.

After years of wanting a Gitzo, I recently bought the GT-0545T Traveler, which is the smallest and lightest Traveler in the series. It folds down to only 14.4″, extends to 48.2″ and weighs 2.1 lbs. Unless you’re really tall, 48″ is an ideal height if you’re using the LCD screen to compose your shots.

You can reverse the center column for ground level shooting, or you can use the optional short center column which saves even more weight.

If you need a little more height, you might consider the next size up, the GT-1545T, which extends to 60″.

The Travelers come with newly redesigned magnesium ball heads which are shaped perfectly to fit when you fold back the legs, and they’re sturdy enough to hold up to 22lbs. You can also get the Travelers without heads.

Either way, if you’re looking for incredibly crafted tripod that will be your BFF for life, then I highly recommend one of the Travelers. Read my detailed post about the GT-0545T Traveler tripod here.

@Danbaileyphoto 🙂 I got the Gitzo traveller. I wish it was a little taller, but it's really light and fits in my suitcase.

profile-pic
Anne McKinnell


The “Good All Around, Lightweight, Affordable” Category

You want a good tripod that will get you by in a variety of situations, that offers decent stability and doesn’t cost an arm and a leg. Sounds reasonable, doesn’t it? Well, there are quite a few models that fit in this category, but here are the ones I like.

MeFOTO Road Trip

The MeFOTO Road Trip is one of the most popular tripods around, and for good reason. They’re well made, offer decent stability, they don’t cost too much and they’re very compact and easy to carry. I see a lot of these on my photo tours.

The aluminum Road Trip extends to 61″, folds down to only 15″, weighs 3.6 lbs. w/ the included ball head and costs less than $200.

It has four twist lock legs that you can set in two positions for shooting on uneven ground, or for shooting low to the ground. As with the Gizto Travelers, the MeFoto Road Tip legs also fold back over the center column when you pack it up.

And like the Gitzos, they also come with straps, and very nice carrying bags which make them very easy to pack and haul around. And they come in a variety of anodized colors.

Easily the best value around, the MeFoto is a great tripod for the money, and will easily hold any mirrorless camera and a lightweight DSLRs. MeFOTO also have a carbon fiber version of the Road Trip.

Edit: June 2017 – Manfrotto just released their own “Road Trip” style tripod, the Manfrotto Element. It has specs very close to the MeFoto, but it costs a little bit less- only $149.

There’s also the Oben CT-3535 Folding Tripod with BBall Head.

It has a max hight of 61.7″, it’s rated to hold 9 lbs, it folds down to only 15.2″, and it doesn’t weigh very much at all: Only 2.9 lbs, and that’s with the included ball head. 
And, it’s very affordable: Only $119 for the aluminum version and $194 for the carbon fiber model.
For other options, check out this post to see the highly rated Manfrotto BeFree, which comes in lots of colors, and the Siuri T2005X, which both offer good stability, compact, lightweight design and reasonable prices. (Manfrotto also makes a Carbon Fiber version of the BeFree). Siuri also has the popular T-025X, which is even more compact without being too wobbly or too expensive. My good friend Ryan has a T-025X and he loves it.
All of these tripods are able to support larger camera gear than the MeFOTO, so if you’re a DLSR shooter, you might look towards those options.


The “Super Ultra Lightweight and Budget Friendly” Category

Face it. It doesn’t matter how great your tripod is if it’s too heavy to carry for the activity you’re doing. Sometimes it’s worth sacrificing a little bit of stability if it means having a tripod with you on fast and light adventures and photo trips.

For this reason, you might consider getting super ultra lightweight option as a second tripod. This gives you more options, and these super light ones are not all that expensive.

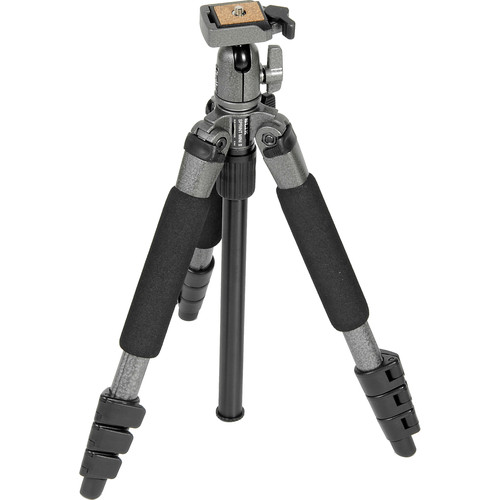
SLIK Mini II

When it comes to lightweight and inexpensive, you can’t beat SLIK Tripods. My first tripod ever was a SLIK and it got a lot of use during my first few yeras as a photographer.

The SLIK Mini II only weighs 1.7 lbs and folds down to 13.8″. The tradeoff is that it’s only rated to hold 2.2 lbs, so if you shoot heavy DSLR gear, then forget it.

However, if you shoot mirrorless gear or a really light DSLR, the MINI will give you way more options than you would have with no tripod.

I actually used my friend’s SLIK MINI this winter during one of our overnight fat bike camping trips this winter, and it worked just fine with my X-T2 and my smaller glass, like the 18mm, 35mm f/2 and even the 56mm f/1.8.

If you need a little more stability, the SLIK Sprint models are probably the best all around tripods for the money if you’re looking for a super lightweight and budget friendly tripod for your lightweight camera gear.


Shot with the X-T2 atop the SLIK Sprit MINI
March 23, 2017
See this post
Choosing The Best Lightweight Tripod For Your Photography

Yesterday was the first day Spring, also known in Alaska as our “Shoulder Season,” and the “Run up to Summer.” Although we still have a 5-foot tall snow berm between our yard and the street, the sun is now setting past 8:00PM here in Anchorage.

I looked out the window the other night at 9:00PM and it wasn’t even pitch black yet. By mid April, it will be light past 10:00PM as we hurtle toward the solstice. We’ve just passed the 12-hour mark for day length and are currently racing at peak speed, gaining 5 minutes and 44 seconds of daylight each day.

While I certainly look forward to warmer temperatures, increasing sunlight, dry trails and switching bikes for the season, I can’t help but look back with great fondness for the Fabulous Winter of 2017.

After three icy, lackluster winters, we finally got the goods. Numerous snowfalls brought much enthusiasm from Anchorage residents, who flocked out on the snow covered trails and into the mountains with boards and bikes and played with smiles on their faces and frost that built up on their their beards and eyelashes.

In early January, we were treated to an astounding weather pattern that left a triple layer of snow, hoar frost and rime ice all layered up together. Every surface and every tree branch looked like it was covered with a thick cover of buttery frosting.

Combined with the low sun angle and our 3:00PM sunsets, the early afternoon light was simply magical. It was the kind of light that outdoor photographers dream of, although it took considerable effort and commitment to actually go out and shoot, given the sub-zero temps we had for most of the month.


Cold or not, it was well worth the effort. I spent many afternoons riding with my X-T2 slung around neck and shooting winter landscape and winter fat biking photos in gorgeous light. I even did a couple of overnight fat bike camping trips, which allowed an even wider range of experiences and photo opportunities. And yes, I can confirm that the X-T2 works just fine in the cold.

And then there are the numerous aerial photography flights I did this past season. Flying in the wintertime in Alaska is challenging. Burdensome. And very cold.

At least that’s how I described it in my extended photo essay which appears in the current issue of Fuji X Passion Magazine’s beautifully printed journal.

Although I’ve been excited about my aerials every year, I’ll never forget the day I shot this photo below, when the light was more pink than I ever remember.

By the way, this is a straight JPEG with absolutely nor processing or tweaking.

I’m extremely excited about the photos I shot this past season. I’m also excited that I finally got caught up on tons of backlogged work projects, including a massive photo editing and keywording blitz.

I even updated my main website with new galleries and open a brand new Print Shop web store where you can purchase reproductions of some of my favorite images as custom prints and cards.

So yes, while I’m definitely excited to launch into Spring and all of the great things that lie ahea, I can’t help but look back with great memories at the memories and images I created during the past few months. I’m really going to miss this one.

Consider this my very fond farewell to the wonderful winter of 2017.

Hoar frost and rime ice on the trees in Anchorage, Alaska.
March 21, 2017
See this post
A Fond Farewell to Winter 2017

What I’ve learned as a Top 100 Photography Blogger

Last fall, my blog was recognized as one the Top 100 Photography Blogs on the planet. This was a huge award for me, because where many of the blogs on this list are large websites with exceedingly high traffic and a staff of writers and editors, I’m just one guy.

Also, the ranking wasn’t just about traffic, it was about quality and content. There are a lot of blogs out there with a whole lot more traffic, but the editors decided that mine was worthy of the list. And I guess it wasn’t a one-time thing, because I was just awarded as a top photographer blogger for 2017 by another list as well.

What this means is that I have a lot of experience to share. I can help make you a better, more successful blogger.

Here are a few extremely valuable tips I’ve discovered during my blogging journey. They can help you build up your own blog, get more traffic, cultivate a loyal readership, and yes, increase the income that comes from your blogging efforts.

Why Blog?

When I wrote my first post on this blog in 2008, I never would have imagined the amount of success and professional opportunities it would end up bringing me.

Originally started as a way to post pictures of my weekly adventures, my blog has become the most prominent asset of my photography business today. Not only does it allow me to highlight my imagery and share my knowledge of photography to readers around the world, (some of whom I’ve met in person during my travels), the traffic it gets has made my blog my most important marketing tool.

It also produces income. (Yes, you can make money with your blog.) This is important for a few reasons. During my first 10 years as a pro photographer, a significant portion of my income was from licensing stock photography. However, this income model has changed (and dropped) significantly during the past decade, so I’ve had to come up with alternative income sources in order to make up for that.

Also, when it comes to getting assignments, competition is as tough as its ever been. (It’s never been easy.) With a younger generation of shooters and art directors and the ever-changing market, where brands often look to the mega Instagram accounts to hire photographers, it’s imperative that I create and maintain alternatives sources of income in case I go a month or two without getting an assignment.

In addition, and this is perhaps the most important aspect, blogging income leads to increased freedom. Being able to create your own passive income streams through blogging allows you to set your own hours, travel and work when you want, without having to rely on whether the phone rings on any given day. And as your readership grows, so does potential income.

Blogging helps you improve as a photographer, too. Every time you write a post, you learn something about yourself and your own process. Many of the posts I write stem from exploring my own questions, problem solving and ideas about photography. In some ways blogging is very much akin to journaling, but journaling with a purpose. What purpose is up to you.

All this being said, blogging is not easy, nor is it a quick path to getting rich, but if you work hard, stick with it and do it because you love the process, it will indeed bring you success. Keep in mind, success can mean a lot of different things, and that’s part of the excitement. You don’t always know where your efforts will lead, but in the end, if you do what you love, the possibilities are endless.

I didn’t start blogging to make money, and even though it does generate income, that’s still not the driving force behind why I spend so much time and effort at it. I blog because I love to share my knowledge and my imagery, and I love connecting with other photographers around the world and helping them become better, more confident shooters.

In the end, it feels the same to all of us when we capture an amazing shot. It seems that my place in the photography world is to inspire people with my imagery and help them experience that same level of excitement with their own photography. That’s what drives my blog. That’s my purpose.

Ok, so after that very long intro, here are 3 highly effective tools I’ve used to help me create a better blog.

1. Start An Email List…Now!

Your email list will be an important aspect of your blogging success, so no matter where you are in your process, you might as well start building an email list right away.

Engagement

A healthy email list does a number of things for you and your blog: First of all, it allows you to connect with a larger audience. This can lead to more clients, but it can also be great on a personal level as well; I’ve met a number of my subscribers in person while traveling, and I even got together for coffee with two of my Romanian readers during my bikepacking trip in Transylvania.

I actually enjoy connecting with my subscribers, and I try to answer every single email, question or comment I get. I’ve come to know many of my readers by name and I like the email conversions we occasionally have outside of my newsletter mailings and seeing their imagery as well.

Marketing

Your email list is also the best marketing tool you’ll have. Whether you want to direct traffic to your latest blog posts, show off your most recent work, let people know about any events you might have, like gallery showings, workshops and classes, or inform your readers about your ebooks or print specials, email is the most reliable way to do this.

Why? Because you can’t count on people to remember to come visit your blog every week, you’ve got to give them little reminders. Or course, you don’t just want to promote yourself all the time, the key to maintaining a healthy email list is to offer your readers extra goodies they can’t get anywhere else, like special discounts, exclude content. We all get too many emails, so subscribers need a reason to stay.

My Recommendation

There are a lot of email systems out there, but I use and recommend Aweber. Aweber gives a wide variety of options for creating emails, sending an RSS feed of your latest blog post to your followers and managing and segmenting your lists, whether you use a single list or multiple lists that represent a verity of client/customer/readers types.

In addition, Aweber gives you awesome stats and great signup forms, easy drag-and-drop editors, and it connect with various apps, like Facebook, PayPal and WordPress. Aweber also lets you run campaigns, which basically allow you to schedule messages and follow-ups without having to write and manually send them every time.

For example, I have my two free guides- my Fujifilm Tips and Tricks Guide and my Using Lenses eBook. When people sign up to get either of these, they get an automatic email with the download link and a follow-up welcome message. This is just scratching the surface, though; you could offer coupons, discount codes, invitations, tips or more elaborate things like an entire e-course.

With a 30-day free trial, an affordable, sliding price scale and excellent customer service, I can’t say enough good things about Aweber. Even if you’re new to blogging, you might as well get that email list going now, because you’ve got a lot of potential and ideas brewing inside your head, don’t you? You can sign up for a free trial below:


Expand your blog audience through email.

With AWeber, you get all the email marketing tools you need to create and send beautiful and engaging emails. For a behind-the-scenes look at how you can use AWeber, sign up to our Test Drive email series:

2. Build a Landing Page for Your Blog

This is one of the best things I’ve done for my blog, and I wish I did it a whole lot sooner. Like years ago.

A “Landing Page” is the “Gateway” to your blog or website. It’s the front door. It tells readers what your blog is about, and it shows them everything you have to offer in a very clear, straightforward way. (You can see my landing page here.)

Directing Traffic

With most WordPress themes, your default blog page show your most recent posts blog form. While this isn’t necessarily a bad thing, a landing page allows you to highlight exactly what you want your readers to focus on, whether it’s showing them your most popular posts, featuring an upcoming event or workshop, marking your ebooks or e-course, or showing a few testimonials from other readers that are designed to entice people to keep reading or even subscribe to your blog.

A good landing page does this in a very simple, focused way without distracting your readers or giving them too many options when they step into the front door of your site.

I use a plugin called Thrive Content Builder and Landing Pages to do mine, and I’m extremely happy with how it it came out. I like that’s it’s clean, professional and non-distracting, with great navigation.

Increased Presentation
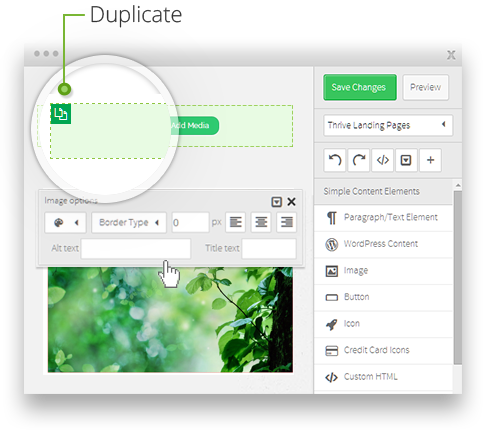
And there’s a HUGE plus- The Content Builder part of the plugin lets you create awesome looking, totally customizable for your blog that make certain pages stand out with a dramatically increased level of visual impact.

For example, what if you want to advertise a workshop, an eBook, create a custom page for a customer or client, or highlight a specific page with no distractions. You don’t want all that sidebar stuff on there- that just makes it look like every other page.

For those special pages, you want clean. You want precise. You want top notch presentation. Thrive Content Builder give you a simple drag-and-drop interface that lets you make your page look anyway you want it to. Or you an use their templates, or even modify an existing template to your liking.

The best way to illustrate this is to show you how I use it. Visit the pages I made for my 2017 Alaska photo workshop and our upcoming Fujifilm X Photographer Summits and you’ll see exactly what I’m talking about.

Increased Functionality

Thrive actually makes a whole package of plugins, and they’re all awesome. (Did you see the testimonials in those workshop pages? I made those with their Ovation Plugin.)

I actually started with the landing page plugin, then I got the Ovation plugin. I was amazed by the quality and functionality of their other products as well, and their customer support, so I went ahead and bought the full Thrive Plugin suite. It doesn’t cost very much, which is only $19/month. That’s nothing. That’s one sandwich and fizzy drink per month.

I’ve wanted to have these kinds of tools and visual options on my site for years, but I never know how to get them up there. It ended being a simple as just getting those plugins. As I said above, I wish I’d done it years ago.

For the price, I feel that getting the Thrive plugins has been the best investment I’ve put into my blog, ever. Remember, marketing isn’t free, and good design is not always cheap. 19 bucks a month is cheap, and it puts you in total control of your site.

3. Have a Good System to Capture and Organize Your Ideas

Ideas are fleeting. They come and go, and if you don’t have a way to capture, keep track and organize them, they’ll disappear into thin air.

A successful blogger needs to have a good system for capturing, storing and organizing ideas so you can expand on them and turn those tiny mental tidbits into fully fleshed out blogs post that are ready to share with the world.

I’ve gone through multiple systems over the years. I started by using pen and paper; a little red Moleskine notebook that I carried around with me everywhere. Well, not everywhere…

…that’s why I switched to the iPhone. I pretty much always have my phone with me. Like when I’m riding my bike or running errands. One of my favorite apps is Day One App, and I use this highly functional and gorgeous app for a variety of journal and note taking tasks. I’ve also used Evernote, which is a pretty useful app as well, and it will also sync to the desktop version. It’s no Day One, but it works ok.

However, my number one favorite writing app is Scrivener.

I’ve been a HUGE fan of Scrivener for years, and it’s been my main writing software since 2009. Originally designed as a comprehensive writing studio for Mac only, Scrivener also has a Windows version, and a totally awesome iOS companion app.
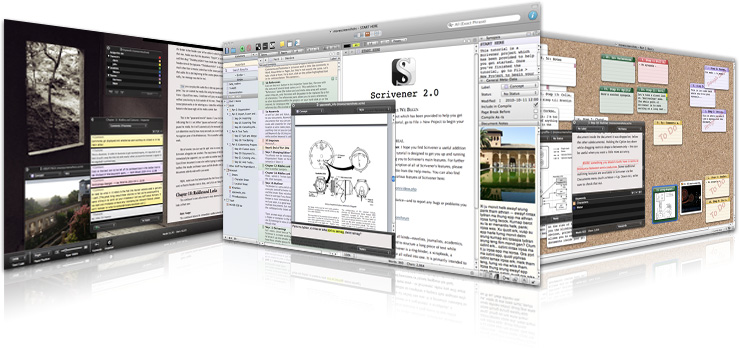
I LOVE Scrivener and I use it for everything- I write blog posts with it, my newsletters, all my eBooks including my 50,000 word Outdoor Action and Adventure Photography book. Not only did I use Scrivener to write and edit X SERIES UNLIMITED, I did the entire PDF export on this book using Scrivener.

In a word, if I’m writing, I’m using Scrivener. It’s such an amazing program because it allows you to organize your thoughts anyway you want.

It’s SOOOOOOO much better than Word, because you don’t have to write linearly in one document, you can make each Scrivener document a different thought, idea, post, article, chapter… anything you want, and you can drag and drop to move your documents anywhere.

Plus you can import photos, PDFs, links, and just about any other kind of thing you’d user for research. You have a field for document notes, project notes, projects statistics and targets, you can apply different labels and you can compile and export your documents in any format you want.

And it syncs perfectly with the new Scrivener for iOS app, which works on both the iPhone and the iPad. Essentially, you can set it up so that anything you write can be accessed, edited and exported from your mobile device or your computer. Oh yea, and it’s totally affordable.
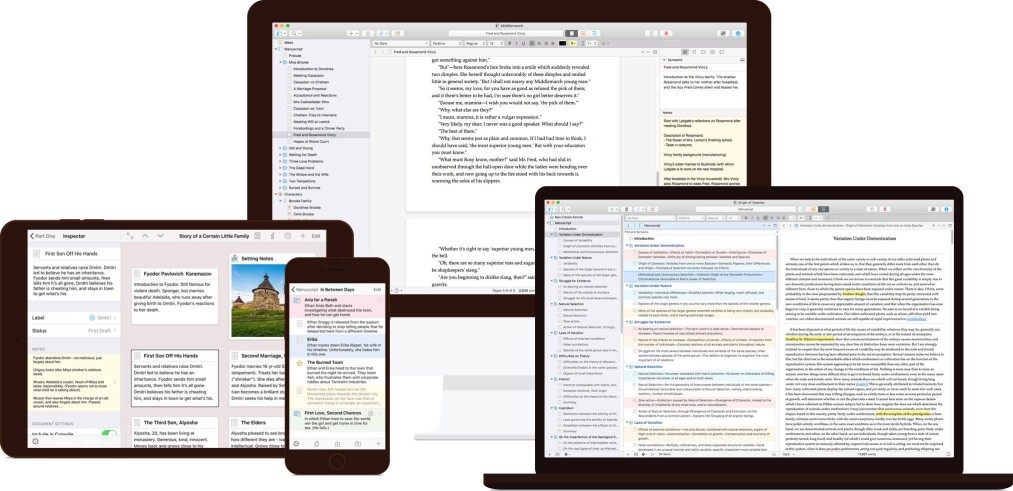
 

Here’s how I use it:

When I get an idea, I open up Scrivener iOS on my iPhone and write it down as a new document in a folder I’ve created called “Blog Post Ideas”. Later, I can edit and flesh it out on any of my devices, even on my desktop computer, or my laptop if I’m traveling, and eventually copy or import the text into WordPress or Aweber.

Any notation or edit I make shows up on the other devices, so I’m always up to date, everywhere. And again, Scrivener has SO many awesome features, it’s just a pleasure to use. I would say that Scrivener actually MAKES me want to write more. It’s that good.

I can’t even imagine my life today without Scrivener. It keeps me highly organized and motivated, and it offers me a seamless workflow that simplifies my entire writing process.

If you write anything on a regular basis, I HIGHLY recommend checking out Scrivener, or Scrivener for Windows if you’re on a PC. It was created by a guy named Keith who lives in the UK, and he has a fantastic, enthusiastic user base. Pretty much everyone who uses the program LOVES it.

So those are my three essential tools I use to increase the functionality, appearance and writing efficiency of my blog. I hope you find some of these tips useful – they can apply to just about any kind of blog, whether you’re writing a feature-rich tips and info blog, a clean photo essay style blog or a personal photography journal.

No matter what kind of blog you have, content is still king. The bottom line is presenting your useful, engaging, entertaining or educational content in an appealing way and building a relationship with your followers. Blogs are all about community. Remember, it’s not about you, it’s about the content and value you bring to the people who read your blog.

I plan to write more blogging-related posts in the future and focus on things like how to generate and distill your ideas, who to write engaging content that resonates with readers and how to make money with your blog through advertising, affiliate marketing and selling your own eBooks and products.

No form found and you won’t miss those posts when they go up.

Thanks for reading and have fun blogging. 🙂 -Dan

March 14, 2017
See this post
3 Essential Tools For Running a Successful Blog

I’m excited to announce that I have a feature article in the brand new issue of of Fuji X Passion Volume 3, which has just been released.

My article is called Winter Aerial Mountain Photography in Alaska. It features a collection of some of my favorite aerial imagery I’ve shot and a detailed personal essay what it’s like to soar high above the rugged and remote terrain and chase magical light in my 70-year old Cessna.

If you haven’t seen the Fuji X Passion print magazine yet, it’s a beautiful journal that explores photography through the eyes of accomplished and talented photographers from around the world who use Fujifilm cameras to produce their work. Volume 3 also contains articles by Bryan Minear, Daniel Malikyar, Fernando Ramirez, Michael Hanke and Steven Dunton.

Perhaps what excites me most about this article is that Fuji X Passion Inspirational Photography Magazine is an actual print magazine. Not merely a printed version of their online virtual magazine, which comes out each month, this is a beautifully crafted, 100-page photography journal created with heavyweight 135gsm paper stock, high quality printing and totally unique content.


With no advertisements or any of the regular stuff you usually expect to see in a magazine, like gear reviews, how to articles and tutorials, this magazine contains gorgeous, full-page imagery and long, introspective articles and interviews written especially for this publication.

In addition, none of the articles have appeared or will appear anywhere else, and no part of the magazine is reproduced online. If you want to read the issue, you have to order a copy and wait to have it shipped to your house.

In many ways, Fuji X Passion Inspirational Photography Magazine follows the kind of tradition we’ve seen with some of the classic photography journals and other “collectible” magazines of the past. I first saw it a few months ago when Volume 2 came out and I was was blown away when I held it in my hands and flipped through the pages.

In a time when we consume most journalism in electronic form as ebooks, PDFs and online magazines, the editors of Fuji X Passion have made an costly investment, based on the notion that people still enjoy the tactile feel turning real pages and seeing words and pictures printed on actual paper.

If you think about it, there’s certainly a serendipitous aspect to this notion. People love the “traditional” aspect of the Fujifilm cameras, and this was certainly Fuji’s goal when creating the system. And it’s no coincidence that the Fuji INSTAX cameras and printers have done so well, they allow us to actually “hold” and share photos by physically giving them to our friends and the other people we meet.

The concept of “holding” a real thing instead of having everything appear on the screen of a mobile phone, tablet or computer still has appeal to us, and so when people share their vision, extend themselves and create “real” things, it’s my feeling that they should be supported.

Maurício & Hugo, two enthusiastic photographers from Portugal are the people behind Fuji X Passion. With Fuji X Passion Inspirational Photography Magazine, they’ve created a very unique journal that any photographer will enjoy reading and keeping on their shelf.

Even if you’re not a Fuji user, this is a beautiful magazine that I’m sure you’ll enjoy reading and having on your shelf.

Volume 3 is on sale right now. You can order it here and begin thinking about the long journey the issue will take as it travels across land and sea in order to get all the way from Portugal to your house. Trust me, the anticipation will be worth it.

March 13, 2017
See this post
Read My Feature Article in Fuji X Passion Magazine, Volume 3

X-T2FrontFrosty

In case you were wondering, the Fujifilm X-T2 works just fine in the cold. Even below Zero. Even when you leave it outside all night long.

I’ve been using the X-T2 quite extensively here in Alaska this winter with no problems. I’ve shot a few thousand frames with the X-T2 in sub-freezing temperatures, and so far, I haven’t had a single issue.

During the past few weeks, I’ve taken it along on some winter overnight fat bike trips. While I’m riding, I just keep the camera slung over my shoulder all day long, and then at night, I just leave it on the tripod outside the tent.

The first night, I didn’t cover the camera, so it kind of frosted up, as you can see in these two photos. However, the next morning, when I came out and turned the camera on, it fired right up. The battery only lasted a few minutes before I got the red “battery dead” icon, so I swapped out with a fresh one and kept shooting.

The next night, I used a much more elaborate form of protection- I draped a glove over the top of the camera to minimize frost buildup. Seemed to work just fine. The next morning there was significantly less frost on the controls. A jacket or vest would work even better.

Bringing it inside the tent could cause condensation, which would ice up, and that would be bad. That’s the first rule of cold weather photography. Better to keep the camera cold and store your batteries inside your warm pockets.

X-T2Frosty

At worst, it occasionally creaks and groans when I first turn it on at 20 below zero, but I think that was just the AF motor of the XF18mm f/2 lens complaining at me.

Being one of the original X Series lenses, the 18 f/2 has the older, slower AF motor design, and the super cold weather slows it down a little bit. It still shoots fine, though, and works at these temps with every other lens I’ve tried.

I did get the “Turn off the camera and turn it back on again” message one time, but other than that, my X-T2 has kept up with me, no matter what the temperature. Fuji lists the operating temperature limit of the X-T2 at -10C, which is 14 degrees F, but I’ve pretty much blown the doors off on that spec. It’s clearly capable of being pushed well below that number.

Maybe there are certain functions that won’t operate at 100% below those temps, but I haven’t found any other limitations as of yet. For general outdoor shooting, the X-T2 is a totally capable camera in cold and extreme weather. Just make sure you bring extra batteries.

It’s the same with the X-T1. I’ve put that camera through similar tests in cold Alaska winter conditions and it never let me down.

So, I realize that it’s almost springtime in other parts of the world, but we’re still waking up to below zero temps this week, so as far as Alaska is concerned, it’s still winter. If you’ve still got winter where you are, or, if it’s about to descend upon you soon, then check out my post 4 Tips for Photographing in Flat Winter Light.

JAN17-02370 JAN17-02339

March 7, 2017
See this post
Yes, the Fujifilm X-T2 Works Just Fine in The Cold

I see each week as a chance to practice new camera techniques and improve as a photographer. Even if you only shoot a small handful of photos during the course of a week, every time you pick it up, you’re giving yourself a new opportunity to learn something, whether you try out a new tip, or notice a different aspect about the light or your subject matter.

In the end, this is what makes you a better shooter. Putting the camera into your hands on a regular basis will lead to increased confidence, efficiency and skill.

Plus, it’s fun to look back on a week and see what you did by gauging the photos you shot. Here’s a collection of my 5 favorite images from the past week. Enjoy, and if you have links to your favorites from the past week, post them in the comment section.

1. Floating on Top of the Snow.

Here’s my friend Kurt Barclay from 45NRTH enjoying some fresh powder on his fat bike. I shot this with my Fujifilm X-T2 and the XF90mm f/2 lens and processed the photo with Luminar, using the “Enigmatic Vision” preset, dialed down to about 20%. I like the way this setting softened the snowy background just a little bit, and I think it helps Kurt stand out with added prominence in the shot.

Just so you know, if you’ve never ridden a fat bike in the snow, you can’t really ride on top of fresh powder. You need some kind of a base, whether it’s an underlying layer of compacted now, ice, or a snow machine (snowmobile) track. If you suddenly find yourself with no base underneath, you’ll sink right in…

2. Ridin’ Snow Bikes and Taking Names.

Here’s another shot of my friend Kurt, this time captured with the XF14mm f/2.8 ultra wide angle lens. I LOVE the 14, it’s one of my favorite of all the Fuji lenses. Being a huge fan of wide glass, I love being able to get very close to my subjects and create that “right in the middle of the action” feel to the image. (Here’s my full review of the Fuji14mm lens.)

This photo was also processed with Luminar, this time using the “Image Enhancer” preset, which I dialed down to about 20%. This seems to be the magic number for me when using the presets in Luminar. The adjustment helped bring out the detail in the clouds, while lightening up the blacks and the shadows on Kurt’s face.

3. Foot Down!

This is Amy making her own line through the powder. She hit a soft spot and… we’ll, you know what comes next, don’t you?! Sometimes it’s all about the moment. I also shot this one with the X-T2 and the XF90mm f/2 lens.

4. Sunset on Nujukenah Point

During the end of the day, we were riding back from the other side of the Eklunta Lake trail, when a dramatic display of pink light hit the surrounding peaks. At the time, we were still in the trees, and pedaling furiously, hoping to break out into an open area before the light faded so we could take some photos of the sunset.

Right as we hit a clearing, we caught the best light hitting a little 5,640′ bump called Nujukena Point. Hopping off the bike, I slapped on the XF90mm f/2 lens and got this shot above. It’s a straight JPEG using the Velvia film sim on the X-T2. You can never go wrong with Velvia at sunset!

5. Bicycle Shop Portrait

I sponsor and ride with the The Bicycle Shop team here in Anchorage, so this week, I shot staff portraits of the people who work at the two stores. Here’s a photo of Zac. Younger, short Zac, not to be confused with older, taller Zac, who also works there.

The Bicycle Shop has been a mainstay of Anchorage for over 50 years. Started in 1964, the store has seen a lot of history, and of course, throughout the early years, they sold tons of Schwinn bikes. (My next door neighbor bought a Schwinn Varsity there back in the 70s.) To honor their legacy, the Dimond Road location has a bunch of classic Schwinns hanging from the ceiling.

I wanted to feature this in my portrait of Zac and show the old and the young, so I used the X-T2 and the super awesome Fuji XF56mm f/1.2 lens, which is ideal for portraits.

To light Zac up close, I used a Nikon SB-800 flash inside a Photoflex HalfDome softbox, and a second bare bulb flash with an orange CTO gel about 20 feet behind an to the left to light the bike also as an accent light on Zac. I used a long zoom setting on the flash to throw a blast of hard, direct light to give the shot more excitement.

I triggered the flashes using a trio of PocketWizards- one on the camera, and one on each flash. To do a shot like this, you could use just about any kind of radio trigger, including the affordable PocketWizard PlusX models, the even more affordable Cactus v.5 triggers, (they also come in a set of 2).

If you’re a Nikon shooter, you could use the SU-800 Wireless Speedlight Commander, which is an awesome piece of gear if you shoot a lot of flash inside. Read my review of the Nikon SU-800 here.

Ok that wraps up this episode. I hope you have a great week!


March 5, 2017
See this post
My 5 Favorite Photos From The Past Week